What’s Inside
- Choose Thick Fillets for Salmon Meal Prep
- Thaw It Slowly in the Fridge
- Pat It Completely Dry First
- Wait to Season Until the Last Second
- Portion Control and the Tail Tuck Trick
- Master the Pan-Roasting Technique
- Cook It Just Under Done
- Steam It in Parchment Packets
- Store It in Glass Containers Immediately
- Reheat Gently in the Oven
- Pair with High-Fiber Carbs
Last Tuesday at Whole Foods, I stood staring at my sad, rubbery lunch container and almost cried. My salmon meal prep turned into a smelly, gray disaster that tasted like wet cardboard. I’m telling you this because I’ve ruined more expensive fish than I care to admit. Fish is notoriously finicky. Overcook it by two minutes and you’re left with chalky flakes that require a gallon of water to swallow. But when you get it right, it’s magic. The rich, buttery texture of perfectly cooked fish paired with the right sides will keep you full until dinner. No more raiding the office vending machine at 3 PM. I finally figured out the exact methods to keep my weekly batches consistently delicious, moist, and free of that horrible microwave fish smell. Let’s break down how to do this right, so you won’t ever have to throw away a ruined batch of expensive groceries again.
1. Choose Thick Fillets for Salmon Meal Prep

I used to buy whatever fish was cheapest. That was a mistake. The secret to perfect salmon meal prep starts at the seafood counter. You need high-quality, thicker fillets. I’m talking at least a 1-inch thick cut. Thinner tail pieces are guaranteed to overcook and dry out during your weekly reheating routine. I learned that the hard way after chewing through what felt like a fish-flavored eraser. If you’re feeling fancy, grab Wild-caught Alaskan Sockeye or King salmon. They have a brilliant ruby-red color and a firm texture that holds up well in the fridge. But let’s be real, that wild stuff costs anywhere from $29.99 to $70 per pound. I can’t afford that every week. Instead, I usually buy farmed Atlantic salmon. My favorite budget hack is grabbing a massive slab of Kirkland Signature farmed salmon at Costco. It usually runs about $10 to $15 per pound, which is totally reasonable. The higher fat content in the farmed stuff keeps it moist longer in your glass containers. Just make sure the flesh looks bright orange and smells like the ocean, not a dirty fish tank. If it smells off while raw, it won’t magically taste better by Wednesday.
2. Thaw It Slowly in the Fridge

Listen to me carefully. Never thaw frozen fish in the microwave. I tried this for months before figuring it out. I’d hit the defrost button, and the edges would start cooking while the middle remained a block of ice. The texture was a rubbery nightmare. Always start with fresh fish that has firm flesh and a mild odor. If you’re using frozen fillets, plan ahead. Thaw it slowly in the refrigerator overnight. I place my portions in a Ziploc slider bag ($5.49 at Target) and set them in a shallow bowl on the bottom shelf. This catches any condensation. It takes about 12 to 24 hours to thaw completely. Once thawed, you have a short window. You must cook it within 1 to 2 days. If you leave it sitting in the fridge for four days, it’s going to spoil. I’ve had to throw away good fish because I got lazy and ordered takeout instead of doing my Sunday prep. Plan your schedule, thaw it safely, and commit to cooking it.
3. Pat It Completely Dry First

This step sounds annoying, but it’s non-negotiable. Chef George Duran says failing to pat your fish dry prevents a good sear and ruins the skin. He’s right. I used to pull the fish out of the package and throw it directly into a hot pan. The excess water would hit the hot oil, spit everywhere, and basically boil the fish instead of searing it. You get zero caramelization that way. Now, I use thick paper towels to thoroughly pat both sides dry. I specifically buy Bounty Select-A-Size paper towels ($8.99 for a 2-pack at Walmart) because the cheap ones disintegrate and leave little fibers on the raw fish. It’s gross. Press down firmly on the flesh and the skin side. You want to remove all that sticky moisture. When you drop a dry fillet into a hot Lodge Cast Iron Skillet ($19.90), you’ll hear a sharp, aggressive sizzle instead of a sad bubbling sound. That sizzle means you’re building a flavorful crust that will hold up all week. You might also like: 20 Beautiful Food Prep Ideas for a Fresh New Look

M MCIRCO 10-Pack,30 Oz Glass Meal Prep Containers 2
If you want something that just works, M MCIRCO 10-Pack is a safe bet (23 reviews, 4.5 stars).
4. Wait to Season Until the Last Second

Most people get this wrong. They think marinating fish overnight makes it flavorful. It doesn’t. Salting fish too early draws out internal moisture and starts to cure the flesh. If you salt it an hour before cooking, you’ll see little puddles of water form on the fillet. That is the moisture you need to keep the fish juicy. I apply a generous pinch of Morton Kosher Salt ($3.49 for a 3 lb box) and fresh cracked black pepper immediately before the fish hits the hot pan. Seconds before. If you’re using an acidic marinade with lemon juice or vinegar, be even more careful. Acid cooks the fish chemically. Think about ceviche. If you leave your fillets sitting in a pool of Trader Joe’s organic lemon juice ($2.99 for 8 oz) for three hours, the muscle fibers break down. The fish turns into a mushy mess when you apply heat. Limit any wet marinating time to under 30 minutes. Trust me, a quick sprinkle of dry spices right before cooking is all you need. You might also like: 15 Cozy Easy Dinner Ideas for Every Budget
5. Portion Control and the Tail Tuck Trick

Buying pre-cut portions is a rip-off. You’re paying a premium for someone else to use a knife. I always purchase a larger, 2-pound fillet from the butcher counter at Sprouts and divide it myself. I use my OXO Good Grips Food Scale ($22.99) to measure out exact 4 to 6-ounce portions. This guarantees my macros are consistent. But here is the secret. When you buy a whole side of fish, you get that thin, tapered tail section. If you cook that thin piece for the same time as the center cut, it turns into fish jerky. It’s awful. To fix this, I use the tail tuck trick. I fold the thinnest inch of the tail underneath itself. This creates a piece of fish with a uniform, 1-inch thickness to match the rest. Now everything cooks evenly. I’ve saved so many pieces of fish from the trash just by folding them over. It’s a tiny adjustment that changes how your leftovers taste on Thursday. You might also like: 15 Stunning Healthy Dinner Ideas to Steal Right Now
6. Master the Pan-Roasting Technique

I swear by the pan-roasting method. It’s a chef-recommended technique that combines the best of both worlds. You get a crispy exterior from stovetop searing, combined with gentle oven cooking. I start by heating a heavy, oven-safe skillet on the stove over medium-high heat. You need a high-smoke-point oil. Skip the extra virgin olive oil, or your smoke alarm will scream. I use Chosen Foods 100% Pure Avocado Oil ($11.99 for 16.9 oz at Kroger). Once the oil is shimmering, I place the dry, seasoned fillets skin-side down. Do not touch them. Let them sear for exactly 3 minutes. The kitchen will smell like a high-end seafood restaurant. Then, I grab my oven mitts and transfer the pan into a preheated oven set to 375°F (190°C). I let the fish finish for about 5 to 8 minutes. The gentle ambient heat cooks the top perfectly without burning the bottom. It’s the only way I cook my prep proteins now.

KOMUEE 10 Packs 30 oz Glass Meal Prep Containers
KOMUEE 10 Packs 30 oz Glass Meal Prep Containers punches above its price — 45 buyers rated it 4.5 stars. I would buy it again.
7. Cook It Just Under Done

Overcooking your fish initially is the main reason it becomes dry when reheated later. If you cook it to 100% doneness on Sunday, putting it back in the oven on Wednesday means you’re cooking it to 120%. It’s going to taste like dust. You have to cook it just under done. I aim for an internal temperature of exactly 120°F to 125°F (49-52°C) when I pull it out. I highly recommend buying a ThermoPro Digital Meat Thermometer ($14.99 on Amazon). It takes the guesswork out of the process. Officially, the FDA recommends 145°F (63°C), but chefs know that pulling it early is the secret to moisture. The residual heat will continue to cook it as it rests. The center should still look slightly translucent and dark pink when you pack it away. When you reheat it at the office, it will finish cooking, resulting in a moist, perfectly flaking piece of fish that actually tastes fresh.
8. Steam It in Parchment Packets

If you hate scrubbing heavy pans and dealing with splattering oil, the En Papillote method is for you. It’s a French term for cooking in a parchment paper packet. This tip took me years to figure out. The parchment creates a sealed steaming environment that locks in every drop of moisture. I tear off a large square of Reynolds Kitchens Parchment Paper ($4.59 at Walmart). I place a 6-ounce fillet right in the middle. I top it with three thin slices of fresh lemon, a sprig of fresh dill, and one tablespoon of Pompeian Extra Virgin Olive Oil ($8.49). I fold the edges over, crimping them tightly to seal the packet. I bake the packets at 400°F (200°C) for 12 to 15 minutes. You’ll know it’s ready when the packet puffs up like a balloon. You carefully slice the paper open, and a cloud of aromatic, lemon-scented steam escapes. The fish is tender. Best of all, you just throw the messy paper in the trash. There is zero cleanup.
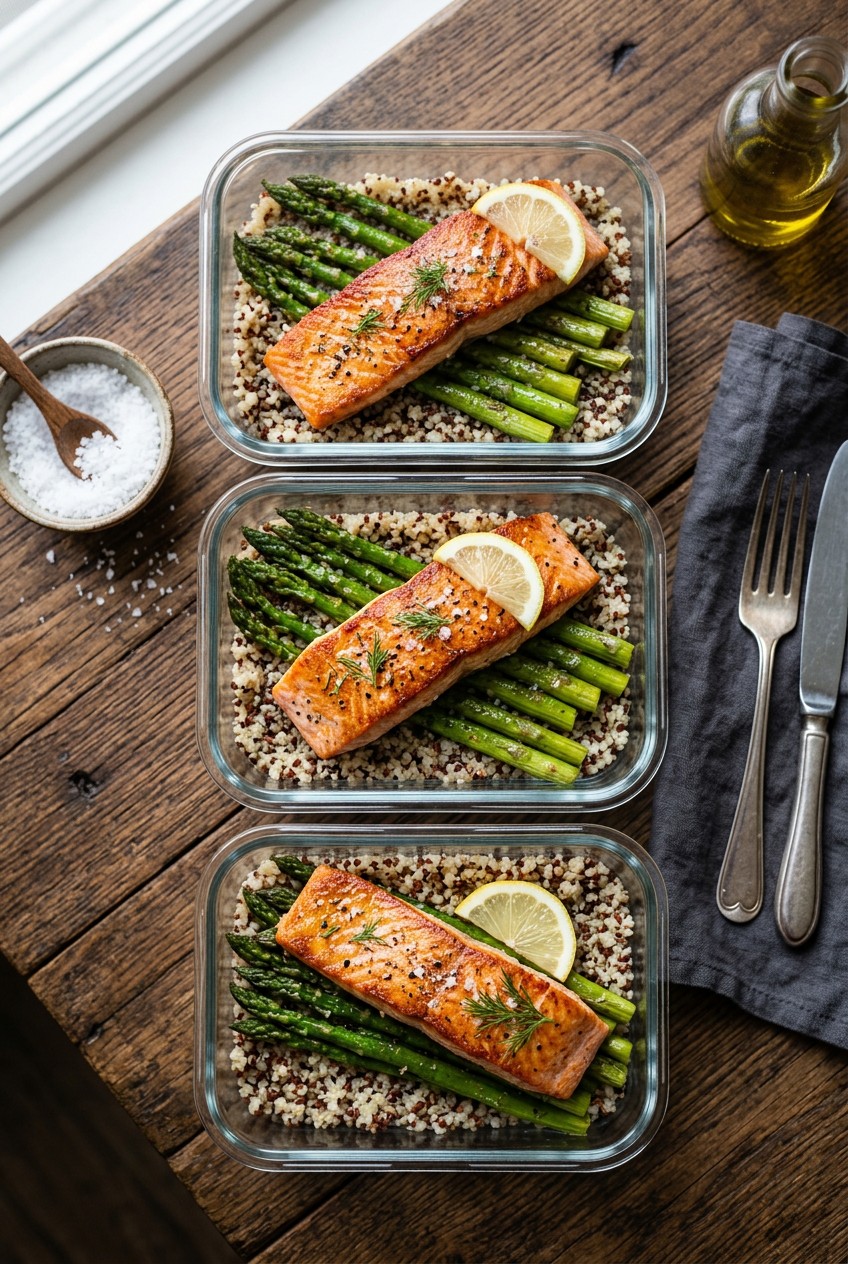
9. Store It in Glass Containers Immediately

Plastic containers are the enemy of fish. I used to pack my lunches in cheap, stained plastic tubs. By Tuesday, the plastic had absorbed the fish oil, and my refrigerator smelled awful. You must store cooked fish properly and promptly. I refrigerate my cooked portions within two hours to prevent bacterial growth. I only use airtight glass containers. I swear by the Pyrex 4-Cup Glass Storage Containers ($24.99 for a 3-pack at Target). Glass doesn’t absorb odors, and it’s safe for reheating. I let the fish cool on the counter for about 30 minutes before sealing the lids. If you put the lid on while the fish is steaming hot, condensation will build up, drip down, and ruin your crispy skin. These glass containers keep the fish safe for 3 to 4 days. If I prep a massive batch and know I won’t eat it all by Thursday, I transfer the extra portions to the freezer. Wrapped tightly, they last up to 3 months.

Skroam 10 Pack Glass Meal Prep Containers
If you want something that just works, Skroam 10 Pack Glass Meal Prep Containers is a safe bet (56 reviews, 4.5 stars).
10. Reheat Gently in the Oven

Microwaving leftover fish is a crime against your tastebuds and your coworkers. Microwaves blast food with intense, uneven radiation. This boils the water inside the fish, destroying the muscle fibers and creating that horrific, pungent smell that lingers in the breakroom. Just don’t do it. The only acceptable way to reheat your salmon is gently in an oven or a toaster oven. I preheat my toaster oven to around 275°F (135°C). I place the fish on a small tray and add a splash of water or a squeeze of fresh lemon juice over the top to reintroduce moisture. Then, I cover it loosely with Reynolds Wrap Aluminum Foil ($5.99). The foil traps the steam and prevents the exterior from drying out. I let it warm up for about 10 to 15 minutes. It takes a little more patience than hitting a button on a microwave, but the result is a piece of fish that tastes like it was just cooked.
11. Pair with High-Fiber Carbs

Eating a plain piece of fish with a handful of limp spinach is depressing. You’ll be starving an hour later. You need to pair your protein with complex carbohydrates and plenty of fiber-rich vegetables. I love using pre-cooked grains to save time. I buy the Seeds of Change Organic Quinoa and Brown Rice pouches ($3.29 at Whole Foods). You just tear the pouch open and dump it into your glass container next to the fish. It has a great nutty flavor and tons of fiber. I also roast massive trays of diced sweet potatoes and broccolini tossed in olive oil and garlic powder. The sweetness of the potatoes pairs beautifully with the savory flavor of the fish. Sometimes I’ll add a handful of sliced red bell peppers for extra crunch. Building a bowl with 6 ounces of fish, half a cup of quinoa, and a giant pile of roasted vegetables guarantees I won’t be hungry until dinnertime.
Honestly, once you master these simple techniques, prepping fish becomes easy. Skip the cheap cuts, throw away your plastic containers, and please promise me you won’t ever use the microwave to reheat your lunch again. Your stomach and your coworkers will thank you. I recommend trying the pan-roasting method this Sunday. Grab a thick fillet, get your pan screaming hot, and enjoy the best lunches of your life. Pin this guide or save it to your bookmarks so you can reference the temperature guide the next time you’re standing in your kitchen wondering if your fish is done!
Frequently Asked Questions
How long does salmon meal prep last in the fridge?
Cooked salmon safely lasts 3 to 4 days in the refrigerator. Always store your cooled fillets in airtight glass containers to maintain freshness and prevent your fridge from absorbing any fishy odors.
Can I microwave my salmon meal prep?
You really shouldn’t. Microwaving violently boils the moisture inside the fish, leaving it rubbery, dry, and extremely smelly. Instead, reheat it gently in a toaster oven at 275°F for 10-15 minutes.
Why is my meal prepped salmon so dry?
You likely overcooked it initially or used a fillet that was too thin. Cook your fish to an internal temperature of 120-125°F so it doesn’t dry out when you reheat it later.
What is the best cut of salmon for meal prep?
Always choose thick, center-cut fillets that are at least 1-inch thick. Avoid thin tail pieces, as they cook too quickly and become tough and chewy during the reheating process.