What’s Inside
- Choose the Right Tortilla for Your Meal Prep Breakfast Burritos
- Master the Egg Prep to Prevent Soggy Disasters
- Select Lean Meats (And Drain the Fat)
- Utilize Cheese as a Strategic Moisture Barrier
- Roast Vegetables Instead of Sautéing
- Avoid Overstuffing and Layer Strategically
- Flash Freeze Your Meal Prep Breakfast Burritos
- Reheat Smartly and Add Wet Condiments Fresh
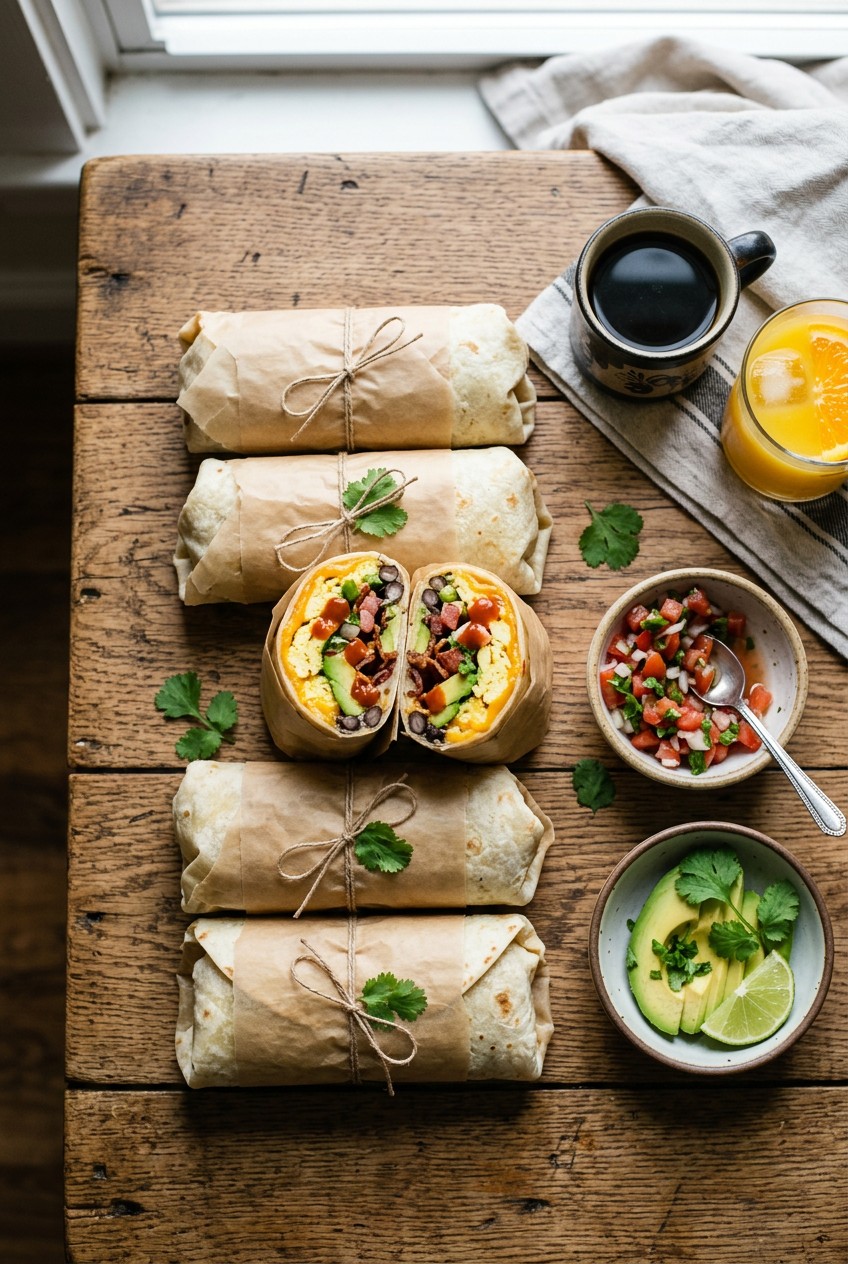
Last Tuesday at Whole Foods, I caught a glimpse of my reflection in the freezer aisle glass and realized I was holding a $6 frozen burrito that tasted like salted cardboard. The freezing air blasted my face as I read the ingredients list full of preservatives. I put it back immediately. Making my own meal prep breakfast burritos is honestly the only way I survive chaotic mornings. I’ve spent years eating soggy, exploding tortillas before I finally figured out the exact science to making them perfectly. The truth is, most people get this completely wrong. They stuff wet eggs into a cheap wrap, freeze it in a panic, and end up microwaving a sad, mushy mess. I’m Esperanza Eliza, and I’m going to walk you through exactly how I make a batch of eight burritos that actually taste fresh all week. It takes a little effort on Sunday, but waking up to a crispy, cheesy, perfectly spiced breakfast makes it worth it. The smell of roasted peppers and sizzling sausage filling my kitchen on a Sunday afternoon is my favorite part of the weekend. I’ve ruined enough breakfasts so you don’t have to.
1. Choose the Right Tortilla for Your Meal Prep Breakfast Burritos

I can’t tell you how many times I’ve cried over a torn tortilla. Two years ago, I tried using standard 8-inch taco tortillas from a generic brand to save a few cents. I stuffed them full, tried to fold the edges, and the sides blew out, spilling hot eggs all over my kitchen counter. It was a disaster. The smell of wasted eggs burning on the hot cast iron pan still haunts me. For your meal prep breakfast burritos, you absolutely need large, burrito-size flour tortillas. They should be 10 to 12 inches in diameter. The smaller ones simply won’t hold the fillings without ripping. I personally swear by the Mission Carb Balance large tortillas. A pack of 8 costs exactly $4.29 at Target. They’re soft, dusted with just enough flour, and have enough stretch to handle a heavy filling. La Tortilla Factory also makes a great 10-inch option for about $5.49 at Sprouts. Before you even think about assembling, you have to warm them up. I take two damp paper towels, place a tortilla between them, and microwave it for 20 seconds. The steam makes the flour pliable so it bends instead of cracking. A pro tip I learned the hard way. Lightly toasting one side of the tortilla in a dry skillet for 60 seconds before filling adds an extra moisture barrier. It sounds like a lot, but it keeps the wet ingredients from seeping into the dough while sitting in the freezer. The toasted flour smells amazing and provides a sturdy base. You won’t regret taking this extra step. Trust me.
2. Master the Egg Prep to Prevent Soggy Disasters

Honestly, this changed how I cook. If you cook your eggs until they’re hard and dry in the pan, you’re ruining your breakfast before it even hits the freezer. Overcooked eggs turn rubbery and release a ton of water when you reheat them. That water soaks straight into your tortilla and turns it into mush. I buy a dozen Vital Farms large pasture-raised eggs for $5.99 at Trader Joe’s. The yolks are vibrantly orange and taste rich. For a batch of 8 burritos, I crack exactly 10 large eggs into a glass bowl and whisk them with a splash of milk until they’re frothy. I pour them into a cold 12-inch nonstick skillet, turn the heat to medium-low, and stir continuously. You want to cook them until they’re just set and still slightly wet. Pull them off the stove about a minute before you think they’re done. The residual heat finishes the job. Here is a massive mistake people make. They scoop boiling hot eggs directly onto the tortilla. You absolutely must let the fillings cool down first. I spread my cooked eggs out on a large metal baking sheet and let them sit for 15 minutes. Cooling the hot fillings releases the steam into the air instead of trapping it inside your wrap. If you trap that steam, it condenses into water. Wet tortillas are gross. Taking this extra step ensures your eggs stay fluffy and your wrap stays dry. The texture remains soft and pillowy, just like they were scrambled on a Sunday morning.
3. Select Lean Meats (And Drain the Fat)

Skip the cheap, high-fat sausage logs. I used to buy the generic 1lb sausage rolls at Walmart for two bucks, thinking I was a budgeting genius. I cooked it up, rolled my burritos, and froze them. When I microwaved one at work the next day, a pool of neon orange grease leaked through the paper towel and stained my favorite beige blouse. It smelled like cheap oil all day. You need lean breakfast meats to keep the grease under control. I highly recommend the Applegate Naturals Chicken & Maple Breakfast Sausage. An 8 oz box costs $6.49 at Whole Foods. It has a slightly sweet flavor that pairs perfectly with savory eggs, and it barely leaves a drop of fat in the pan. The smell of maple syrup caramelizing in the skillet is incredible. If you prefer pork, Jones Dairy Farms Pork Sausage is fantastic. A 1lb roll runs about $4.99 at Kroger. Whichever meat you choose, cook it until thoroughly browned and crispy. The sound of it sizzling in the pan is the best alarm clock. Once it finishes cooking, don’t just scoop it out of the pan. Pour the meat into a fine mesh strainer and let all the excess fat drip away into a bowl for at least five minutes. You can even pat it down with a paper towel. Less grease means a firmer, cleaner bite when you pull these out of the freezer on a busy Tuesday. I’ve even experimented with smoked salmon for a richer flavor, but lean sausage is my weekly staple. You might also like: 15 Brilliant Batch Cooking Ideas That Actually Work

M MCIRCO 10-Pack,22 Oz Glass Meal Prep Containers
A dependable everyday pick — M MCIRCO 10-Pack pulls in 86 ratings at 4.5 stars. Not flashy, just solid.
4. Utilize Cheese as a Strategic Moisture Barrier

Cheese isn’t just for flavor. It’s an architectural necessity. When I assemble my burritos, cheese is always the very first thing that touches the tortilla. It acts as a waterproof seal between the soft flour wrap and the wetter ingredients like eggs or veggies. You need about 1/4 cup of shredded cheese per burrito. I usually go with a sharp Pepper Jack for a little kick, or a creamy Monterey Jack. Now, I have a strong opinion about this. Don’t buy the bags of pre-shredded cheese. I know it saves time, but pre-shredded cheese is coated in cellulose or potato starch to keep it from clumping in the bag. That powder prevents the cheese from melting smoothly and gives it a gritty texture when reheated. It tastes like wet cardboard. Buy a solid block of cheese and grate it yourself. I grab the huge 2 lb block of Tillamook Monterey Jack at Costco for $12.99. I use a cheap metal box grater from Target, and it takes exactly three minutes to grate enough for a week. Lay the 1/4 cup of freshly grated cheese directly in the center of your room-temperature tortilla. When you eventually reheat the burrito, that cheese melts into a thick, gooey barrier that locks all the moisture away from the outer shell. It’s brilliant. The rich, salty bite of real melted cheese pulling apart as you take your first bite is worth the physical effort of grating it yourself. You might also like: 20 Gorgeous Meal Planning Ideas for Any Style
5. Roast Vegetables Instead of Sautéing

Sautéing your vegetables is a rookie mistake. I spent months tossing raw bell peppers and spinach into a frying pan, cooking them for five minutes, and throwing them into my meal prep. The result was a watery, mushy disaster that made the bottom of my wrap dissolve. Vegetables hold a massive amount of water. If you don’t extract that water before freezing, it’ll ruin everything. The secret is roasting them in the oven. I chop up two red bell peppers, one large yellow onion, and 2 cups of sweet potatoes into tiny half-inch cubes. The rhythmic sound of my chef’s knife hitting the cutting board is therapeutic. I toss them with 2 tablespoons of olive oil, a heavy pinch of coarse sea salt, and spread them out on a baking sheet. I roast them at 425 degrees Fahrenheit for 20 to 25 minutes. Roasting evaporates the excess liquid and caramelizes the edges, bringing out an intense sweetness. The smell of roasting onions is heavenly. I usually grab all my produce fresh from Sprouts because their bell peppers are consistently huge and crisp. Spending $4 on fresh veggies and roasting them properly changes the texture of the filling. The sweet potatoes get crispy on the outside and tender on the inside. Plus, roasting aligns with eating more plant-centered meals. It adds tons of fiber without adding any unwanted moisture to your freezer stash. Sometimes I’ll toss in a handful of drained black beans for extra protein. You might also like: 20 Cozy High Protein Lunch Ideas for Any Style
6. Avoid Overstuffing and Layer Strategically

Most people get greedy when they assemble their food. I’m guilty of this. Last winter, I tried to pack a full cup of eggs, sausage, and potatoes into a single wrap. I folded the bottom up, pulled the sides in, and the entire thing burst open right down the middle. I had to eat it out of a bowl with a fork. It was humiliating. You have to practice restraint. Aim for exactly 1/2 cup of total filling per 10-inch tortilla. It doesn’t look like a lot when it’s sitting flat on the cutting board, but I promise it’s the perfect amount once rolled. You also need to layer strategically. Lay your fillings in a narrow strip right down the center. Put the dry cheese down first. Then add your roasted vegetables. Finally, place the cooked eggs and drained sausage right in the dead center. The eggs and meat are the wettest components, so keeping them wrapped inside the dry cheese and veggies protects the outer shell. Once assembled, fold the sides in tight, roll it over, and tuck the flap underneath. I wrap each one tightly in a square of Reynolds Wrap aluminum foil. A 50-square-foot roll is $4.98 at Walmart. The tight foil wrap compresses everything and holds the shape perfectly. It feels like a solid, heavy little brick of deliciousness in your hand. The foil also protects against freezer burn, which is crucial if you aren’t eating them immediately.

M MCIRCO 10-Pack,30 Oz Glass Meal Prep Containers 2
If you want something that just works, M MCIRCO 10-Pack is a safe bet (23 reviews, 4.5 stars).
7. Flash Freeze Your Meal Prep Breakfast Burritos

Don’t just toss eight freshly wrapped burritos into a plastic bag and shove them in the freezer. I did this exactly once. The warm burritos melted the frost in the freezer, squished together, and froze into a solid, impenetrable block of aluminum foil and dough. I had to use a butter knife to pry them apart, and I tore half the tortillas in the process. You have to flash freeze them first. After wrapping each one in foil, lay them flat on a large baking sheet. Make sure they aren’t touching each other. Place the entire baking sheet in the freezer for at least one hour until they’re rock solid. This rapid cooling process ensures they hold their exact shape and prevents them from sticking together. It also keeps everything food safe by dropping the temperature quickly. Once they’re frozen solid, you can transfer them all into a large gallon-sized Ziploc freezer bag. A box of 30 bags costs $5.89 at Target. Squeeze all the excess air out of the bag before sealing it. Properly wrapped and stored like this, your meal prep breakfast burritos will stay fresh in the freezer for up to three months without a single spot of freezer burn. Pulling one out of the frosty bag on a dark Monday morning feels like a gift to my future self. The sound of them clinking together like frozen rocks means I did it right. Took me years to figure out.
8. Reheat Smartly and Add Wet Condiments Fresh

The way you reheat your food dictates exactly how it’ll taste. If you just throw a frozen brick into the microwave on a paper plate, you’re going to end up with lava-hot edges and a frozen center. If I’m in a rush, I unwrap the foil, wrap the frozen burrito in a damp paper towel, and microwave it on high for exactly 2 minutes, flipping it halfway through. The damp towel steams the tortilla so it stays soft. But if I have a little extra time, the air fryer is the best method. Keep the foil wrapped tightly around it and pop it in the air fryer at 400 degrees Fahrenheit for 15 minutes. Then, unwrap the foil and cook it for two more minutes to crisp up the outside. It tastes like it just came off a restaurant griddle. The crunch is loud and satisfying. Finally, keep your wet condiments out of the freezer. Adding salsa, sour cream, or guacamole inside the wrap before freezing is a guaranteed way to create a soggy, disgusting mess. I buy the Trader Joe’s Chunky Homestyle Salsa for $2.99. I keep a jar in the fridge at work. When my breakfast is hot and crispy, I dip each bite into the cold, fresh salsa. The contrast between the hot, cheesy filling and the cold, acidic salsa is incredible. It makes the whole meal taste fresh.
I honestly can’t imagine going back to chaotic, hungry mornings. Taking an hour on Sunday to prep these saves me so much stress and money during the week. Plus, I actually look forward to eating breakfast now. If you’re tired of spending six dollars on a sad, icy wrap from the grocery store, you have to try this method. Grab some quality ingredients, roast your veggies, and please, grate your own cheese. You won’t regret it. Don’t forget to save this post and pin it to your meal prep boards for later. Let’s make this week a delicious one.
Frequently Asked Questions
Can I leave meal prep breakfast burritos in the fridge instead of the freezer?
Yes, you can keep them in the fridge for up to four days. If you plan to eat them later in the week, it’s best to freeze them immediately to maintain the best texture and prevent the tortilla from getting soggy.
How long do meal prep breakfast burritos last in the freezer?
When properly wrapped in aluminum foil and stored in an airtight Ziploc bag, your burritos will stay fresh for up to three months. Flash freezing them first is the secret to preventing freezer burn.
Why do my frozen burritos get soggy when I microwave them?
Sogginess usually comes from trapped moisture. To fix this, make sure your eggs and roasted vegetables are completely cooled before assembling. Also, try wrapping the frozen burrito in a slightly damp paper towel when microwaving.
What are the best tortillas to use for freezing?
Large 10 to 12-inch flour tortillas work best. Brands like Mission Carb Balance or La Tortilla Factory offer the perfect stretch. Always warm them slightly before rolling to prevent the edges from tearing.