What’s Inside
- Prevent Soggy Salads with the Mason Jar Layering Technique
- Master the Air Fryer for Crispy Chicken and Vegetables
- Embrace Sous Vide for Perfectly Cooked Proteins
- Batch Cook Versatile Components Instead of Full Meals
- Utilize Your Freezer for the Best Meal Prep Ideas For The Week
- Invest in High-Quality, Stackable Containers for Longevity
- Always Label and Date Your Prepped Food
- Avoid Over-Prepping and Lean on Meal Kits When Needed
- Don’t Underestimate Prepped Sides and Whole Roasted Veggies
Last Tuesday at Whole Foods, I stood under those buzzing fluorescent lights staring at a $14 pre-packaged wilted salad. If you need cheap, reliable meal prep ideas, you know that moment of panic. I was ready to cry. The spinach looked like wet, dark green tissue paper. My stomach growled loud enough for the person next to me to hear. I realized winging my lunches was draining my bank account and ruining my sanity. Finding a system that works isn’t just about saving money. It’s about keeping your peace of mind when Wednesday rolls around and you’re too exhausted to cook. I tried prepping twenty-one meals at once back in 2022. I ended up throwing away six containers of slimy, foul-smelling chicken by Friday. It was a disaster. I felt guilty tossing that food. Now, I stick to a tight, efficient system that works for my life. I’m going to share how I keep my food budget under $5 per serving without eating sad rice and dry chicken. These are the methods, tools, and lessons I use in my kitchen every Sunday. Let’s fix your fridge.
1. Prevent Soggy Salads with the Mason Jar Layering Technique

I used to pack my work salads in flat, cheap plastic tubs. By lunchtime, the lettuce tasted like wet cardboard. It was depressing. Then I discovered the vertical layering method. You need tall containers for this. I swear by the classic Ball 32-ounce Wide Mouth Mason Jars. You can grab a 12-pack for $12.99 at Target. The thick glass doesn’t hold onto weird onion smells like cheap plastic does. The secret is the stacking order. Pour your liquid dressing in first at the bottom. I use 2 tablespoons of a sharp balsamic vinaigrette. Next, drop in your hard, non-absorbent vegetables. Think chopped carrots, cherry tomatoes, or crunchy bell peppers. These act as a waterproof barricade. After that, add your heavy grains or beans. I like 1/2 cup of rinsed chickpeas or bulk quinoa. Buying pantry staples in 5-pound bags from the bulk section saves me $100 or more monthly. Finally, stuff the delicate greens like spinach or mixed spring lettuce at the top. They stay dry and crisp until you shake the jar before eating. This keeps my salads fresh for 4 or 5 days. I tried this wrong for months. I put cucumbers too close to the lettuce once and ended up with a mushy mess. Skip the fat-free bottled dressings too. They taste horrible and ruin the whole jar.
2. Master the Air Fryer for Crispy Chicken and Vegetables

If you’re still baking chicken breasts in a glass dish until they turn gray and rubbery, we need to talk. The air fryer changed how I handle my weekly proteins. I use the Ninja Air Fryer 4-Quart. It costs $99 at Walmart. It’s worth every penny. I buy 1.5 lbs of raw chicken breast and cut it into bite-sized chunks. I toss the meat with 1 tablespoon of olive oil, a pinch of kosher salt, garlic powder, and smoked paprika. I air fry the chicken for 18 minutes at 375 degrees Fahrenheit. You must pause and flip the pieces halfway through. The edges get a golden char while the inside stays juicy. I do the same for my vegetables. I take 2 cups of raw, chopped broccoli or Brussels sprouts. I toss them with 1 teaspoon of olive oil and a dash of Trader Joe’s Everyday Seasoning, which is only $1.99 a bottle. I air fry the greens for 15 minutes at 400 degrees Fahrenheit. The broccoli florets get these crispy, burnt tips that taste amazing. I try to make my meals half non-starchy vegetables, a quarter lean protein, and a quarter complex carbohydrates. Packing these air-fried components into my containers makes hitting my macros easy and delicious.
3. Embrace Sous Vide for Perfectly Cooked Proteins

I know sous vide sounds fancy. It translates to “under vacuum” in French. It used to intimidate me. I thought it was for high-end restaurant chefs. I was wrong. It’s the ultimate lazy hack for meal prep. I use the Anova Culinary Sous Vide Precision Cooker. I bought it for $129 at Target last year. You just seal your raw meat in a bag, drop it in a pot of water, and clip the machine to the side. I use standard Ziploc Gallon Freezer Bags, about $5.49 for a box at Kroger, using the water displacement method to push the air out. You don’t need a fancy vacuum sealer. I’ll drop three large chicken breasts in the water bath at 145 degrees Fahrenheit. I leave them alone for two hours while I clean or watch TV. The machine holds the water at a precise temperature. You can’t overcook the meat. It’s impossible. When you pull the chicken out, it’s tender and retains all its moisture. This method improves the shelf-life of prepped meats. I used to chew through dry, chalky chicken on Thursdays. Now, my day-four chicken is just as juicy as day one. I slice the meat into 4 oz portions and store them in glass containers. Just sear the outside in a hot pan for thirty seconds if you want a crust. You might also like: 20 Inspiring Carnivore Meal Prep Ideas That Are Totally Worth It
![[8-Pack,30 oz]Glass Meal Prep Containers](https://m.media-amazon.com/images/I/713Zfdsgi4L._AC_UL320_.jpg)
[8-Pack,30 oz]Glass Meal Prep Containers
Honestly, [8-Pack surprised me — sturdier than it looks in the photos, and over 7 buyers gave it 4.5 stars.
4. Batch Cook Versatile Components Instead of Full Meals

Most people get this wrong. They cook five identical, rigid portions of chicken, rice, and broccoli. By Wednesday, you’re so bored you order a $20 pizza. I call this meal fatigue. It’s a budget killer. Instead of prepping full meals, I focus on ingredient prep. I cook large quantities of versatile staples. I’ll boil 4 to 5 cups of brown rice or quinoa. I buy the 5-pound bag of Lundberg Family Farms Brown Rice from Whole Foods for $14.99. Then, I roast 2 to 3 pounds of mixed vegetables on a sheet pan. Finally, I grill 1 to 2 pounds of tofu or chicken. I maximize my hands-off time using my Instant Pot Duo 7-in-1, which costs $99.99 at Walmart. While I chop vegetables, I cook a batch of shredded chicken or lentils in the Instant Pot. It requires zero babysitting. I keep all these components in separate, large containers in my fridge. When I pack my lunch, I mix and match. Monday is a rice bowl with peppers and chicken. Tuesday is a wrap using the same chicken with spinach and hummus. This modular approach eliminates the dread of eating the same thing five days in a row. It takes the same amount of time on Sunday but gives you more flexibility during a chaotic work week. You might also like: 15 Stunning Lunch Weekly Meal Prep Ideas You Haven’t Thought Of
5. Utilize Your Freezer for the Best Meal Prep Ideas For The Week

Don’t limit prep to the refrigerator. Your freezer is sitting there, underutilized. I used to throw away so much food. Then I discovered silicone freezing trays. I’m obsessed with Souper Cubes. I bought a 1-cup silicone tray for $19.95 at Sprouts. They look like giant ice cube trays. I make a massive batch of black bean chili or lentil stew on Sundays. I pour the leftovers into the Souper Cubes. Once they freeze, I pop out the 1-cup blocks and toss them into a freezer bag. When I’m too tired to cook, I grab two blocks and microwave them. It’s fast. I also freeze cooked grains. I portion 2-cup servings of rice into flat zip-top bags. I press them flat so they stack neatly without taking up space. You can microwave the frozen rice with a splash of water, and it tastes freshly steamed. I learned not to freeze everything, though. Do not freeze raw potatoes or anything with a cream-based sauce. The texture turns grainy and disgusting. Stick to hearty stews, broths, and cooked grains. Your future self will thank you when you find a stash of zero-effort meals ready on a stressful Tuesday night. You might also like: 15 Creative Healthy Meal Prep Ideas That Make a Real Difference
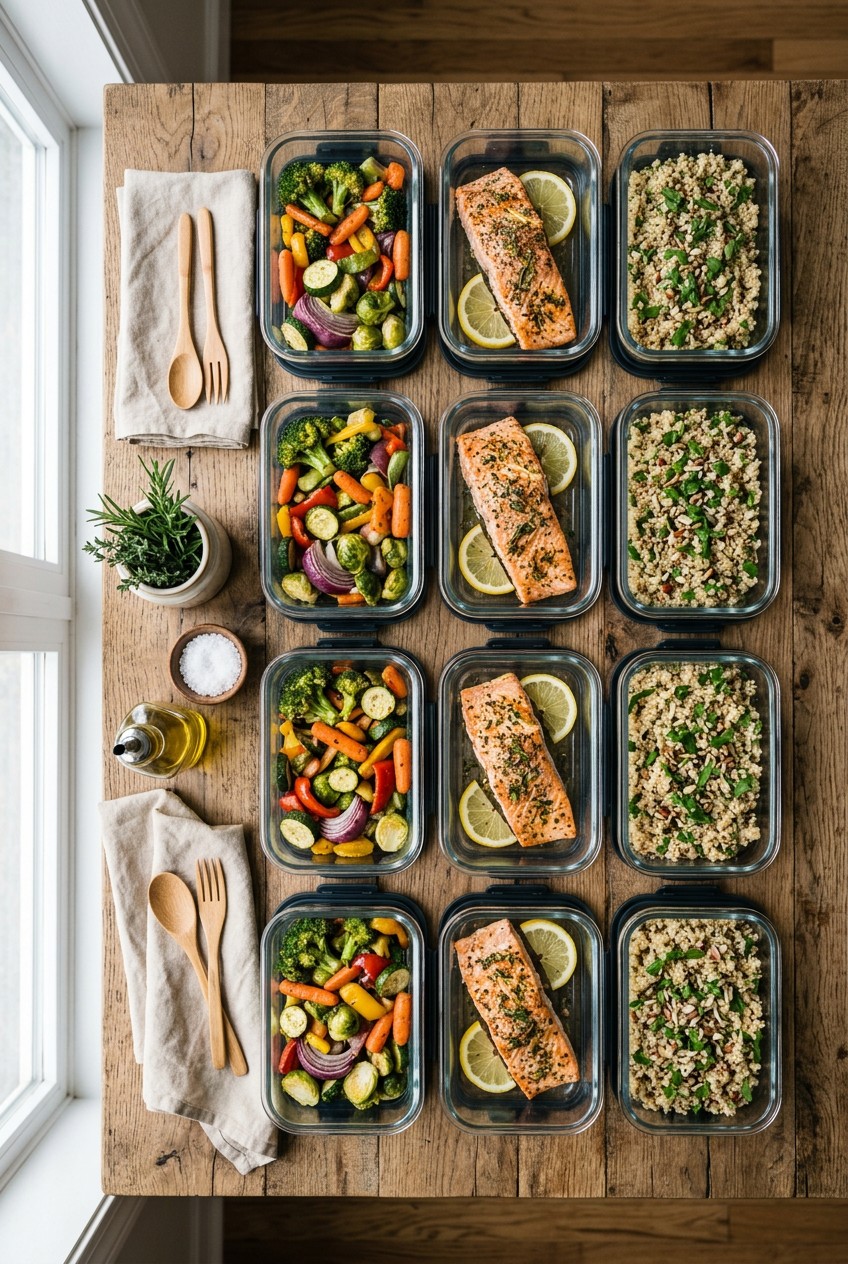
6. Invest in High-Quality, Stackable Containers for Longevity

You can’t build a routine using flimsy, warped takeout containers. I tried that in college. The lids popped off in my bag. I ended up with oily salad dressing soaked into my laptop sleeve. It was a nightmare. Upgrading your storage is mandatory. I recommend durable, leak-proof options. I use Rubbermaid Brilliance containers. A starter set costs $33 to $40 on Amazon or at Target. They have snap-down latches and airtight seals. They’re clear, so you can see what’s inside. They also resist tomato sauce stains. If you prefer avoiding plastic, go for tempered glass. The Glasslock 18-Piece Sets run $30 to $45 at Costco. Glass is heavier, but it’s microwave, oven, and freezer safe. It won’t absorb funky garlic odors. Whatever you choose, make sure they are uniformly shaped so they stack perfectly. Having a neat fridge makes you want to eat the food you cooked. When my fridge looks like a chaotic game of Tetris with mismatched lids, I lose my appetite. Spend the fifty bucks once. It pays for itself in a month when you stop ruining your bags with spilled chicken soup.

KOMUEE 10 Packs 30 oz Glass Meal Prep Containers
If you want something that just works, KOMUEE 10 Packs 30 oz Glass Meal Prep Containers is a safe bet (45 reviews, 4.5 stars).
7. Always Label and Date Your Prepped Food

This sounds obvious, but you’re probably skipping it. I used to shove bowls into the fridge and assume I’d remember when I cooked the pork. Spoiler alert: I never remembered. By Thursday, I’d be sniffing containers, playing food roulette. A common mistake is neglecting to label your work. Experts emphasize clearly marking each container. Write down the meal name and the date. I use a roll of blue painter’s tape and Sharpie Extreme Permanent Markers. A 4-pack of markers is $5.99 at Target. The painter’s tape sticks to glass but peels off without leaving sticky residue. This habit ensures you follow the “first in, first out” rule. You eat the older food first. It prevents mystery leftovers from growing mold in the back of your fridge. It takes thirty seconds to slap tape on a lid. I do it while my pans cool down. You also need to select recipes that reheat well. Avoid prepping foods that become rubbery, like fried items or delicate seafood. Opt for hearty casseroles. Food poisoning isn’t worth the risk. Throwing away a $4 portion of salmon because you can’t remember if it’s three days old is just throwing money in the trash.
8. Avoid Over-Prepping and Lean on Meal Kits When Needed

I see beginners make this mistake. They watch an aesthetic Sunday routine video. Suddenly, they’re at the store buying eighty dollars of produce. They spend six hours chopping and packaging 21 meals. By Tuesday, they’re exhausted. By Thursday, they’re sick of eating roasted zucchini. Trying to prep every meal leads to burnout and food waste. Start small. I recommend prepping just 2 or 3 meal options for the week. This changed how I approach my weekends. I only prep my Monday through Wednesday lunches. That’s it. For busy professionals, meal kit delivery services are a growing trend in 2026. Companies like HelloFresh, around $8 to $11 per serving, or Factor, around $9.99 to $10.99, deliver pre-portioned ingredients or ready-to-eat meals. This cuts down on planning and cooking time. When I know a brutal week is ahead, I order a box. Yes, it costs more than bulk rice, but it saves my sanity. Increase your volume only as you build your routine. You aren’t a robot. Sometimes you crave something different by the end of the week. Giving yourself permission to prep less makes the habit sustainable. You won’t dread your Sunday afternoons.
9. Don’t Underestimate Prepped Sides and Whole Roasted Veggies

A common oversight is neglecting the side dishes. People prep a container of shredded pork, but they’ve got nothing to eat it with. Then they buy a $5 bag of chips at the gas station. You must prep versatile options to complete meals. I always prep a dozen hard-boiled eggs. You can bake them in a muffin tin in under 20 minutes. I buy Vital Farms Pasture-Raised Eggs. They cost $6.99 a dozen at Whole Foods. The yolks are a rich, dark orange. I peel them on Sunday and keep them in a glass container. They’re the perfect instant protein for a salad or a quick breakfast. Another time-saver is cooking vegetables whole. Instead of spending twenty minutes chopping a rock-hard squash, I roast an entire spaghetti squash or cauliflower in the oven. I poke a few holes, rub it with Kirkland Signature Olive Oil ($18.99 at Costco), and bake it at 400 degrees Fahrenheit for an hour. While the cooking time is longer, it reduces your hands-on work. Just slice it open when it’s soft and scoop out the strands. It frees you up to wash dishes or just drink your coffee.
I’ve spent years tweaking this routine. I promise that finding reliable meal prep ideas doesn’t have to be an exhausting chore. Start with one or two of these methods. Buy a decent set of glass containers, try roasting a whole squash, or label your leftovers with blue tape. You’ll be amazed at how much time and money you save. I swear by the bulk grain prep and the air fryer chicken. Those two habits alone cut my grocery bill in half. Don’t force yourself to eat soggy salads. Skip the fat-free dressings. They taste like wet cardboard. Season your food aggressively. I tried doing this perfectly for months before I realized that “good enough” is better than burning out. If you found these tips helpful, save this post or pin it to your favorite Pinterest board for next Sunday. Your future hungry self will thank you when you open the fridge on a stressful Wednesday to a perfectly organized, delicious meal.

M MCIRCO 10-Pack,22 Oz Glass Meal Prep Containers
Honestly, M MCIRCO 10-Pack surprised me — sturdier than it looks in the photos, and over 86 buyers gave it 4.5 stars.
Frequently Asked Questions
What are the best containers for meal prep?
I highly recommend Rubbermaid Brilliance or Glasslock sets. They have airtight seals that prevent leaks and keep food fresh longer. Glass won’t absorb smells, while high-quality plastic is lighter for commuting.
How long do prepped meals last in the fridge?
Most prepped meals last 3 to 4 days. If you use the mason jar layering technique for salads or sous vide your meats, you can easily stretch that to 5 days without losing quality.
Can I freeze my meal prep?
Absolutely. I freeze hearty stews, soups, and cooked grains using silicone trays like Souper Cubes. Just avoid freezing raw potatoes or cream-based sauces, as their texture gets completely ruined when thawed.
How do I avoid getting tired of my prepped food?
Stop prepping full, identical meals. Instead, batch cook versatile components like plain rice, roasted vegetables, and grilled chicken. Mix and match these ingredients daily so you aren’t eating the exact same thing twice.