Last Tuesday at 7 PM, I tossed a $14 piece of raw salmon straight into the trash because it smelled like a wet dog. I stood there, staring at wilted cilantro and three stained plastic containers of mystery meat, feeling totally defeated by my own grocery shopping. If you need fresh ideas to save your sanity, you’re in the right place. Reliable food prep is about basic survival, not achieving some picture-perfect influencer aesthetic. I did this wrong for months before figuring out what actually works. I’d spend four hours on a Sunday cooking massive, complicated meals, only to realize by Wednesday that I couldn’t stomach another bite of the same chicken and rice. The food got boring, the textures turned to mush, and I ended up ordering a $25 pizza anyway. It’s frustrating to waste time and money like that. Let’s fix it. I’m going to share the exact methods, specific products, and hard-learned lessons that finally made my weekly routine stick. Trust me. Grab a coffee, and let’s get into the details of how to stock your fridge without losing your mind.
1. Ditch the Plastic for Heavy-Duty Glass

I swear by glass containers. For years, I used cheap plastic tubs that eventually developed a permanent, cloudy orange grease ring from old spaghetti sauce. They smelled faintly of rancid garlic no matter how many times I ran them through the dishwasher. Skip the cheap plastic stuff. It’s gross. You need quality glass meal prep containers. I bought the Pyrex Ultimate 10-Piece Set for $45.99 at Target, and it changed my fridge organization entirely. If you’re on a tighter budget, the Prep Naturals Glass Containers are a great deal at $24.99 for a 5-pack on Amazon. Consumer Reports notes that glass containers last 5 to 10 times longer than plastic. They don’t stain, they don’t absorb weird odors, and they’re safer for microwave reheating. The heavy clink of glass stacking in my fridge just feels cleaner. However, glass is heavy and can shatter. If you’re commuting on a crowded train or tossing a bag into your gym locker, I recommend grabbing a set of BPA-free plastic Rubbermaid Brilliance 3.2-cup containers. They cost about $14.99 for two at Kroger. They have a leak-proof seal with heavy-duty latches, so you won’t end up with salad dressing soaked into your gym socks. I learned that the hard way.
2. Batch Cook Grains Like You Mean It

Most people get this wrong by trying to cook a fresh pot of rice every single night. I used to stand over a boiling pot on a Tuesday, starving and waiting 45 minutes for brown rice to finish. It’s a massive waste of energy. You need to batch cook grains and legumes for efficiency. I usually buy a huge bag of Lundberg Family Farms organic brown rice at Whole Foods for $7.49 (32 oz). I measure out 4 cups of dry brown rice on Sunday afternoon. Once cooked with 8 cups of water, this yields about 12 cups of fluffy rice. The nutty, toasted smell fills the whole kitchen. Cooked grains safely sit in the refrigerator for 3 to 5 days. If I know I won’t eat all 12 cups, I freeze half in airtight bags. It stays good for up to 3 months. When you’re ready, microwave a 1-cup portion with a tiny splash of water to bring the steam back. It tastes just like fresh rice. You can do this with Trader Joe’s organic quinoa ($3.99 for a 16 oz bag) or dried lentils. A pro tip: cook your grains in chicken or vegetable broth instead of plain water. Plain water makes grains taste like wet cardboard. Add a heavy pinch of kosher salt and a bay leaf. It makes a huge difference in flavor by Thursday.
3. The 50/25/25 Container Rule

I used to pack lunches that were 90 percent pasta and 10 percent a sad broccoli floret. By 2 PM at my desk, I’d hit a massive carb coma and feel like I needed a nap under my keyboard. Registered dietitians recommend the 50/25/25 rule for structuring your meals. Your container should visually be 50 percent fruits and vegetables, 25 percent lean protein, and 25 percent grains. Dietitian Samantha Nimmons talks about this ratio constantly to avoid the common mistake of unbalanced meals. When I pack my Pyrex, I literally draw an imaginary line down the middle. One entire half gets filled with 1.5 cups of roasted zucchini and bell peppers. Then I split the remaining half. One quarter gets 1/2 cup of roasted sweet potatoes, and the final quarter gets 4 ounces of grilled chicken. Visually, the bright colors of the vegetables should dominate the space. This keeps your energy levels stable and stops mid-afternoon sugar cravings. Honestly, this changed how I view portion sizes entirely. It forces you to eat more fiber, which keeps you full. Don’t skip the vegetable half. It’s tempting to load up on mashed potatoes, but you’ll regret it when you’re yawning through a 3 PM meeting. You might also like: 20 Inspiring Meal Prep Ideas for Any Style

8 Pack 36oz Large Glass Meal Prep Containers with lids
8 Pack 36oz Large Glass Meal Prep Containers with lids has been one of the most consistently praised picks in this category. 859 reviewers averaged 4.5/5.
4. Perfecting Protein Portions with a Scale

Eyeballing your meat is a guaranteed way to run out of food by Thursday. I used to grab a pair of tongs and drop a massive pile of shredded chicken into my bowls. By Wednesday, I was scraping the bottom of the container. You need to portion proteins precisely. The goal is to aim for 3 to 4 ounces of cooked protein per meal. This provides 20 to 30 grams of protein, the sweet spot for muscle recovery and fullness. If you don’t have a scale, a quick visual guide is a portion of meat the size and thickness of your own palm. But honestly, buy a food scale. I use the OXO Good Grips 11-pound stainless steel food scale. It costs $55.99 at Target and is incredibly accurate. I buy massive packs of Kirkland Signature chicken breasts at Costco for $2.99 per pound. After I grill the batch, I let it cool, chop it, and weigh out exactly 4.0 ounces into each container. The texture of cold chicken isn’t always glamorous, but knowing the exact macros gives you total control. It prevents over-portioning, which ruins your budget, and under-portioning, which leaves you starving at midnight. You might also like: 15 Stunning Healthy Dinner Ideas to Steal Right Now
5. Air Fryer Magic for Crispy Components

Microwaved sweet potato fries are a soggy, depressing tragedy. I ate them for a year before buying an air fryer. Using an air fryer is mandatory for quickly preparing crispy elements that normally turn into mush. I bought the Ninja 4-Quart Air Fryer for $89.00 at Walmart, and it sits permanently on my counter. The loud whirring is the soundtrack to my Sunday afternoons. To get perfect, crispy chicken breasts, I rub them with 1 tablespoon of olive oil and a heavy coat of smoked paprika. I air fry at 375 degrees Fahrenheit for 18 minutes, flipping halfway. The outside gets a crunchy crust while the inside stays juicy. For vegetable stir-fry components, I toss 2 cups of chopped broccoli and bell peppers with 1 teaspoon of sesame oil. I blast them at 400 degrees Fahrenheit for 15 minutes, shaking the basket violently every 5 minutes. The edges of the broccoli get charred and crispy. If you pack these crispy veggies in a separate small container and only combine them right before eating, they won’t get soggy. You might also like: 20 Lovely Work Lunch Ideas to Inspire Your Next Project
6. Sous Vide Your Meats for Tender Results

This sounds fancy, but it’s the laziest and most foolproof way to cook meat. I used to constantly overcook pork chops until they had the dry, chalky texture of a shoe insert. Then I discovered sous vide. This involves vacuum-sealing your food in a plastic bag and dropping it into a precisely temperature-controlled water bath. It is impossible to overcook meat this way. I use the Anova Culinary Nano Sous Vide Precision Cooker. It’s an entry-level wand that costs about $129.00 at Target. I seal 2 pounds of steak with 2 tablespoons of butter and a sprig of fresh rosemary. I set the water bath to 130 degrees Fahrenheit and walk away for two hours. The meat cooks perfectly edge-to-edge. A massive benefit is that vacuum-sealing blocks oxidation. This extends the shelf life of your cooked meats in the fridge by several days. One warning: don’t cheap out by using a flimsy sandwich bag. I tried this last year, the seal broke, and I ended up boiling a $20 steak in murky, buttery water. It was a disaster. Buy the proper bags. After the meat comes out, give it a 60-second sear in a hot cast iron pan to get a crust.

Skroam 10 Pack Glass Meal Prep Containers
A dependable everyday pick — Skroam 10 Pack Glass Meal Prep Containers pulls in 56 ratings at 4.5 stars. Not flashy, just solid.
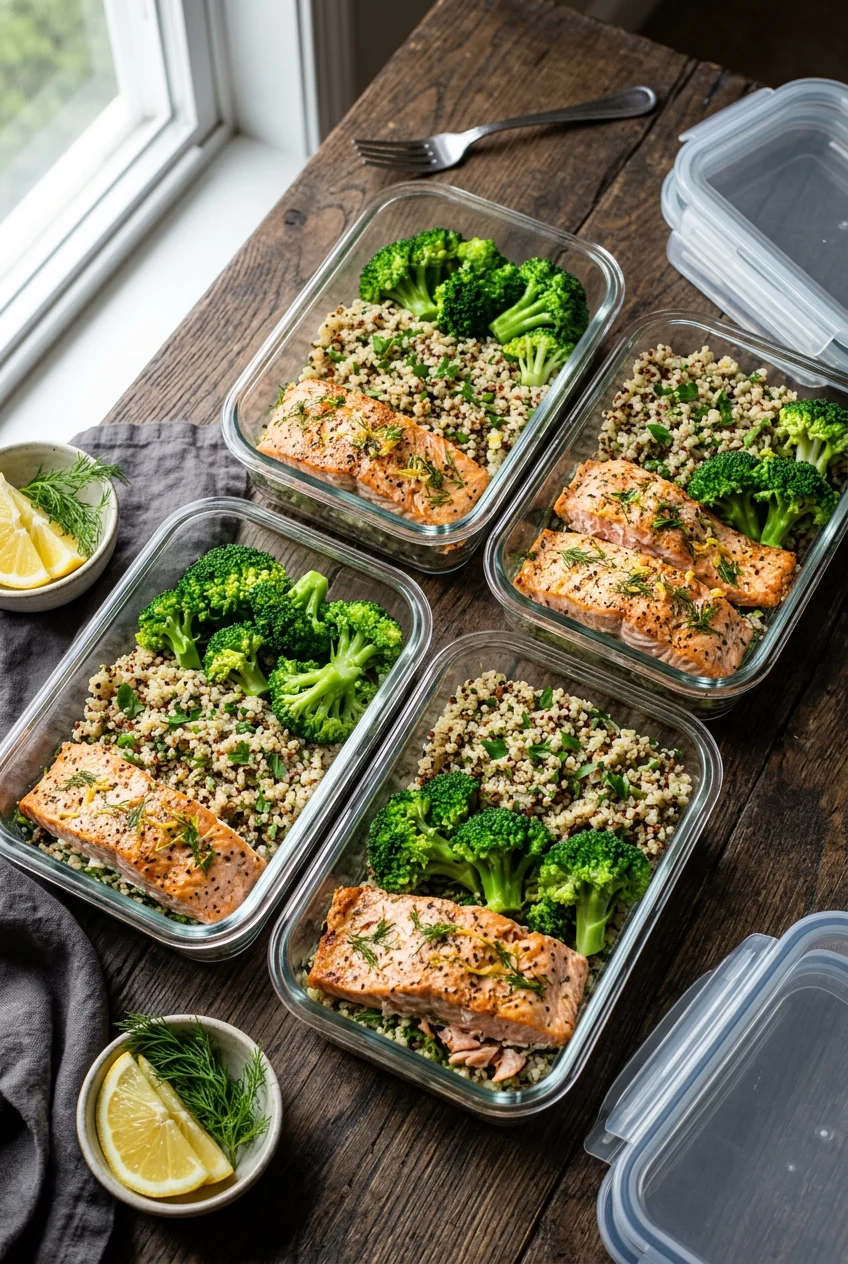
7. Prep Components, Not Boring Full Meals

The biggest reason people quit is flavor fatigue. Eating the exact same chicken, rice, and green beans out of a box for five days is psychological torture. By Wednesday, you’re staring at the container with dread. Instead of preparing five identical full meals, focus on cooking versatile components. I do a massive produce run at Sprouts Farmers Market every Sunday. I roast two large sheet pans of vegetables, usually 2 pounds of sweet potatoes at $1.49/lb and a bunch of asparagus. I’ll cook a large batch of quinoa. Then, I’ll prep two different protein sources, like 1 pound of ground turkey with taco seasoning and 1 pound of baked salmon with lemon. I store these components in large, separate glass containers. This assembly-line method allows for varied meals throughout the week. On Monday, I might make a taco bowl. On Tuesday, I can eat the salmon over spinach with sweet potatoes. You mix and match based on what you actually crave. It feels like a buffet in your own kitchen rather than eating sad leftovers.
8. The Mason Jar Salad Layering Trick

Packing a salad for work usually results in a slimy, wilted mess of spinach by lunchtime. The vinegar in the dressing breaks down the delicate leaves if they touch for more than an hour. To combat soggy salads, use strategic layering. I buy a 12-pack of Ball 32 oz Wide Mouth Mason Jars for $14.99 at Kroger. The wide mouth is crucial so you can get a fork in there. The rule is that the wettest ingredients go at the bottom, and the driest at the top. I pour 2 tablespoons of balsamic vinaigrette into the bottom of the jar. Next, I add a layer of hardier vegetables that won’t absorb the liquid quickly. I use 1/2 cup of chopped carrots and 1/2 cup of diced bell peppers. They marinate in the dressing and taste better. Then, I add a barrier layer of 1/2 cup of cooked quinoa or chickpeas. On top goes 3 ounces of chopped chicken. Finally, I stuff the top half of the jar full of delicate greens like arugula. The greens are suspended safely at the top, dry. When ready to eat, shake the jar to distribute the dressing or dump it onto a plate. The lettuce stays loud and crunchy.
9. Souper Cubes Will Save Your Freezer

Don’t underestimate your freezer. I used to freeze leftover chili in massive, gallon-sized Ziploc bags. When I wanted a single bowl, I’d have to take a literal ice pick to the block of meat to chisel off a portion. It was dangerous and stupid. You need to use specialized tools. I am obsessed with Souper Cubes. These are thick, heavy-duty silicone trays designed for freezing individual portions. A set of two 1-cup trays costs about $29.95 on Amazon. After I make a huge batch of chicken noodle soup or beef stew, I ladle 1 cup into each compartment. I snap the plastic lid on top and freeze it overnight. The next day, I pop out the frozen bricks and transfer them to a freezer bag. This prevents freezer burn and saves space. The silicone is flexible so the cubes pop out with a satisfying snap. When I’m freezing cold after work, I just grab two cubes, drop them in a mug, and microwave for four minutes. It’s effortless. You can also use these trays to freeze individual portions of cooked rice or pasta sauce.

Vtopmart 5Pack 22oz Glass Storage Containers with Lids
Vtopmart 5Pack 22oz Glass Storage Containers with Lids punches above its price — 32 buyers rated it 4.5 stars. I would buy it again.
10. Integrate Swicy Flavors for Excitement

If you’re only seasoning your food with salt, pepper, and garlic powder, you’re going to get bored fast. You need to tap into the swicy flavor trend. Swicy is a combination of sweet and spicy, and it’s the easiest way to keep your palate excited. I rely heavily on Trader Joe’s Hot Honey, which costs $3.49 for an 8-ounce bottle. The thick, sticky sweetness hits your tongue first, followed by a sharp, tingling heat from the chili flakes. I mix 1 tablespoon of hot honey with 1 teaspoon of low-sodium soy sauce to create a glaze. I brush this over baked salmon or grilled chicken during the last five minutes of cooking. The sugars caramelize and create a sticky, dark crust. You can also experiment with mango-habanero marinades. I buy a jar of fresh mango salsa at Whole Foods for $3.99 and blend it with half a habanero pepper. Pour that over raw chicken breasts in a ziploc bag and let it sit for two hours before grilling. The bright, acidic fruit flavor cuts through the heavy spice perfectly. Adding these intense flavors prevents the dreaded fatigue that ruins most meal prep routines. Stop eating plain, dry chicken. It’s a choice, and it’s a bad one.
11. Wash and Chop Everything Immediately

This is the most tedious tip, but it saves the most time. If you put whole, unwashed vegetables into your crisper, they will rot. I have thrown away so many bags of slimy, brown celery because I was too lazy to chop them on Sunday. You must wash, chop, and store fruits and vegetables immediately upon bringing them home. When I get home from Whole Foods with a bunch of organic carrots ($1.99/bunch), three bell peppers, and a head of broccoli, I don’t sit down. I leave my shoes on, pull out my cutting board, and process everything right then. I wash the peppers, slice them into strips, and pack them into glass containers. Pre-chopped bell peppers, carrots, and broccoli stay crisp in airtight containers for 3 to 4 days. They are instantly ready for a quick Tuesday night stir-fry or for dipping into hummus. To reduce chopping time for dense vegetables, use your appliances. A lesser-known hack is cooking hearty vegetables whole. I take an entire head of cauliflower, trim the leaves, and place it whole on a trivet inside my Instant Pot with 1 cup of water. I cook it on high pressure for 3 minutes. It comes out perfectly tender, and I didn’t have to chop a single floret.
I hope these strategies help you take back your weeknights. I’ve ruined enough steaks and eaten enough soggy salads to know that having a plan is the only way to survive a busy schedule without relying on expensive takeout. Start small. Don’t try to prep 21 meals on your first try, or you’ll burn out. Pick two or three of these methods to test out this Sunday. I highly recommend starting with the glass containers and the air fryer chicken. If you found this helpful, please pin this article to your favorite Pinterest board so you can easily find these temperatures and measurements the next time you’re standing in the grocery store aisle trying to remember what to buy.