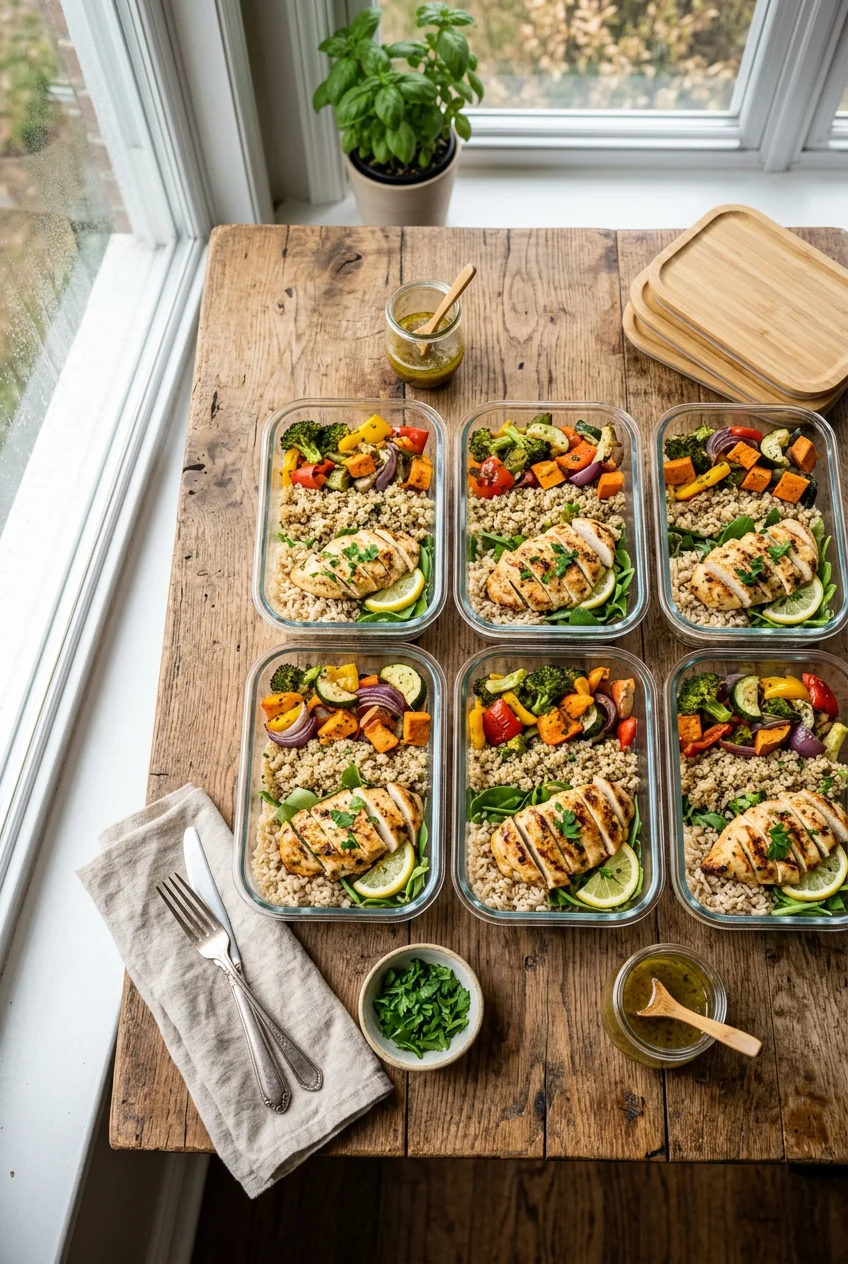
What’s Inside
- Prioritize Borosilicate Glass for a Clear Meal Prep Aesthetic Picture
- Master Soft, Side-Window Natural Lighting
- Use Neutral, Matte-Finish Tableware as Props
- Try the 2-2-2 Method for Visual Balance
- Apply Color Theory with Complementary Hues
- Showcase Layers in Clear Containers at a 45-Degree Angle
- Avoid the Harsh Flash and Cluttered Background Mistake
- Freeze Uniform Blocks with Silicone Trays
- Batch Your Shoots and Try Macro Photography
Last Tuesday, I sat on my kitchen floor staring at five plastic containers of gray chicken and mushy broccoli. I wanted that perfect meal prep aesthetic for my Instagram, but my reality looked like a sad hospital dinner. The plastic was stained with old tomato sauce. The lighting from my overhead fan cast a sickly yellow shadow over the rice. I realized right then that cooking is only half the battle. If you want your high-protein meals to actually look appetizing, you need a specific strategy for plating, lighting, and storage. I spent the next six months testing different containers, camera angles, and lighting setups in my tiny apartment. I’ve ruined dozens of meals trying to get the shot. I’ve bought props that looked terrible on camera. I tried styling raw ingredients around my finished plates and just ended up with a massive mess to clean. Now, I follow a strict system to make sure my food looks as good as it tastes. Here is exactly how I set up my kitchen to capture high-protein meals that actually look satisfying.
1. Prioritize Borosilicate Glass for a Clear Meal Prep Aesthetic Picture

I tried using cheap plastic tubs for months before figuring it out. Last October, I microwaved a plastic container of turkey chili at work, and the sides warped and melted directly into my food. It ruined my lunch and looked terrible. Skip the cheap plastic stuff. It stains easily and makes your food look cloudy on camera. You need clear, borosilicate glass. Borosilicate glass is the exact same material used in laboratory beakers. It withstands extreme temperature changes, meaning you can pull a container straight from the freezer and put it in the microwave without it shattering. I buy the Prep Naturals Glass Meal Prep Containers. A set of five costs exactly $24.99 on Amazon. They typically last five to ten years with daily use. The clarity of the glass is crucial for a clean meal prep aesthetic picture. When I shoot my high-protein pasta bakes, you can see every distinct layer of cheese and sauce through the side of the glass. I also picked up a 24-piece Glasslock set at Costco last month for $34.99. The lids latch securely with a satisfying snap, which matters when I’m stacking them in the fridge and need to ensure they won’t leak. If you want portion control, divided containers are trending heavily right now for visual organization. I use the OXO Prep & Go Divided Containers. They cost $16.99 each. The compartments keep my grilled chicken breasts completely separate from my roasted sweet potatoes. This prevents the sweet potatoes from getting soggy and keeps the visual presentation sharp and organized for the camera. Learned that the hard way.
2. Master Soft, Side-Window Natural Lighting

Most people get this wrong by shooting their food at 8 PM under warm kitchen overhead lights. I did this for a year. The result is always a flat, orange-tinted disaster that makes fresh spinach look like wet cardboard. You need soft, natural light coming from the side. Position your meal prep setup on a table directly next to a window. This creates gentle shadows that add depth to your chicken and rice, making the textures stand out. Avoid direct sunlight at all costs. Direct sunlight creates harsh, blown-out highlights on shiny ingredients like olive oil or teriyaki sauce. I aim to shoot during the morning or late afternoon. This indirect light provides a flattering glow without harsh shadows. Last week, the midday sun was too bright while I was shooting a batch of quinoa bowls. I drove to Target and bought a basic $15.00 sheer white curtain panel. I taped it over my kitchen window to diffuse the light. It acts exactly like a professional photography softbox. The light hits the food, highlighting the texture of the grains without creating bright white reflections on the glass containers. If your kitchen window faces a brick wall, you’ll need to move your setup. I regularly carry my heavy wooden cutting board and five glass containers into my bedroom just to use the south-facing window. It’s annoying. But the lighting makes the difference between a sad desk lunch and a professional photograph.
3. Use Neutral, Matte-Finish Tableware as Props

Glossy plates are an absolute nightmare for food photography. I bought a set of shiny black ceramic bowls from Walmart three years ago, thinking they looked modern and sleek. Every single time I tried to photograph a meal in them, the overhead window reflection bounced off the bowl and ruined the shot. You could literally see my silhouette holding the camera in the reflection of the plate. Switch to neutral, matte-finish tableware immediately. White, gray, or muted earth tones work best. A matte finish ensures the food remains the focal point and prevents those distracting reflections. I currently use the Kaloh Stoneware dinner plates from West Elm. They cost $12.00 per plate. The slightly textured, unglazed finish makes the vibrant colors of my roasted vegetables stand out beautifully. For backgrounds, keep it incredibly simple. A plain wooden table works well. If you have ugly laminate countertops like I do, buy affordable vinyl backdrops. I bought a 2-foot by 3-foot vinyl backdrop from an Etsy seller for $22.50. It mimics the texture of white marble perfectly. I use painter’s tape to secure it to my wall and let it drape down over my table, creating a curve. It rolls up for easy storage in my closet and wipes clean with a damp cloth when I inevitably spill soy sauce on it. I tried using real marble slabs before, but they weigh thirty pounds and cost hundreds of dollars. The vinyl option is much more practical for a weekly prep routine. Trust me on this. You might also like: 10 Healthy Meal Prep Ideas for Every Budget

Rubbermaid Brilliance Tritan Plastic Food Storage
If you want something that just works, Rubbermaid Brilliance Tritan Plastic Food Storage Containers BPA Free is a safe bet (583 reviews, 4.5 stars).
4. Try the 2-2-2 Method for Visual Balance

I used to prep massive batches of a single recipe. I’d make five pounds of chicken, rice, and black beans. Staring at five identical containers of brown and beige food is visually exhausting. It looks like slop. A highly structured approach works much better for photography. The 2-2-2 method involves prepping exactly two proteins, two vegetables, and two grains. This strategy forces visual variety into your weekly menu. Last Sunday, I went to Trader Joe’s and bought two proteins. I grabbed 16 ounces of their Shawarma Chicken Thighs for $6.99 per pound and 14 ounces of Extra Firm Tofu for $1.99. For vegetables, I bought a 12-ounce bag of broccoli florets for $2.49 and three large bell peppers for $3.99. For grains, I cooked two cups of basmati rice and roasted two large sweet potatoes. When you arrange these six components into different combinations across your containers, it naturally creates a cohesive, balanced set. You get a mix of textures and colors without having to cook ten entirely different recipes. The variety makes the overall photograph look abundant and professional. The visual organization of having distinct, separate components appeals directly to the eye. It looks planned. I lay out all the cooked components on my counter in separate bowls before assembling the containers. Seeing the distinct piles of food helps me plan the color distribution for the final photograph so no two identical meals sit next to each other in the frame. You might also like: 12 Meal Prep Snacks You Need to See
5. Apply Color Theory with Complementary Hues

Food photography relies heavily on basic color theory. If you pack a container with grilled chicken, brown rice, and roasted cauliflower, the entire meal is beige. It looks dead on camera. You need to pair your meal’s dominant color with a complementary color. Complementary colors sit opposite each other on the color wheel. If your main dish is a red tomato-based pasta, add a bright green garnish. I always keep fresh herbs in my fridge specifically for this purpose. I stop by Sprouts Farmers Market every week to buy a bunch of fresh curly parsley for $1.49 and cilantro for $0.99. A simple sprinkle of chopped parsley over a bowl of turkey meatballs breaks up the red sauce and introduces a contrasting pop of vibrancy. Just make sure to add the fresh garnish immediately before shooting. If you put chopped cilantro on a hot meal and seal the lid, it wilts into a dark green sludge within ten minutes. I learned that the hard way when photographing a batch of chicken tikka masala last year. Alternatively, use analogous colors. These are colors next to each other on the color wheel. A salad with dark green spinach, light green cucumbers, and yellow bell peppers creates a harmonious, serene visual. The colors blend naturally. I also use props to introduce complementary colors. If I’m shooting orange sweet potatoes, I’ll place a folded blue linen napkin in the corner of the frame to make the orange pop. You might also like: 11 Meal Prep Ideas High Protein for Every Budget
6. Showcase Layers in Clear Containers at a 45-Degree Angle

Salads and grain bowls look terrible when you mix everything together before taking the photo. The dressing coats the vegetables, making everything look dull and wilted. When I prep my high-protein Greek salads, I keep the ingredients strictly separated by layers. I use Weck Tulip Jars for this specific task. A set of six 1-liter jars costs $34.95 on Amazon. I start with three tablespoons of vinaigrette at the very bottom. Then I add half a cup of hard, non-absorbent vegetables like cherry tomatoes from Kroger, which cost $2.99 per pint. Next comes four ounces of diced grilled chicken, followed by a quarter cup of feta cheese. The delicate greens go at the very top, completely away from the dressing. To capture this properly, you have to shoot from a 45-degree angle. An overhead flat lay shot only shows the spinach on top. A 45-degree angle allows the camera lens to see directly through the clear glass, highlighting the distinct layers of dressing, tomatoes, chicken, and greens. It emphasizes the depth and freshness of the meal. I use a shallow depth of field for these shots. I set my camera aperture to f/2.8. This keeps the front edge of the glass jar in sharp focus while the background gently blurs out. It draws the viewer’s eye directly to the texture of the ingredients inside the jar. I also wash the rubber gaskets for the Weck jars by hand. If you put them in the dishwasher, they dry out and crack, ruining the aesthetic.

Bento Box Adult Lunch Box – 4 Pack, 5
Bento Box Adult Lunch Box – 4 Pack has been one of the most consistently praised picks in this category. 24 reviewers averaged 4.5/5.
7. Avoid the Harsh Flash and Cluttered Background Mistake

Never use your phone’s built-in flash for food photography. I did this during my first month of meal prepping because my apartment kitchen was dark. The flash creates harsh, blown-out highlights on oily foods and casts deep, ugly shadows behind the containers. It makes a beautiful piece of glazed salmon look like a late-night crime scene photo. If you don’t have good natural light, you simply have to wait until the next morning to take the picture. Clutter is another massive issue that ruins perfectly good food photos. A messy background completely destroys the focus of the image. When I shoot, I clear absolutely everything off my kitchen counter. I remove the paper towel roll, the dish soap, the mail, and the random coffee mugs. I wipe down the surface to remove any stray breadcrumbs or water spots. I only leave the meal prep containers and maybe one intentional prop, like a clean fork or a folded linen napkin. Too many props distract from the food. I once tried styling a shot with scattered raw ingredients around the finished containers. I put raw garlic cloves and dry pasta directly on the table. It looked ridiculous and messy, not rustic. The food should stand entirely on its own. Keep the frame tight. Make sure the edges of the photo aren’t accidentally capturing the dirty dishes sitting in your sink.
8. Freeze Uniform Blocks with Silicone Trays

Batch prepping soups and stews presents a unique visual challenge. For years, I poured my leftover turkey chili into gallon-sized Ziploc bags and threw them in the freezer. They froze into lumpy, uneven shapes that were impossible to stack. They looked awful in my freezer organization photos. Now, I use silicone freezing trays. I buy the Souper Cubes 1-Cup freezing trays. They cost $19.99 each. I use Souper Cubes because the rigid steel rim prevents spills when carrying liquid from the counter to the freezer. You pour one cup of soup into each silicone compartment, freeze it overnight, and pop out perfectly uniform, rectangular blocks of food. Last Sunday, I made a massive batch of high-protein lentil soup using dry lentils from Whole Foods. I froze the entire batch in these trays. When I photographed the frozen blocks stacked neatly in a glass container, it looked incredibly professional and satisfying. The sharp edges and uniform shapes appeal to the organizational aspect of meal prepping. It proves you have a system. Once the blocks are frozen solid, I transfer them to a large freezer-safe Stasher bag, which costs $21.99. I label the bag with blue painter’s tape and a black Sharpie. This method saves a ton of space and looks infinitely better than photographing a plastic bag full of frozen brown liquid. It completely changed how I document my freezer stash.
9. Batch Your Shoots and Try Macro Photography

Trying to take a perfect photo every single time you cook will burn you out quickly. I tried shooting my lunch every day for a month, and I ended up eating cold food every afternoon because setting up the shot took too long. Instead, batch your photography just like you batch your cooking. According to professional food photographers, batching your meal prep photos into one dedicated session is the most efficient method. I prep all my ingredients on Sunday morning. I plate the meals, set up my lighting once, and shoot everything sequentially. I can usually get 30 to 45 high-quality images in an hour. This provides enough content for an entire month of posting. If you want to capture the intricate textures of your high-protein meals, you need to look into macro photography. I recently rented a Tamron 90mm f/2.8 macro lens for my DSLR camera. Buying it new costs around $649.00. A macro lens allows you to get incredibly close to the food while maintaining crisp focus. You can capture the coarse grains of sea salt on a steak or the tiny seeds on a strawberry. When shooting macro, you must use a tripod. The depth of field is so narrow that breathing slightly will throw the image out of focus. I disable the image stabilization on my lens, lock the camera on the tripod, and use a two-second timer to take the shot. This ensures maximum sharpness for those satisfying close-up texture shots. No exaggeration.
Getting the lighting and angles right takes practice, but it’s worth the effort. Once you stop using cheap plastic and start paying attention to natural window light, your food will finally look as good as it tastes. I highly recommend starting with the borosilicate glass containers and a cheap vinyl backdrop. Those two minor changes fix 90 percent of the glaring issues in most kitchen photos. You don’t need a professional studio. You just need a clean counter, a window, and a basic understanding of color contrast. If you found this breakdown helpful, save this page to your favorite Pinterest board so you can reference these lighting and plating techniques before your next big Sunday prep session. Let’s make those high-protein meals actually look appetizing.

Food Scale, 11lb Digital Kitchen Scale with 6 Units LCD
A dependable everyday pick — Food Scale pulls in 21 ratings at 4.5 stars. Not flashy, just solid.
Frequently Asked Questions
What is the best container for a meal prep asthetic picture?
Clear borosilicate glass containers are the best option. They don’t stain or warp like plastic, and the clear glass allows you to photograph the distinct layers and textures of your food from the side.
How do I light my meal prep photos?
Always use soft, indirect natural light from a window. Position your food next to the window so the light hits it from the side. Avoid using overhead kitchen lights or your phone’s built-in flash.
What is the 2-2-2 meal prep method?
The 2-2-2 method involves prepping two proteins, two vegetables, and two grains. This creates visual variety in your containers, preventing your photos from looking like a monotonous batch of identical meals.
How can I make beige food look better on camera?
Use color theory by adding complementary hues. If you have a brown or beige meal like chicken and rice, add a bright green garnish like fresh parsley or cilantro right before taking the photo to introduce contrast.
