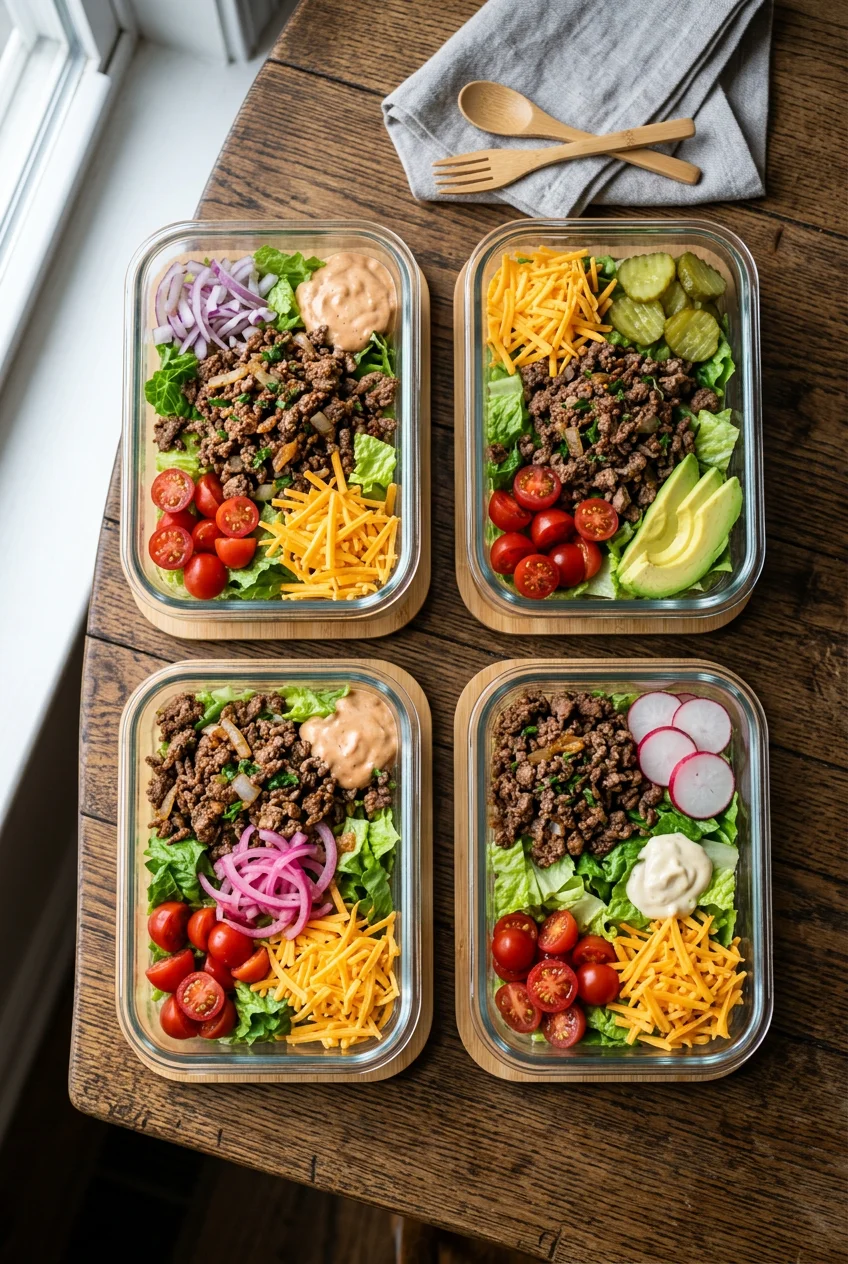
What’s Inside
- Prioritize Lean Protein for Health and Longevity
- Master the Meat Seasoning for Flavor Depth
- Prevent Soggy Greens with Strategic Layering
- Cool Components Completely Before Assembling
- Separate Your Sauce for Optimal Texture
- Craft a Signature Special Sauce
- Embrace Built-in Fries with Roasted Potatoes
- Utilize BPA-Free Glass Containers for Safety
Last Tuesday at Whole Foods, I stared at a $14.99 pre-made salad that looked like sad, wilted lawn clippings. That’s when I decided to fix my burger bowl meal prep. My first attempt three years ago was a disaster. I packed everything into one giant plastic tub on a Sunday night. By Wednesday, the lettuce was slimy. The ground beef sat in a pool of congealed, cloudy orange fat. I threw it in the office trash and ordered overpriced Thai takeout. Meal prep only works if the food tastes good on day four, and soggy lettuce isn’t going to cut it.
Over the last two years, I’ve figured out how to build these bowls so the potatoes stay crisp, the meat stays flavorful, and the greens stay crunchy all week long. It takes me forty-five minutes on a Sunday afternoon. I usually listen to a true crime podcast and chop red onions while the potatoes roast. You don’t need fancy gadgets to make this work. You just need a solid strategy and a few specific ingredients. Here’s how to make a week of lunches you’ll actually want to pull out of the fridge.
1. Prioritize Lean Protein for Health and Longevity

I used 80/20 ground beef once to save a few dollars. It cost me $4.99 a pound at Kroger, and I thought I was being frugal. When I pulled my glass container out of the fridge on a Tuesday, there was a thick, solid white layer of fat coating the bottom. I tried to scrape it off with a plastic fork, but it clung to the meat. I ended up microwaving it, which just turned the fat into a greasy soup that drowned my cherry tomatoes. It was disgusting, and my stomach hurt for hours. I learned that the hard way.
Now, I strictly buy Simple Truth 93/7 lean ground turkey, which usually runs $6.49 for a 16-ounce package at Kroger, or 90/10 lean ground beef. Ground beef prices fluctuate, but a lean package usually runs around $8.34 per pound. The leaner meat prevents that excessive grease slick from forming. I heat a stainless steel skillet over medium-high heat. I don’t add oil because the meat’s own fat keeps it from sticking. A two-pound batch of 93% lean ground turkey yields about seven quarter-cup servings. If you want consistent macros, use a medium OXO cookie scoop, which costs $16.99 at Target, to portion out the meat into two-ounce servings. I scoop the meat directly from the hot cast iron pan into the containers. If you’re eating a plant-based diet, grab a package of Beyond Meat crumbles for $7.99 for 10 ounces at Sprouts. They cook up the same way, though they do stick to stainless steel, so use a non-stick skillet instead.
2. Master the Meat Seasoning for Flavor Depth

Plain ground turkey tastes like nothing. It’s a blank, depressing canvas. For months, I just sprinkled table salt and pepper over the meat while it browned. I wondered why my lunches tasted like hospital food. You can’t just lightly season ground meat if you expect it to hold up for four days. The cold temperatures dull the flavors, so you have to season the protein aggressively.
I usually grab a bottle of McCormick Grill Mates Worcestershire Pub Burger Seasoning from Walmart. It costs $3.48 for a 2.75-ounce bottle, and it has a savory depth that mimics a grilled burger. If I run out, I make my own. For a two-pound batch, I mix two teaspoons of garlic powder, two teaspoons of onion powder, two teaspoons of smoked paprika, and three tablespoons of Lea & Perrins Worcestershire sauce, which costs $4.19 for a 10-ounce bottle at Target. The smoked paprika hits the hot pan and makes your kitchen smell like a cookout. I pour the Worcestershire sauce in at the end. It sizzles loudly and creates a sticky, dark glaze. Don’t skip this. It coats every crumble, giving it a shiny, caramelized exterior that holds up beautifully. The intense umami flavor makes a massive difference when you eat the meat cold or reheated.
3. Prevent Soggy Greens with Strategic Layering

Most people get this wrong. I certainly did. If you toss romaine into a bowl and dump warm ground beef on top, you’ll ruin your lunch before you put the lid on. The heat wilts the greens instantly. Strategic layering is the only way to keep your bowls fresh until Friday. Always place your sturdiest ingredients at the very bottom. You might also like: 12 Summer Meal Prep for Every Budget
I put a half-cup of roasted sweet potatoes down first. Then, I add the seasoned meat. The delicate greens, like chopped iceberg or Good & Gather chopped romaine, which costs $2.99 for a 9-ounce bag at Target, go on top. I also add my raw vegetables here. Here’s a trick for red onions. Raw red onions can overpower a bowl and make your breath smell terrible. To fix this, I thinly slice half a red onion and soak the slices in ice-cold water for fifteen minutes before packing them. This pulls out the sulfur compounds and mellows the bite. I drain them on a paper towel before adding them to the bowl. I also wait to add fresh avocado until the day I eat the bowl. Pre-sliced avocado turns a bruised brown by day two. I keep a fresh avocado on my desk at work and slice a quarter of it right before eating. You might also like: 15 Stunning Healthy Dinner Ideas to Steal Right Now

Food Scale -33lb Digital Kitchen Scale for Food Ounces
Food Scale -33lb Digital Kitchen Scale for Food Ounces Grams Rechargea has been one of the most consistently praised picks in this category. 78 reviewers averaged 4.5/5.
4. Cool Components Completely Before Assembling

This sounds obvious, but skipping this will destroy your ingredients. Last November, I was rushing through my Sunday prep to watch a football game. I pulled my roasted potatoes out of the oven, scooped the hot turkey out of the skillet, dumped everything into my containers, and shoved them in the fridge. The next day, I opened my lunch container and water dripped off the lid. The trapped steam created heavy condensation. You might also like: 15 Creative Healthy Meal Prep Ideas That Make a Real Difference
My crispy potatoes turned into mush. My expensive romaine was waterlogged and limp. You can’t just shove warm food in the fridge. You must let every cooked component cool to room temperature before putting a lid on it. I spread my meat out on a large baking sheet lined with parchment paper. It cools in twenty minutes this way. I leave the roasted vegetables on their sheet on the counter. I set a timer for thirty minutes. I touch the bottom of the glass bowls to make sure there’s no residual heat before I reach for the lids. Once everything is at room temperature, I assemble the bowls. I use Pyrex 4-cup glass storage bowls, which run $24.99 for a 4-pack at Target. The thick glass gets cold in the fridge, which helps keep the greens crisp once the lids are sealed.
5. Separate Your Sauce for Optimal Texture

Pouring dressing over your meal prep on a Sunday is a rookie mistake. The acid and moisture will break down your lettuce by Monday afternoon. You end up with a sad, pinkish-brown puddle at the bottom that smells like sour ketchup. I store my burger sauce in small, individual condiment containers to prevent this.
I bought a 4-pack of Sistema Dressing Pots for $5.99 at The Container Store, but you can find similar ones at Sprouts or Amazon. They hold 1.18 ounces, which is roughly two tablespoons. This is the perfect portion size. The lids have a silicone seal that snaps shut, so I never worry about the sauce leaking. I line up five of these pots on my counter and fill them during my Sunday prep. I nestle the tiny sealed pot inside the larger glass container, resting it right on top of the dry lettuce. This way, I never forget my dressing. When it’s time to eat, I pull the small pot out, microwave the meat and potatoes, and pour the cold sauce over the hot bowl. The contrast between the cold, tangy sauce and the warm, savory meat is incredible. It feels like a freshly prepared restaurant meal.
6. Craft a Signature Special Sauce

Store-bought burger sauces are packed with soybean oil and refined sugar. They taste sweet and leave a greasy film in my mouth. I make my own every Sunday in three minutes. I use a base of Fage Total 5% Whole Milk Greek Yogurt, which costs $7.49 for a 32-ounce tub at Whole Foods. Skip the fat-free stuff. It tastes like cardboard and separates into a watery mess. Trust me.
I measure out two-thirds of a cup of the whole milk yogurt into a glass bowl. I add a quarter-cup of Primal Kitchen Unsweetened Ketchup, which is $5.49 for an 11.3-ounce bottle, two tablespoons of French’s yellow mustard, one teaspoon of garlic powder, and one teaspoon of smoked paprika. Then, I chop up two tablespoons of pickles. Instead of standard dill, I buy Bubbies Naturally Fermented Kosher Dill Pickles for $7.99 for a 33-ounce jar at Whole Foods. You find them in the refrigerated section. They offer an intense, tangy crunch and provide probiotics. I whisk everything together with a metal fork until it turns a pale salmon pink color. The sharp acidity from the fermented pickles cuts through the richness of the ground beef, balancing the bowl perfectly.

Etekcity Food Kitchen Scale
A dependable everyday pick — Etekcity Food Kitchen Scale pulls in 1,736 ratings at 4.5 stars. Not flashy, just solid.
7. Embrace Built-in Fries with Roasted Potatoes

A burger needs fries. Since regular french fries turn into chalky sticks in the fridge, I incorporate roasted potatoes into my bowls instead. I buy a 10-pound bag of sweet potatoes from Costco for about $7.99. I scrub them, leave the skin on for fiber, and chop them into small cubes. The smaller you chop them, the crispier they get.
I toss the cubes on a large aluminum baking sheet with one tablespoon of Chosen Foods avocado oil, which I get at Costco for $12.99 for a 16.9-ounce bottle, a pinch of kosher salt, and cracked black pepper. I roast them at 400°F for 25 to 30 minutes. Here’s the critical part. Don’t crowd the pan. I did this for months. I’d pile two pounds of potatoes onto one sheet to avoid washing two. They ended up steaming instead of roasting, resulting in mushy cubes. You need to leave empty space so the hot air can circulate. If you have to use two baking sheets, use two. The edges should be dark brown and blistered, while the insides stay creamy. They provide a dense, starchy base that keeps you full until dinner.
8. Utilize BPA-Free Glass Containers for Safety

If you’re still using flimsy, black plastic takeout containers, it’s time to upgrade. Plastic scratches, holds onto grease, and absorbs the smell of raw onions. I switched to glass two years ago after my plastic containers developed a permanent orange tint from smoked paprika.
I use the OXO Everyday Glass Food Storage Set. A set of four costs about $29.99 at Target, which is $7.50 per container. It’s an investment, but glass resists odors and stains. The lids have four locking tabs and a silicone gasket. You have to push firmly to snap them shut, which gives me peace of mind. More importantly, glass is microwave safe without leaching chemicals. This brings me to my final strategy. I store my ingredients slightly separated. I keep the cooked meat and potatoes together on one side of the glass container. I keep the fresh toppings, like the lettuce, tomatoes, and soaked onions, on the opposite side. When I eat at the office, I use a fork to scoop the cold salad portion onto a paper plate. I microwave the glass container with just the meat and potatoes for sixty seconds. Then, I dump the cold salad back on top of the hot ingredients. This prevents the lettuce from wilting and maintains the perfect temperature contrast. It works, no exaggeration.
Burger bowl meal prep doesn’t have to be a depressing experience. If you follow these layering rules, let your ingredients cool, and use the right glass containers, you’ll actually look forward to your lunch break on a Thursday. Pin this guide for your next Sunday prep session, and let me know how your special sauce turns out.
Frequently Asked Questions
How long do burger bowls last in the fridge?
When stored in airtight glass containers with the sauce kept separate, burger bowls stay fresh for 3 to 4 days. Make sure all hot ingredients are completely cooled before sealing the lids.
Can I freeze burger bowl meal prep?
You can freeze the cooked ground meat and roasted potatoes for up to three months. However, you can’t freeze the fresh greens, tomatoes, or yogurt-based sauce, as they will turn to mush when thawed.
What is the best meat for burger bowls?
Using 93/7 lean ground turkey or 90/10 lean ground beef is best. Leaner meats prevent a thick layer of congealed fat from forming in your meal prep containers when stored in the fridge.
How do I keep the lettuce from getting soggy?
Always place sturdy ingredients like potatoes at the bottom, followed by the meat, and put the delicate lettuce on the very top. Never pack warm ingredients, and always store your dressing in a separate container.
