What’s Inside
- Choose Lean Protein to Avoid the Grease Trap
- Ditch the Packets for Custom Taco Seasoning
- Cilantro-Lime Rice Base for Meal Prep Taco Bowls
- Charred Corn and High-Volume Veggies
- Plant-Based Proteins That Actually Keep You Full
- The Secret Water Method for Fresh Avocados
- Prevent Soggy Meal Prep Taco Bowls with Smart Layering
- Glass Containers Are Non-Negotiable
- Add Gut-Healthy Fermented Toppings
Last Tuesday, I opened my glass lunch container in the harsh office breakroom light and found a depressing, grey puddle of grease soaking into mushy rice. My taco bowl meal prep had turned into a literal swamp. I’d layered hot ground beef directly over cold lettuce, sealed the lid tight, and shoved it in the fridge. It’s a rookie mistake, but I made it for months before figuring out the mechanics of proper food storage and temperature control. You don’t need to eat wet cardboard to hit your macros, and you certainly don’t need to endure soggy lettuce. Let’s fix this.
I started prepping lunches because buying a salad at the deli across the street was draining my bank account. I walked into Target one afternoon, grabbed a stack of glass containers, and decided I was going to master the Sunday prep routine. It wasn’t easy at first. My chicken was dry, my rice was clumpy, and my avocados turned black before Wednesday. But after two years of trial and error, I’ve nailed down a system that actually works. The key isn’t just the recipes. It’s knowing how to cool the ingredients, how to layer the textures, and how to store the toppings so everything tastes as fresh on Thursday as it did on Sunday. I’m going to walk you through exactly how I build these containers, step by step.
1. Choose Lean Protein to Avoid the Grease Trap

I buy 93% lean ground beef at Costco. The 3-pack costs around $24.99, which breaks down to about $8.33 per pound. Cheaper 80/20 blends run about $5.41 per pound at Walmart, but the fat renders out during cooking and solidifies into a gross white crust in the fridge. Skip the fat-free stuff. It tastes like wet cardboard. You want just enough fat for flavor, but not enough to ruin the texture of your meal prep taco bowls. Here is a specific trick I learned after eating dry turkey for a year. Ground meat dries out in the fridge. To fix this, I mix 1 teaspoon of Bob’s Red Mill Arrowroot Starch (it’s $4.69 for a 16 oz bag at Whole Foods) with a splash of chicken bone broth. I pour this into the skillet during the last two minutes of simmering the beef. It creates a glossy, slightly saucy texture that thickens the liquid without making the meat gummy. When you microwave it three days later, the meat stays tender instead of turning into rubber pebbles.
I use a heavy cast iron skillet and let the pan get smoking hot before adding the meat. You want a hard sear on the outside. If you crowd the pan, the beef boils in its own juices. I tried this wrong for months before figuring it out. Took me years to figure out. Cook the meat in two batches if you have to. I’d rather spend the extra ten minutes cooking than eat boiled, grey beef all week. The texture difference is massive.
2. Ditch the Packets for Custom Taco Seasoning

Store-bought seasoning packets are convenient, but they aren’t the best option for daily lunches. I used the Siete Mild Taco Seasoning packets for a while. They cost $2.99 each at Sprouts. The flavor is decent, but paying three dollars to season one pound of meat gets expensive fast. Plus, the high sodium content leaves my fingers swollen by 3 PM. Now, I make a bulk homemade blend. I keep a glass jar of it in my pantry. For every 1 pound of meat, I use 1 tablespoon of cumin, 1 tablespoon of chili powder, 1 teaspoon of garlic powder, 1 teaspoon of onion powder, and 1/2 teaspoon of cayenne pepper. I buy the 365 brand spices at Whole Foods. A standard 1.9 oz bottle of cumin is $3.99. Mixing it myself means I control the sodium completely. If you prefer a smokier profile, swap half the regular chili powder for chipotle chili powder.
Pro tip: bloom your spices. Don’t just dump the dry powder onto cooked meat. Push the browned beef to the edges of the skillet, drop a teaspoon of olive oil in the center, and add your spice blend directly to the hot oil. Let it toast for thirty seconds until you can smell the cumin. This releases the essential oils in the spices. I didn’t do this for years, and my taco meat always tasted a little dusty. Toasting the spices fixes that flat flavor profile immediately. Add half a cup of water after toasting to scrape up the browned bits on the bottom of the pan. You might also like: 10 Healthy Breakfast Meal Prep That Actually Work
3. Cilantro-Lime Rice Base for Meal Prep Taco Bowls

Plain white rice is boring. It’s functional, but it doesn’t do anything for the overall flavor of your meal prep taco bowls. I upgrade my base by making cilantro-lime rice. I start with 1 cup of Lundberg Family Farms Long Grain White Rice. A 32 oz bag is $5.49 at Target. I rinse the rice in a fine mesh strainer until the water runs completely clear. This removes the surface starch. If you skip this step, your rice clumps together into a solid brick in the fridge. After cooking the rice and letting it rest for ten minutes, I fluff it with a fork. Then, I stir in the juice of one whole lime and 3 tablespoons of fresh, finely chopped cilantro. Do not add the lime juice while the rice is cooking. The heat destroys the bright, acidic flavor. I made this mistake last November, and the rice just tasted bitter. You might also like: 15 Clever Family Dinner Ideas for a Fresh New Look
If you’re watching your carbohydrate intake, you can do the exact same thing with cauliflower rice. I buy the Trader Joe’s Organic Riced Cauliflower. It’s $2.99 for a 12 oz frozen bag. I sauté it in a dry non-stick pan for five minutes to evaporate the excess moisture before adding the lime and cilantro. Wet cauliflower rice will ruin your entire bowl. You want it as dry as possible before it goes into the container. I portion out exactly 1/2 cup of the cooked rice per container. Using a digital food scale helps keep the portions consistent. It’s easy to accidentally scoop a whole cup of rice, which throws off the balance of the bowl. You might also like: 20 Lovely Work Lunch Ideas to Inspire Your Next Project
![[8-Pack,30 oz]Glass Meal Prep Containers](https://m.media-amazon.com/images/I/713Zfdsgi4L._AC_UL320_.jpg)
[8-Pack,30 oz]Glass Meal Prep Containers
[8-Pack has been one of the most consistently praised picks in this category. 7 reviewers averaged 4.5/5.
4. Charred Corn and High-Volume Veggies

Dietitians constantly recommend increasing vegetable intake for satiety. I practice a high-volume meal prep strategy. This means I load my containers with nutrient-dense, low-calorie vegetables so the physical volume of the food is larger. For every 1 pound of protein, I add 2 diced bell peppers and 1 diced zucchini. I buy the 3-pack of organic tri-color bell peppers at Trader Joe’s for $4.99. I roast them on a sheet pan at 400 degrees for twenty minutes. But the real flavor comes from the corn.
I use canned sweet corn. The Del Monte brand is $1.59 for a 15.2 oz can at Kroger. I drain it completely and pat it dry with a paper towel. Then, I char it in a screaming hot cast iron skillet with one teaspoon of olive oil, a pinch of salt, and a heavy dash of smoked paprika. I leave it completely untouched for five to seven minutes. Don’t stir it. You want the kernels to blister and turn almost black on one side. This adds a smoky depth and a chewy texture that completely changes the bowl. I used to just dump cold canned corn over my rice. It was watery and bland. Charring the corn takes ten minutes but provides a massive return on the flavor profile. It’s the difference between a sad desk lunch and something you actually want to eat. I also mix in shredded romaine lettuce to replace half the rice portion if I want a lighter meal.
5. Plant-Based Proteins That Actually Keep You Full

You don’t have to use meat. Plant-based grounds like Beyond Meat or Impossible Foods offer a similar texture to ground beef. They typically range from $6 to $10 per pound. I buy the 12 oz package of Impossible Plant-Based Beef at Target for $6.99. It cooks exactly like regular beef, but it does release a lot of oil, so I drain it on a paper towel before adding my seasoning blend. If I’m trying to keep my grocery bill lower, I skip the imitation meats and use seasoned black beans and lentils. I use the Goya brand black beans. A 15.5 oz can is $1.39 at Walmart.
For a four-serving prep, I rinse and drain two cans of black beans and toss them with my homemade taco spice blend in a warm skillet. I’ve learned that you have to dry the beans thoroughly after rinsing them. If you add wet beans to the hot oil, they spit aggressively, and the spices turn into a muddy paste instead of coating the beans evenly. I pair the beans with 1/2 cup of cooked brown lentils for extra fiber. I buy the Palouse Brand brown lentils on Amazon. A 3-pound burlap sack is $14.99. I boil them in vegetable broth instead of water. It infuses them with a savory baseline flavor. The combination of black beans and lentils provides a dense, chewy texture that holds up perfectly in the fridge for five days. They won’t dry out like ground turkey sometimes does.
6. The Secret Water Method for Fresh Avocados

Avocados are difficult to prep ahead of time. I used to slice half an avocado on Sunday, and by Tuesday, it was a slimy, brown mess. I tried squeezing lemon juice over it, storing it with the pit, and wrapping it in tin foil. Nothing worked perfectly. Then I learned the water method. It sounds completely wrong, but it prevents cut avocado from browning for up to three days. I buy a bag of six small Hass avocados at Aldi for $3.49.
I mash two of them in a small glass bowl with a fork. I press a piece of plastic wrap directly onto the surface of the mashed avocado, making sure there are no air bubbles. Then, I pour about 1/2 inch of lukewarm tap water directly on top of the plastic wrap before sealing the bowl with an airtight lid. The water acts as a heavy, oxygen-blocking seal. Oxygen is what causes the oxidation and browning. When I’m ready to eat, I just pour the water off, peel back the plastic wrap, and the avocado is perfectly green. I did this last Thursday, and the avocado was still vibrant green on Sunday afternoon. If you prefer sliced avocado, you can submerge the slices completely in a container of water and store them in the fridge. They stay green, but the texture gets slightly waterlogged. Mashing it and using the plastic wrap barrier is much better. I can’t stand mushy, waterlogged avocado slices, so the mash is my go-to method.

M MCIRCO 10-Pack,22 Oz Glass Meal Prep Containers
M MCIRCO 10-Pack has been one of the most consistently praised picks in this category. 86 reviewers averaged 4.5/5.
7. Prevent Soggy Meal Prep Taco Bowls with Smart Layering

A common mistake is combining all the ingredients while they are still hot. This creates steam inside the container. When you put a steamy container in the cold fridge, the condensation drips down and turns everything into soup. To prevent soggy meal prep taco bowls, you have to let the hot components cool down to room temperature before assembling. I spread my cooked rice and ground beef on separate baking sheets to cool quickly.
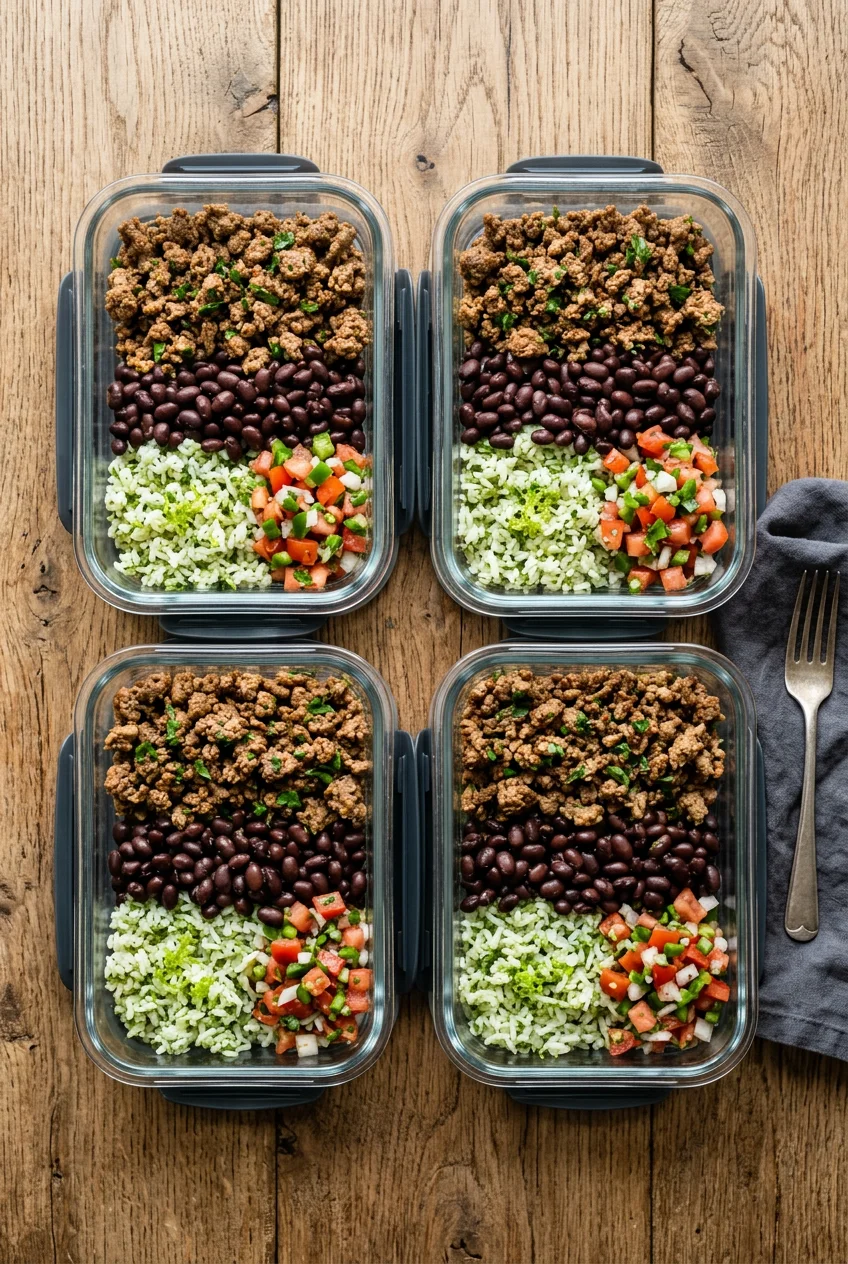
Once cooled, layering is critical. I put the cilantro-lime rice at the absolute bottom. Next goes the protein layer. Then, I add the drained black beans and the charred corn. I never put wet toppings in the main container. I dice Roma tomatoes, white onions, and jalapeños for fresh pico de gallo. I store this mixture in small 2 oz plastic condiment cups with tight lids. I buy a pack of 100 Jello shot cups at Walmart for $3.48. They are the perfect size for salsa or sour cream. I keep the shredded Tillamook Sharp Cheddar Cheese (an 8 oz bag is $4.49 at Target) in a separate silicone bag. If you put the cheese directly on the cold meat, it gets slimy. Keeping the wet and dairy ingredients isolated maintains the textural integrity of the base ingredients. You just dump the little cups into the main bowl right before you eat. I tried putting the salsa directly on the rice once. By Wednesday, the rice had absorbed all the tomato juice and turned pink and mushy. Separate containers are mandatory.
8. Glass Containers Are Non-Negotiable

I used cheap plastic containers for two years. They stained orange from the chili powder, warped in the microwave, and absorbed the smell of cumin permanently. I finally threw them all away and invested in glass. Glass meal prep containers are non-negotiable for this type of food. I use the Pyrex 10-Piece Glass Food Storage set. I bought it at Target for $24.99. Yes, it costs more upfront than a $5 pack of plastic tubs, but glass lasts for five to ten years. The plastic sets usually need replacing every six months because the lids crack or the bottoms warp from the microwave heat.
Glass also reheats food much more evenly. Plastic tends to create hot spots, leaving the center of your rice freezing cold while the edges turn to lava. The Pyrex containers I use have tight-fitting plastic lids that don’t leak, even if the container tips over in my work bag. I learned this the hard way last month when my canvas tote bag fell off the passenger seat of my car. The glass container hit the floorboard hard, but the lid stayed perfectly sealed. No taco juice spilled on my car mats. When you’re dealing with seasoned meat and beans, you want an absolute seal. Glass doesn’t hold onto odors, so you can wash it in the dishwasher and it comes out completely neutral. I also use the Glasslock brand sometimes. A 4-container set is $19.99 on Amazon. The snap-hinge lids are extremely secure.
9. Add Gut-Healthy Fermented Toppings

I always add an acidic element to cut through the heavy, savory flavors of the meat and beans. Recently, I’ve started incorporating fermented ingredients for gut health. I make my own pickled red onions. I thinly slice one large red onion and pack it into a glass mason jar. I boil 1 cup of white vinegar, 1/2 cup of water, 1 tablespoon of sugar, and 1 teaspoon of salt, then pour the hot liquid over the onions. I let it sit on the counter until it cools. The whole process costs maybe $1.50 per jar. I add a forkful of these bright pink onions to my bowls after reheating.
Speaking of reheating, you have to do it smartly. I remove the lid, take out the tiny cups of salsa and the avocado, and microwave the glass base container for exactly 90 seconds. If you microwave the avocado, it tastes like warm garbage. I’ve done it, and I couldn’t finish my lunch. After the base is hot, I stir it well, then add the cold pickled onions, fresh pico de gallo, and cheese. Managing the portions is also easier when you assemble it this way. I aim for exactly 4 ounces of cooked protein and 100 grams of cooked rice per bowl. I use an Escali Primo Digital Food Scale ($24.95 at Whole Foods) to weigh everything as I build the containers on Sunday afternoon. Sometimes I use Cleveland Kitchen Classic Kimchi. A 16 oz pouch is $5.99 at Target. It sounds weird on tacos, but the spicy crunch works perfectly. Trust me on this.
Getting your Sunday prep right takes a little practice, but it’s entirely worth the effort. You won’t be tempted by the drive-thru at noon when you have a perfectly portioned, highly seasoned lunch waiting in the fridge. I’ve been eating these bowls almost every week since January, and I’m still not tired of them because I constantly swap out the protein and the salsa. The glass containers and the water method for the avocado are the two most important takeaways here. Don’t skip those steps. If you found this breakdown helpful, pin this post to your favorite recipe board on Pinterest so you can reference the homemade spice blend measurements later. Let me know in the comments if you try the arrowroot starch trick for the ground beef.

KOMUEE 10 Packs 30 oz Glass Meal Prep Containers
KOMUEE 10 Packs 30 oz Glass Meal Prep Containers has been one of the most consistently praised picks in this category. 46 reviewers averaged 4.5/5.
Frequently Asked Questions
How long do meal prep taco bowls last in the fridge?
When stored in airtight glass containers, meal prep taco bowls will last 4 to 5 days in the refrigerator. Always store wet toppings like salsa and sour cream in separate containers to prevent the rice and lettuce from getting soggy.
How do you keep avocado from turning brown in meal prep?
Use the water method. Mash the avocado in a bowl, press plastic wrap directly against the surface, and pour half an inch of water on top of the plastic. Seal with a lid. Pour off the water when ready to eat.
Can I freeze meal prep taco bowls?
You can freeze the cooked meat, beans, and rice components for up to 3 months. Do not freeze fresh toppings like lettuce, tomatoes, avocado, or cheese, as their textures will be completely ruined when thawed.
What is the best container for meal prep taco bowls?
Glass containers with snap-locking lids are the best option. Glass won’t stain from spices like cumin or chili powder, it doesn’t absorb odors, and it reheats food much more evenly in the microwave compared to plastic.
