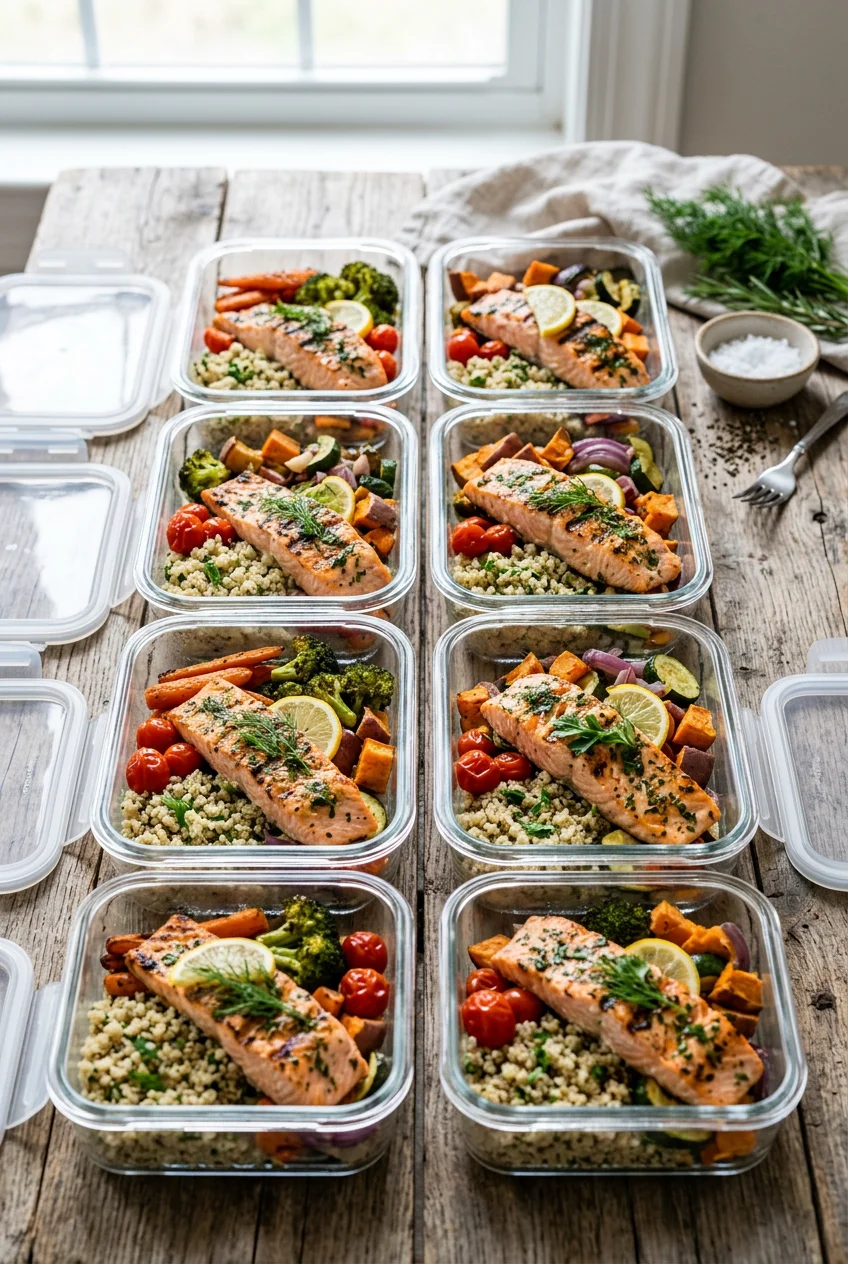
What’s Inside
- The Foundation of Aesthetic Meal Prep: Glass Containers
- Nailing the 50/25/25 Rule for Balanced Portions
- Layering Salads in Clear Containers
- Batch Cooking Components, Not Boring Meals
- Why You’re Ruining Textures (The Hot Food Mistake)
- Smart Appliances and Pre-Cut Cheats
- The Over-Oiling Disaster in Aesthetic Meal Prep
- FIFO, Labeling, and Photography Secrets
Last Tuesday at Whole Foods, I dropped a flimsy plastic container of lentil soup right in the middle of aisle four. It shattered into sharp plastic shards and a brown, muddy puddle that smelled intensely of cumin and regret. I stood there staring at the mess while a store employee named Dave grabbed a yellow mop bucket. I wanted the floor to swallow me whole. That was the exact moment I finally committed to mastering aesthetic meal prep. I realized aesthetic meal prep isn’t just about making your fridge look like a perfectly curated Pinterest board. It’s about creating food that actually survives the week without turning into a sad, soggy, unappetizing mess. I’m Esperanza Eliza. I’ve spent years eating cold, rubbery chicken and wilted spinach out of permanently stained Tupperware that always smelled faintly of old taco seasoning. I tried this wrong for months before figuring it out. I’d spend my entire Sunday cooking, only to end up with meals I actively dreaded eating by Wednesday. Let’s fix your Sunday routine right now. You’re going to need some basic tools, a little patience, and a willingness to toss out the fat-free stuff. Skip the fat-free stuff. It tastes like wet cardboard. We aren’t doing diet culture here. We’re doing real, delicious food that looks as good as it tastes. I’m talking vibrant salads, perfectly roasted root vegetables, and juicy proteins.
1. The Foundation of Aesthetic Meal Prep: Glass Containers

In 2026, glass meal prep containers are the gold standard. I used to buy those cheap 50-pack plastic tubs from Amazon. They warped in the microwave on the very first use. Worse, they held onto the smell of garlic and onions for weeks. Disgusting. Now, I only use high-quality glass. You want borosilicate glass because it’s got superior thermal shock resistance. This means you can pull a container straight from the deep freezer and pop it directly into a 400-degree oven without it exploding. I personally swear by the Rubbermaid Brilliance glass containers. I picked up a 5-piece set at Target last month for exactly $29.99, and it’s the best money I’ve spent all year. The airtight silicone seals and four-sided locking tabs are non-negotiable. If you’re packing 1.5 cups of tomato basil soup for lunch, you need a 100% leak-proof seal. I learned this the hard way when soup leaked all over my faux-leather tote bag on the subway. I had to throw away a perfectly good notebook and spend hours wiping down the lining. Ello Duraglass is another great option. They’ve got these colorful silicone sleeves that look amazing stacked in the fridge. A 10-piece set usually runs about $45.00 at Walmart. If you need larger sizes, Razab makes fantastic glass containers with locking lids. A set of four large containers is around $35.00 on Amazon. Don’t cheap out here. Investing in good glass is step one. To keep them pristine, take a butter knife and pop the silicone ring out of the lid every two weeks to scrub away any hidden food particles. Trust me on this.
2. Nailing the 50/25/25 Rule for Balanced Portions

If your meals look brown and boring, you’re probably messing up your ratios. I used to pack containers with 80% brown rice and a tiny sliver of dry chicken. It looked depressing. Now, I follow the 50/25/25 rule. Aim for 50% fruits and vegetables, 25% lean protein, and 25% grains or starchy vegetables. This automatically creates a colorful, visually appealing plate. To do this without dragging out a digital kitchen scale, master hand-sized portioning. Use a palm-sized portion for protein. That’s roughly 3 to 4 oz of cooked meat. Use a cupped hand for carbohydrates, which is about 1/2 cup of cooked grains. Grab two cupped hands for vegetables. That equals around 2 cups raw or 1 cup cooked. Finally, use a thumb-tip for fats, which is approximately 1 tablespoon. Last week, I grabbed some beautiful purple cabbage, bright orange carrots, and a bundle of fresh asparagus at Sprouts. I shredded exactly 2 cups of the raw veggies, added 4 oz of grilled salmon, and 1/2 cup of wild rice. The spectrum of colors makes the food pop. Food stylist expert Heidi Harris always says to add fresh herbs for a pop of color. I sprinkle 1 tablespoon of fresh cilantro or diced green onions on everything. It makes a huge difference. You won’t believe how much better your food looks when you follow this formula. I’ve completely stopped guessing what a serving size looks like. It takes the mental fatigue out of Sunday prep and ensures every single container looks incredibly appetizing.
3. Layering Salads in Clear Containers

Salads are the hardest thing to prep. I tried prepping a massive Caesar salad in a giant plastic bowl once. By Wednesday, the romaine lettuce was a slimy, blackish-green nightmare. It smelled like a swamp. The secret to prepping salads that actually last is utilizing clear containers for layered visuals. You need to keep the wet ingredients far away from the delicate greens. I actually upcycle glass jars for this. I save old pasta sauce jars. You can buy a bottle of Goo Gone for $4.99 to scrub off the stubborn sticky labels. It works like magic. Once your jar is clean, always put your 2 tablespoons of dressing at the very bottom. Next, add hard vegetables like cucumbers, radishes, or cherry tomatoes. Then add your grains, like 1/2 cup of quinoa. Follow that with your protein. Finally, pack the leafy greens at the top. The clear glass lets you see the vibrant layers. It looks so pretty sitting on the fridge shelf. I buy the organic mixed greens from Trader Joe’s for $2.49 a bag. They’ve got the perfect mix of baby spinach and arugula. They stay perfectly crisp for five days when you layer them this way. When you’re ready to eat, just shake the jar vigorously and dump it into a wide bowl. The dressing coats everything evenly, and the hard vegetables stay crunchy. I’ve saved so much money by not throwing away rotten spinach at the end of the week. No exaggeration. You might also like: 15 Creative Healthy Meal Prep Ideas That Make a Real Difference

M MCIRCO 10-Pack,30 Oz Glass Meal Prep Containers 2
M MCIRCO 10-Pack punches above its price — 23 buyers rated it 4.5 stars. I would buy it again.
4. Batch Cooking Components, Not Boring Meals

Most people get this wrong. They cook a massive pot of chili, portion it into five identical bowls, and call it a day. By Thursday, you’re so sick of chili you end up ordering a $25 DoorDash burrito out of sheer desperation. Don’t do that. You need to batch cook components, not just full meals. This is an expert tip that changed my life. I roast a huge tray of chicken breasts on Sunday. I portion out exactly 80g of cooked chicken per serving. Then I make a big batch of quinoa, measuring out 1/2 cup cooked per serving. I roast a variety of vegetables like zucchini and bell peppers. This lets me mix and match meals all week to prevent food burnout. Monday is a chicken and quinoa bowl. Tuesday is chicken tacos with corn tortillas. Wednesday is a cold quinoa salad. I buy bulk packs of chicken breasts at Costco for about $3.49 per pound to keep costs low. I divide them up, freeze half, and roast the rest. While I’m prepping, I also use a surprising tip. I bake my bacon. For perfectly crispy, straight bacon without standing over a popping grease fire, lay it flat on a baking sheet. Bake it at 400 degrees for 15 minutes. It frees you up to chop vegetables or wash dishes. I can’t stand frying bacon on the stove anymore. It makes my hair smell like grease for two days and ruins my stovetop. You might also like: 20 Gorgeous Meal Planning Ideas for Any Style
5. Why You’re Ruining Textures (The Hot Food Mistake)

This is my biggest pet peeve. I see people pulling steaming hot food off the stove and immediately snapping the lids onto their meal prep containers. Stop doing this. It’s a massive common mistake. Sealing hot food traps steam inside the container. That steam turns into heavy condensation. The water drips back down onto your perfectly roasted sweet potatoes and turns them into mush. Even worse, trapping heat creates the perfect breeding ground for bacterial growth. I ruined a whole batch of crispy roasted chickpeas last year because I sealed them while they were still warm. They turned soft, grainy, and tasted like damp sand. It was awful. I ended up throwing $15 worth of organic groceries straight into the trash. You must always allow food to cool completely to room temperature before sealing and refrigerating. I usually leave my glass containers open on the counter for about 45 minutes. I’ll go watch an episode of my favorite show while I wait. Once the food is cool to the touch, snap the airtight lids on. Your textures will stay crunchy and fresh. If you’re worried about leaving food out and forgetting it, just set a timer on your phone. I also recommend wiping the inside of the lid with a dry paper towel right before you seal it, just to catch any lingering moisture. It’s a tiny step that makes a huge difference. You might also like: 20 Lovely Work Lunch Ideas to Inspire Your Next Project
6. Smart Appliances and Pre-Cut Cheats

You don’t have to chop every single vegetable by hand. I used to spend three hours on Sunday just dicing onions and peeling carrots. My feet would ache, and my hands would smell like raw onions until Tuesday morning. Now, I utilize smart appliances and I don’t underestimate frozen or pre-cut ingredients. I use my Instant Pot to steam a whole head of cauliflower in literally four minutes. I use a slow cooker for tough cuts of pork. I use a rice cooker for perfect jasmine rice. This frees up your hands for other prep tasks. I also buy pre-washed and chopped vegetables. Yes, they’re slightly more costly. A bag of pre-chopped broccoli florets at Kroger is $3.29, compared to $1.99 for a whole head. But the 15 minutes of time you save is worth every single penny. I also rely heavily on frozen fruits for my morning smoothies. A 16 oz bag of frozen mango chunks is incredibly nutrient-dense because it’s flash-frozen at peak ripeness. You just toss 1/2 cup into the blender with some spinach and almond milk. It cuts my morning routine down to five minutes. I’ve stopped feeling guilty about buying the pre-cut stuff. It keeps me consistent, and that’s what actually matters. If spending an extra dollar means you’ll actually eat your vegetables this week, do it.

Vtopmart 5Pack 22oz Glass Storage Containers with Lids
Vtopmart 5Pack 22oz Glass Storage Containers with Lids punches above its price — 34 buyers rated it 4.5 stars. I would buy it again.
7. The Over-Oiling Disaster in Aesthetic Meal Prep

Let’s talk about oil. Healthy fats are important, but using too much oil is a total disaster for aesthetic meal prep. I used to drench my roasted vegetables in olive oil because I thought it made them taste better and crisp up faster. But when you put heavily oiled food in the fridge, the oil solidifies. You end up with a cold, gelatinous texture that coats the roof of your mouth in a really gross way. It makes reheating a nightmare. It’s a common mistake that ruins perfectly good meals. Use oil sparingly. I measure out exactly 1 tablespoon of avocado oil for an entire sheet pan of vegetables. I toss them in a large bowl to ensure an even coating before putting them on the hot cast iron pan. Instead of relying on oil for moisture, opt for cooking methods like air frying or baking. You can also rely on flavorful marinades or broths. I marinate my chicken in a mixture of lemon juice, garlic, and just 1 teaspoon of sesame oil. It stays incredibly juicy without turning greasy in the fridge. Skip the heavy, oil-based store-bought dressings too. They separate in the fridge and look terrible. A simple vinaigrette made with apple cider vinegar, Dijon mustard, a pinch of salt, and a tiny splash of olive oil is all you need. It stays emulsified and won’t turn into a solid block of fat.
8. FIFO, Labeling, and Photography Secrets

If you want your fridge to look like a professional kitchen, you need to adopt the culinary school hack called FIFO. First In, First Out. Always push the older meals to the front of the fridge shelves and put the fresh ones in the back. This ensures you consume older items first and prevents you from finding a mystery meal covered in green fuzz three weeks later. I use a simple strip of blue painter’s tape and a black Sharpie to label every single container. I write the meal name and the exact date of preparation. “Lemon Chicken – Oct 12.” It takes two seconds and saves so much confusion. The tape peels off easily before washing. Finally, if you want to take photos of your meals for Instagram or Pinterest, pay attention to your background. Food photography experts say to use neutral backgrounds. I place my glass containers on a raw wooden cutting board or a clean white marble countertop. I make sure there’s natural light coming from a nearby window. This ensures the bright colors of the food remain the absolute focal point. Don’t take photos under harsh yellow kitchen lights. It makes everything look sickly and unappetizing. Learned that the hard way. I’ve learned that a simple garnish, like a fresh lemon wedge or a sprinkle of black sesame seeds, makes the photo look incredibly professional. It takes two extra seconds but makes a massive visual impact.
Meal prep doesn’t have to be a miserable chore that ends in soggy salads and rubbery chicken. Once I switched to heavy glass containers, mastered my hand-sized portions, and stopped sealing my hot food, everything changed. I personally swear by these methods. They save me hours of stress and keep my grocery budget in check. Start small this Sunday. Pick two components to batch cook, like quinoa and chicken, and grab some Goo Gone for those old pasta jars. You’ll be amazed at how quickly your fridge starts looking like a piece of art. If you’re tired of throwing away spoiled food every Friday, these simple changes are exactly what you need. Pin this guide so you don’t forget the 50/25/25 rule when you’re standing confused in the produce aisle. You’ve got this. Let’s make this week delicious.
Frequently Asked Questions
What is the best container for aesthetic meal prep?
High-quality borosilicate glass containers are the best choice. Brands like Rubbermaid Brilliance or Ello Duraglass offer airtight silicone seals that prevent leaks, don’t stain, and allow you to see the vibrant layers of your food.
How do I keep my meal prep salads from getting soggy?
Always use clear glass jars and layer your ingredients strategically. Put your dressing at the very bottom, followed by hard vegetables, grains, proteins, and pack your delicate leafy greens at the very top.
Why does my meal prep get soggy in the fridge?
You’re likely sealing your containers while the food is still hot. This traps steam, which turns into condensation and drips back onto your food. Always let your food cool completely to room temperature before sealing.
What is the 50/25/25 rule in meal prep?
It’s a simple portioning rule for balanced, colorful meals. Aim to fill your container with 50% fruits and vegetables, 25% lean protein, and 25% grains or starchy carbohydrates.
