What’s Inside
- Build Meal Prep Lunches with the 50/25/25 Rule
- Keep Ingredients Separated in Leak-Proof Containers
- Air Fryer Chicken for Faster Meal Prep Lunches
- Batch Cook Grains and Proteins on Sundays
- Freeze Soups and Stews in Silicone Trays
- Sous Vide Proteins for Maximum Freshness
- Use Tinned Fish and Frozen Veggies for Budget Bowls
- Pack Dressings Separately to Save Your Greens
Last Tuesday at Whole Foods, I dropped my heavy canvas tote bag right in the middle of the crowded produce aisle. A poorly sealed glass container of balsamic vinaigrette shattered, exploding dark, oily liquid over three expensive organic avocados and my favorite cream-colored knit sweater. The sharp, acidic smell of cheap vinegar followed me for two straight days. Figuring out how to pack meal prep lunches shouldn’t end in public humiliation and ruined clothes. I did this wrong for months before I figured it out. It took me years, honestly. You don’t need to eat sad, soggy salads at your desk while your stomach grumbles at 2 PM. I’m here to show you how I stock my fridge for the week without losing my mind. The secret isn’t just cooking massive pots of plain white rice and dry chicken breasts. It’s about smart storage, specific temperatures, and knowing which ingredients actually survive past Tuesday. I’m skipping the fluff. These are the hard lessons I’ve learned from countless Sunday afternoons covered in flour, hot oil, and pure frustration. By the time we’re done, you’ll know exactly what to buy and what to avoid.
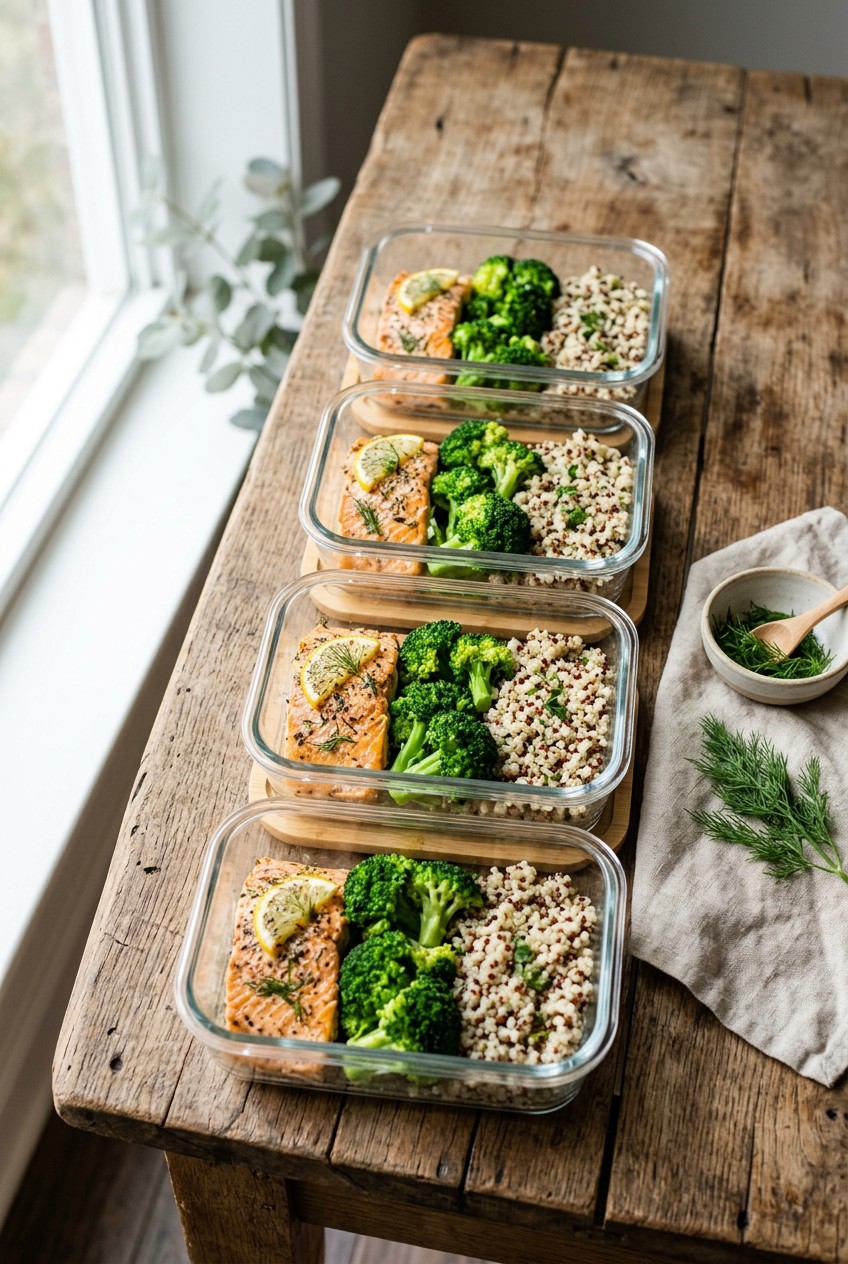
1. Build Meal Prep Lunches with the 50/25/25 Rule

Most people get this wrong right out of the gate. They pack a massive, heavy bowl of pasta with three tiny pieces of steamed broccoli and wonder why they’re asleep at their keyboard by 3 PM. I swear by the 50/25/25 rule for balanced meals. When you’re portioning your containers, you want exactly 50 percent fruits and vegetables, 25 percent lean protein, and 25 percent grains or starchy vegetables.
Let’s break down what this looks like in a glass container. A perfect setup consists of 2 cups of mixed dark greens and deeply roasted broccoli florets taking up half the space. Then, add 3 to 4 ounces of cooked chicken breast to one corner. Finally, scoop exactly 1/2 cup of cooked quinoa into the remaining spot. This specific ratio keeps your blood sugar stable.
I buy Target’s Good & Gather Organic Quinoa for exactly $2.99 per 16-ounce bag. It has a nutty, earthy smell when it boils and provides a fantastic chewy texture. Fiber is a huge deal right now for gut health and feeling full. I recommend mixing 1/2 cup of rinsed black beans, baked tofu cubes, or roasted chickpeas into that quinoa section. A Mediterranean Quinoa Salad with chickpeas is my favorite.
Skip the fat-free stuff. It tastes like wet cardboard. You need healthy fats to absorb the nutrients from those greens. Drizzle a little real olive oil over the top. I used to pack 80 percent rice and barely any protein. My stomach would literally growl during afternoon meetings. Fixing this ratio completely fixed my afternoon energy crashes. It’s a simple visual trick. Just draw an imaginary peace sign in your bowl and fill the sections accordingly. You won’t regret eating this way.
2. Keep Ingredients Separated in Leak-Proof Containers

If you’re still using those flimsy, stained plastic takeout boxes from last year, we need to have a serious intervention. I bought a cheap, generic set once, and the lids warped in the dishwasher after a single run. My roasted sweet potatoes ended up tasting exactly like the garlic salmon I packed next to them. It was disgusting. You need quality, leak-proof containers with thick dividers to prevent soggy meals and flavor mingling.
I’m obsessed with the OXO Prep & Go Divided Container. It runs around $10 to $15 at most big box stores. It features three distinct compartments and a heavy-duty leak-proof lid with thick silicone gaskets. It’s ideal for pairing a wet protein, like chicken in teriyaki sauce, with two dry sides without turning everything to mush.
For durability and reliability, I can’t recommend the Rubbermaid Brilliance containers enough. A 10-piece set costs around $25 to $35 at Walmart. They are clear, so you can see exactly what you’re grabbing from the fridge at 7 AM. They’re microwave, freezer, and dishwasher safe. The plastic latches make a loud, satisfying snap when you lock them down.
Here is a common mistake. Don’t store warm food in these airtight containers. If you seal hot roasted vegetables, it creates a ton of condensation on the lid. That moisture drips right back down, leading to rapid bacterial growth and a horribly mushy texture. Always allow your cooked food to cool down completely to room temperature. Give it at least two hours on the counter before snapping those Brilliance lids shut and stacking them in the fridge. I learned that the hard way. I ruined so many batches of roasted potatoes before I figured this out.
3. Air Fryer Chicken for Faster Meal Prep Lunches

Air fryers aren’t just a passing fad. They are essential for quick, healthy batch cooking. I used to bake chicken breasts in the oven on a sheet pan, and they always came out dry, pale, and rubbery. The air fryer changed my entire Sunday routine by producing crispy textures with barely any oil in a fraction of the time.
Every Sunday, I take 1.5 lbs of raw chicken breast, pat it completely dry with a paper towel, and toss it in a large metal bowl. I use a heavy hand with the spices. You need a diverse range of herbs to combat blandness, which add flavor with virtually zero calories. I mix 1 tablespoon of smoked paprika, 1 teaspoon of cumin, 1 teaspoon of garlic powder, and a heavy pinch of Italian seasoning. Rub that all over the meat until it’s coated red. You might also like: 15 Cozy Freezer Meals Ideas to Transform Your Space
I toss the seasoned chicken into my Ninja 4-Quart Air Fryer, which I grabbed for $89.99 at Costco. I set it to exactly 375 degrees Fahrenheit for 18 minutes. The trick is to open the basket and flip the chicken halfway through. You’ll hear the fat sizzling and see a gorgeous golden-brown crust forming on the edges. You might also like: 20 Inspiring Meal Prep Ideas for Any Style
When the chicken is done, I don’t wash the basket immediately. I throw in 2 cups of raw Brussels sprouts or broccoli florets, crank the heat to 400 degrees Fahrenheit, and fry them in the leftover chicken drippings for 10 minutes. The edges get almost burnt and crispy, which tastes incredible cold the next day. This entire process takes under thirty minutes and leaves my kitchen smelling like a fancy barbecue joint instead of a sterile hospital cafeteria. You might also like: 20 Clever Quick Lunch Ideas You Haven’t Thought Of

KOMUEE 10 Packs 30 oz Glass Meal Prep Containers
A dependable everyday pick — KOMUEE 10 Packs 30 oz Glass Meal Prep Containers pulls in 45 ratings at 4.5 stars. Not flashy, just solid.
4. Batch Cook Grains and Proteins on Sundays

Honestly, this changed how I view my entire weekend. I used to try and cook four distinct, complicated recipes on a Sunday afternoon. I’d end up with a sink full of twenty dirty pots, a flour-covered countertop, and a raging headache by 8 PM. Now, I focus strictly on ingredient prep instead of full meals.
Dedicate your time to cooking massive batches of versatile staples. I’ll boil 2 to 3 cups of dry quinoa or brown rice in vegetable broth. That small amount of dry grain magically yields 6 to 9 cups of cooked food. I also brown 1.5 to 2 lbs of lean ground turkey in a massive cast-iron skillet with diced onions. By storing these components separately in my 12-piece Rubbermaid Brilliance set, which runs about $33 to $40, I can mix and match all week to prevent boredom.
I usually buy Bob’s Red Mill Farro for $4.49 per 24-ounce bag at Sprouts. It has a dense, chewy bite that holds up beautifully in the fridge for days without getting gummy.
But here is a huge mistake most people make. They over-prep highly perishable items. While that cooked ground turkey will safely last up to 4 days in the fridge, your delicate leafy greens won’t. I used to chop romaine lettuce on Sunday and wonder why it was a slimy, black mess by Thursday. Aim to prep highly perishable items like chopped spinach, fresh berries, or sliced cucumbers for only 2 to 3 days in advance. You preserve the crisp texture and prevent throwing rotting, smelly food in the trash.
5. Freeze Soups and Stews in Silicone Trays

Don’t underestimate the power of a good freezer stash. Eating the exact same chicken and rice bowl four days in a row causes severe meal prep monotony. By Wednesday, you’re staring at your plastic container with pure hatred and ordering a twenty-dollar turkey club sandwich on DoorDash instead.
To fix this, I freeze individual portions of cooked meals. I am devoted to Souper Cubes. They cost around $15 to $20 per tray on Amazon or at Target. They are thick silicone molds with reinforced steel rims that let you freeze soups, heavy stews, and pasta sauces in convenient 1-cup or 2-cup square portions.
Last winter, I made a massive batch of spicy black bean chili. I poured the cooled chili into the 1-cup Souper Cubes tray, snapped on the tight plastic lid, and froze it overnight. The next morning, I just popped out a perfect, frozen brick of chili and dropped it into a round glass bowl.
When you microwave it at the office, the rich smell of cumin, crushed tomatoes, and garlic fills the breakroom. It tastes like it just came off the stove. You must ensure the food is completely cooled before pouring it into the silicone molds. If you freeze hot liquid, the ice crystals form rapidly on the surface. When you reheat it, all that extra ice melts and violently waters down your rich soup, ruining the thick texture you worked so hard to build. I ruined a beautiful lentil soup doing exactly that.
6. Sous Vide Proteins for Maximum Freshness

If you haven’t tried sous vide cooking yet, you’re missing out on the most tender meat of your life. Sous vide is French for “under vacuum.” It involves cooking food in a precisely temperature-controlled water bath. It sounds fancy, but it’s actually the laziest, most foolproof way to cook proteins.
I use an Anova Precision Cooker, which typically costs between $100 and $200 depending on the model. You attach this metal wand to the side of a large pot of water. You place your raw chicken breast or steak into a plastic bag, seal it tightly, and drop it in the water. The machine keeps the water at exactly 150 degrees Fahrenheit.
I buy Ziploc Freezer Bags for $5.49 for a 30-count box at Kroger. The vacuum-sealing method pushes all the air out. This doesn’t just guarantee perfectly cooked, juicy proteins. The lack of oxygen in the bag helps preserve freshness for days longer than normal Tupperware, drastically reducing food waste.
I do have to share a funny failure. The first time I tried this, I didn’t zip the top of the bag securely. I walked away for two hours. When I came back, the bag had filled completely with hot water, turning my expensive steak into a gray, boiled, rubbery disaster. I literally cried standing in my kitchen. Always double-check your seal. Once you get it right, the pull-apart texture of a sous vide chicken breast is unmatched. It shreds beautifully with just a fork.

8 Pack 36oz Large Glass Meal Prep Containers with lids
8 Pack 36oz Large Glass Meal Prep Containers with lids punches above its price — 866 buyers rated it 4.5 stars. I would buy it again.
7. Use Tinned Fish and Frozen Veggies for Budget Bowls

Groceries are painfully expensive right now. Buying fresh, out-of-season vegetables and premium cuts of meat every single week will drain your bank account fast. I’ve learned to utilize frozen vegetables and high-quality tinned fish for budget-friendly efficiency.
Frozen vegetables are picked and flash-frozen at their absolute peak ripeness. They offer a cost-effective shortcut. You eliminate the chopping phase and reduce your kitchen waste to zero. I dump a cup of frozen broccoli florets straight into my glass containers on Sunday. By Monday lunch, they’ve thawed perfectly in the fridge and are ready to be microwaved.
For protein, I lean heavily on tinned fish. Boneless and skinless sardines or wild-caught tuna provide an affordable, fast protein source that requires zero cooking. I grab Wild Planet Wild Sardines in Extra Virgin Olive Oil for $4.49 a tin at Whole Foods. Sometimes I’ll grab Trader Joe’s brand if I’m on a tighter budget.
I just dump the tin of fish over a bed of warm brown rice and top it with those steamed veggies. The rich, salty bite of the sardines mixes with the nutty rice perfectly. I also use infused olive oils to dress these bowls. Garlic or chili-infused oils act as an instant seasoning for plain vegetables.
Don’t forget to label and date everything in your fridge. This small step is crucial. I use a thick black permanent marker on a piece of masking tape to clearly label all prepped items with the exact date they were cooked. Cooked proteins are only safe for 3 to 4 days in the fridge. If you don’t label it, you’ll end up playing a dangerous game of guessing by Thursday.
8. Pack Dressings Separately to Save Your Greens

There is nothing worse than opening your lunch bag at noon to find a brown, wilted pile of lettuce swimming in a puddle of muddy vinaigrette. The acid in salad dressing breaks down the cellular walls of fresh greens in a matter of hours. It smells awful and tastes even worse.
To prevent your salads from becoming a soggy nightmare, you must store your dressings and sauces in small, separate containers. I treated myself to the Mepal Salad Lunch Box, which runs around $40. It’s a sturdy bowl that actually includes a tiny, leak-proof built-in dressing container right in the lid.
If you don’t want to spend forty bucks on a bowl, just buy small reusable silicone condiment cups. Even cleaned-out condiment packets from takeout joints work in a pinch. I usually pack 2 tablespoons of Primal Kitchen Greek Vinaigrette, which I buy for $7.99 an 8-ounce bottle at Target.
When it’s time to eat, I pour the dressing over the dry greens and shake the bowl violently. The crisp, loud crunch of fresh romaine lettuce is satisfying.
Also, keep an eye on the instant meal trend for 2026. The old “just add water” concept is getting a massive upgrade. I keep high-quality instant options in my desk drawer. Brands are making desk drawer ramen with real bone broth bases, spicy chili crisps, and adaptogenic add-ins. When I completely forget my meal prep at home on the kitchen counter, these instant meals save me from buying a greasy burger.
Prepping your food shouldn’t feel like a second full-time job. It just takes a little strategy, the right containers, and a stubborn refusal to eat soggy lettuce. I recommend starting with just the air fryer chicken and some rice this Sunday. Keep it simple. Don’t try to make six different complex recipes at once. You’ll burn out by week two and hate the entire process. Once you master the basics of temperature control and smart storage, you’ll never go back to paying fifteen dollars for a mediocre cafe salad. It’s just not worth it. Save this post, pin it to your favorite recipe board, and pull it up on your phone next time you’re standing confused in the grocery store aisle! You’ve got this, and your future hungry self will thank you.
Frequently Asked Questions
How long do meal prep lunches last in the fridge?
Most cooked meal prep lunches, especially those with lean proteins like chicken or ground turkey, will safely last 3 to 4 days in the fridge. Highly perishable items like chopped leafy greens or fresh berries should only be prepped 2 to 3 days in advance.
What are the best containers for meal prep lunches?
For meal prep lunches, you need durable, leak-proof options. The OXO Prep & Go Divided Container is great for keeping wet and dry ingredients separated. Rubbermaid Brilliance glass or plastic containers are excellent for their airtight seals, preventing condensation and bacterial growth.
How do you keep meal prep lunches from getting soggy?
The secret is packing your dressings and sauces separately. Use small reusable silicone condiment cups or a container with a built-in dressing lid. Also, ensure your cooked food cools completely to room temperature before sealing the lid to prevent trapped steam and condensation.
Can you freeze meal prep lunches?
Yes, freezing is perfect for soups, stews, and heavy sauces. Use silicone molds like Souper Cubes to freeze 1-cup or 2-cup portions. Just make sure the food is completely cooled before freezing to prevent ice crystals from watering down your meal when reheated.