What’s Inside
- Start With High-Fiber Tortillas for Your Meal Prep Burritos
- Build a Cheese Barrier for Moisture Control
- Cool Your Fillings Completely
- Choose Lean Proteins for Meal Prep Burritos
- Pick the Right Rice and Cook it Fluffy
- Pre-Cook and Drain High-Moisture Veggies
- Master the Art of Portion Control and Tight Rolling
- Wrap Individually and Flash Freeze
- Reheat in the Air Fryer for Crispy Perfection
- Add Fresh Sauces and Toppings Post-Reheating
I stood over my kitchen sink last Tuesday at 7 AM, watching sad, gray bean juice drip from the bottom of a split tortilla onto my favorite fuzzy slippers. My first attempt at meal prep burritos was a disaster. The tortilla was gummy, the filling was ice cold, and it smelled like wet cardboard. I’m here to tell you it doesn’t have to be this way. After wasting money and destroying dozens of tortillas, I finally figured out the science to making these work. You won’t believe how easy it is once you know the tricks. I’ve spent six months perfecting my freezer stash. Let’s fix your breakfast and lunch routine. Keep reading to see how I build, freeze, and reheat them so they taste fresh every single time.
1. Start With High-Fiber Tortillas for Your Meal Prep Burritos

I did this wrong for months. I used to buy the cheapest, flimsiest flour wraps at Walmart, and they’d disintegrate in my hands before I even got them to the freezer. Now, I prioritize high-fiber options for durability. My holy grail is the Mission Carb Balance burrito-sized tortillas. The 10-inch ones. They cost exactly $5.48 for an 8-count pack at my local Target. They have a stretchy texture that won’t tear when you pull them tight. Plus, they crisp up beautifully. Another solid option is the Ole Xtreme Wellness wraps, usually around $4.29 at Kroger. Before you put fillings inside, warm them up. Cold wraps are stiff and crack instantly. I wrap a stack of 4 in a damp paper towel and microwave them for exactly 25 seconds. They come out steaming, soft, and smelling like a warm bakery. You can also toss them on a hot cast iron pan for 10 seconds per side if you like that toasted smell. Skip the fat-free stuff. My sister hates the texture, but my husband can’t get enough of the high-fiber ones. Trust me. You need that flexibility to pack in your ingredients securely.
2. Build a Cheese Barrier for Moisture Control

If you take away one thing from my mistakes, let it be this. Wet ingredients are the enemy of a good freezer wrap. I learned this the hard way after packing a batch full of watery salsa and biting into a mushy, depressing mess two days later. You need a cheese barrier. It’s non-negotiable. Lay down exactly 2 tablespoons of shredded cheese in the center of your warm tortilla before adding anything else. I’m obsessed with the Tillamook Farmstyle Thick Cut Sharp Cheddar. I grab the 8 oz bag for $3.99 at Sprouts. The thick shreds melt perfectly and create a waterproof wall between the flour base and your beans or meats. When the warm fillings hit the cheese, it softens just enough to seal the pores of the wrap. If you’re using Monterey Jack, the Trader Joe’s brand at $2.99 for a 12 oz bag is fantastic too. Just spread it out in a thin, even rectangle. Don’t dump it all in a pile. The cheese needs to coat the bottom surface where the heavy, moist ingredients sit. It traps the grease and juices, keeping the outer shell dry and structurally sound.
3. Cool Your Fillings Completely

Most people get this wrong. I certainly did. Last November, I was rushing to finish my Sunday prep before a friend came over. I scooped boiling hot ground beef and steaming rice straight out of the pan and rolled up ten wraps. I threw them into the freezer. Two weeks later, I pulled one out to reheat, and it was a solid block of ice crystals. When I microwaved it, it turned into a soggy puddle. The heat from your fillings creates steam. If you wrap them while they’re hot, that steam gets trapped, turns into condensation, and ruins the texture. You have to let everything cool completely. I spread my cooked meats, rice, and beans out on a large metal baking sheet. The metal helps dissipate the heat quickly. I leave the tray in the fridge for at least 20 minutes. You want the ingredients cold to the touch. It feels weird, but I promise it’s the only way to prevent sogginess. I usually use this time to wipe down my counters or chop cilantro. Patience is crucial. If your black beans (I use the 15 oz cans from Whole Foods 365 brand, $1.19 each) aren’t cold yet, step away from the assembly line. You might also like: 20 Gorgeous Meal Planning Ideas for Any Style

Vtopmart 5Pack 22oz Glass Storage Containers with Lids
A dependable everyday pick — Vtopmart 5Pack 22oz Glass Storage Containers with Lids pulls in 32 ratings at 4.5 stars. Not flashy, just solid.
4. Choose Lean Proteins for Meal Prep Burritos

Let’s talk about meat. Heavy, greasy meats like cheap pork sausage will leak fat all over your freezer stash. The grease congeals into weird white lumps when frozen, and it’s gross when you bite into it. I strictly use lean proteins now. My go-to is 95% lean ground beef. I buy the 1 lb grass-fed packs at Trader Joe’s for $6.99. It browns up beautifully with 1 tablespoon of olive oil and a packet of low-sodium taco seasoning. It has plenty of flavor without the excess liquid fat. Ground turkey is another amazing option. I get the Jennie-O 93% lean ground turkey at Walmart for $4.48 a pound. If you want to keep costs low, shredded chicken breast is the winner. I buy a 3-pound family pack of boneless, skinless chicken breasts at Costco for about $2.99 per pound. I throw them in my slow cooker with a jar of salsa. Once shredded, that 3-pound batch yields enough meat for 16 hefty wraps. That brings the cost down to about $1.50 per meal. When you cook your meat, make sure you let all the liquid evaporate in the pan. You want it relatively dry but heavily seasoned. You might also like: 20 Clever Quick Lunch Ideas You Haven’t Thought Of
5. Pick the Right Rice and Cook it Fluffy

I used to think all rice was the same until I bit into a frozen wrap and hit a dense, gluey lump of mush. Short-grain or sticky rice will clump in the freezer and turn into a brick. You need long-grain white rice for the perfect texture. I swear by Jasmine rice. I buy the big 5-pound bag of Mahatma Jasmine Rice at Target for $7.59. The long grains cook up light and fluffy, but remain cohesive enough to stay put. The floral scent of Jasmine rice mixed with a squeeze of lime juice and 1/4 cup of chopped cilantro is heavenly. If you want more fiber, brown rice works too, but it takes longer. I measure exactly 1.5 cups of uncooked rice, rinse it until the water runs clear, and cook it. This yields about 4 cups, the perfect amount for a batch of ten. Rinsing the rice is mandatory. It removes the surface starch that causes clumping. When it’s done, I fluff it violently with a fork to separate the grains and let the steam escape before laying it out on my cooling tray. You might also like: 15 Gorgeous Chicken Breast Dinner Ideas That Make a Real Difference
6. Pre-Cook and Drain High-Moisture Veggies

Raw veggies don’t belong inside the freezer. I tried putting raw diced onions and bell peppers in my mix once. The freezing process destroyed their cell walls, and when I reheated them, they released a flood of water that turned everything into soup. You have to pre-cook your high-moisture vegetables. I chop up two large green bell peppers (usually $0.88 each at Walmart) and one large yellow onion. I sauté them in a skillet over medium-high heat with 1 tablespoon of avocado oil until they’re soft and slightly charred. The smell of sizzling onions and peppers is the best part of Sunday prep. Zucchini is another great filler, but it holds a ton of water. If I use zucchini, I roast it in the oven at 400 degrees for 20 minutes to dry it out. Regardless of how you cook them, you must drain the veggies. I let them sit in a fine mesh strainer over a bowl for 10 minutes before adding them to my assembly station. You’ll be shocked at how much liquid drips out. Keep that liquid far away from your tortillas.

M MCIRCO 10-Pack,30 Oz Glass Meal Prep Containers 2
A dependable everyday pick — M MCIRCO 10-Pack pulls in 23 ratings at 4.5 stars. Not flashy, just solid.
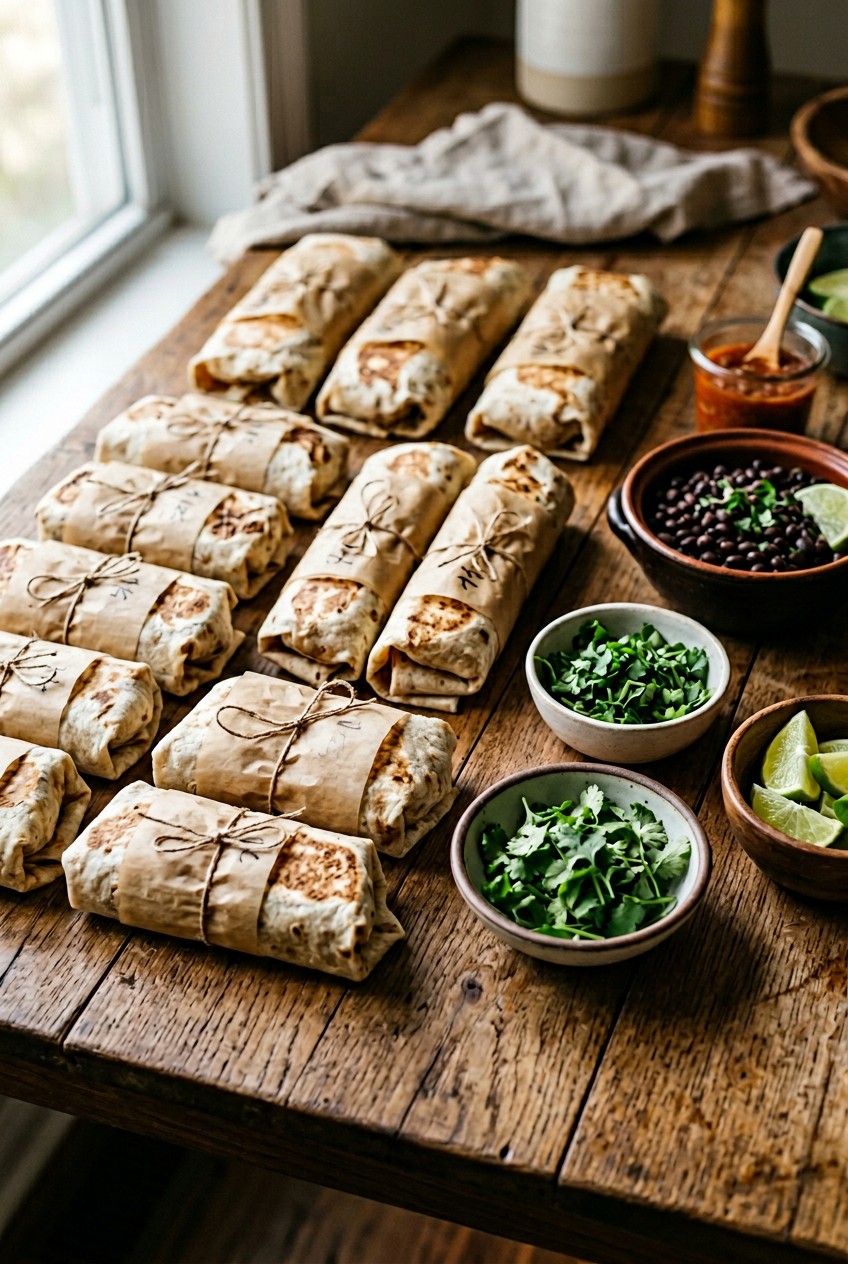
7. Master the Art of Portion Control and Tight Rolling

Overstuffing is my weakness. I always want to add one more spoonful of meat. But if you put too much filling inside, the tortilla will tear, and you won’t be able to seal the edges. A loose roll means freezer burn and messy eating. Less is more here. I measure exactly 1 cup of total ingredients per 10-inch tortilla. That’s roughly 1/4 cup of rice, 1/4 cup of beans, 1/4 cup of meat, and 1/4 cup of veggies and cheese. I use a standard metal measuring cup so I don’t cheat. To roll it tightly, follow a method. I fold in the left and right sides of the tortilla first, about two inches on each side. Then, I pull the bottom edge up and over the filling. Here is the trick. I pull the whole thing back tightly toward me, tucking the filling into a dense log under the flap. Then I roll it firmly upwards until the top edge seals underneath. It should feel like a firm, compact cylinder, not a squishy pillow. If it feels loose, unroll it and try again. A tight wrap pushes out the excess air, which is what causes freezer burn.
8. Wrap Individually and Flash Freeze

Don’t just throw your naked creations into a giant bag. I did this during my college years, and they froze together into an inseparable starch monster. I had to chisel them apart with a butter knife. You have to wrap them individually for longevity. I use a double-layer method. First, I wrap each one tightly in Reynolds Wrap heavy-duty aluminum foil ($5.49 at Kroger). I fold the ends of the foil in just like I folded the tortilla. Then, before I put them in bags, I flash freeze them. I place all the foil-wrapped logs on a baking sheet in a single layer with space between each. I put the tray in the freezer for two hours until they’re rock solid. Once they’re frozen, I transfer them into a gallon-sized Ziploc freezer bag ($6.29 at Target). This prevents them from squishing each other and freezing into weird shapes. I use a sharpie to write the date and contents on the bag. They stay fresh for up to 3 months this way, protected from freezer burn by the double layer of foil and plastic.
9. Reheat in the Air Fryer for Crispy Perfection

Microwaves are fine, but if you want to experience pure joy, use an air fryer. Microwaves often leave the edges chewy and the middle lukewarm. The air fryer makes the outside shatteringly crisp while heating the inside evenly. I have a Ninja 4-Quart Air Fryer ($89.00 at Target), and it’s my favorite appliance. I take a frozen wrap straight from the freezer, unwrap the foil, and place it in the basket. I set the temperature to 375 degrees and cook it for exactly 18 minutes. I flip it with silicone tongs halfway through. The tortilla puffs up and turns a gorgeous golden brown. It sounds hollow and crispy when you tap it with a fork. If you have to use a microwave at work, remove the foil and wrap the frozen log in a damp paper towel. Microwave it on the defrost setting for 2 minutes, then on high for 2 more minutes, flipping it every 30 seconds. Whatever method you use, buy a cheap digital meat thermometer. You must ensure the internal temperature reaches 165 degrees Fahrenheit. Eating a lukewarm chicken filling is a fast track to food poisoning, and we aren’t messing around with that.

8 Pack 36oz Large Glass Meal Prep Containers with lids
8 Pack 36oz Large Glass Meal Prep Containers with lids has been one of the most consistently praised picks in this category. 866 reviewers averaged 4.5/5.
10. Add Fresh Sauces and Toppings Post-Reheating

I used to pack sour cream and fresh guacamole inside before freezing. Let me save you the disgust. Frozen sour cream separates into a watery, curdled nightmare when reheated. Hot avocado turns brown and tastes bitter. Fresh lettuce wilts into slimy strings. Never put watery sauces or raw ingredients inside your freezer stash. Keep them separate. I buy the tiny 2 oz plastic condiment cups with lids (a pack of 50 is about $3.50 at Walmart). On Sunday, I portion out my sour cream, my favorite Herdez Salsa Verde ($2.98 at Sprouts), and some fresh cilantro into these cups. I keep them in the fridge. When I pack my lunch, I grab a frozen wrap and one of the little sauce cups. After I reheat my meal at the office, I dip each bite into the cold sauce. The contrast between the hot, crispy, spicy filling and the cold, tangy sour cream is incredible. It tastes like you just bought it from a gourmet food truck. It took me years to figure out that keeping the wet stuff separate is the secret key. It takes five extra minutes of prep on Sunday, but it completely changes the eating experience.
I’m so glad I stuck with this process instead of giving up after my first soggy disaster. Having a freezer full of these ready to go saves me at least $50 a week on takeout, and I actually look forward to eating them. I highly recommend spending an hour this Sunday making a batch of ten. You won’t regret it when Wednesday morning rolls around and you’re running late for work. If you found these tips helpful, please save this post and pin the images below to your favorite recipe boards so you can find it later!
Frequently Asked Questions
How long do meal prep burritos last in the freezer?
When wrapped properly in a double layer of foil and placed inside an airtight freezer bag, they will easily last up to 3 months. Always label your bags with the date so you know exactly when you made them.
Why do my burritos get soggy when I reheat them?
Sogginess usually happens if you wrap your fillings while they are still hot, trapping steam inside. It can also happen if you skip the cheese barrier or include watery ingredients like raw tomatoes and sour cream inside the wrap.
Can I microwave a frozen burrito without it getting hard?
Yes. The trick is to remove the foil, wrap the frozen burrito in a damp paper towel, and use the defrost setting first. Flipping it every 30 seconds helps it heat evenly without drying out the tortilla edges.
What is the best way to reheat burritos so they are crispy?
The air fryer is the absolute best method for a crispy shell. Unwrap the frozen burrito and air fry it at 375 degrees Fahrenheit for 15 to 20 minutes, flipping halfway through. It comes out golden and perfectly crunchy.