What’s Inside
- Optimize Your Ground Beef Meal Prep Purchases
- Employ Baking Soda for Enhanced Browning
- Batch Cook Efficiently to Prevent Steaming
- Use a Potato Masher for Efficient Crumbles
- Season Post-Browning for Maximum Flavor Impact
- Drain Fat Smartly with Aluminum Foil
- Divide and Conquer with Flavor Bases
- Incorporate Lentils or Mushrooms to Stretch Portions
- Invest in Quality Glass Meal Prep Containers
- Utilize Flat Freezing for Ground Beef Meal Prep
- Avoid the Common Mistake of Counter Thawing
- Cook Ground Beef Directly from Frozen
Last Tuesday at Whole Foods, I stared at a sad, gray puddle of meat in my hot cast iron pan and nearly cried. I’d totally ruined my ground beef prep for the week by crowding the pan until it smelled like wet dog and tasted like rubber. I tossed three pounds of ruined food that night. It’s a rite of passage, honestly. Ground beef prep doesn’t have to end in tears and gray mush. I’ve spent the last three years figuring out how to make cheap meat taste amazing. Skip the fat-free stuff. It tastes like wet cardboard. Let’s fix your routine. I’m going to walk you through exactly how I do this every single Sunday. You won’t believe how easy it is once you know the tricks. I promise your kitchen won’t look like a disaster zone when we’re finished.
1. Optimize Your Ground Beef Meal Prep Purchases

I’m a massive fan of buying in bulk. If you’re buying one pound at a time, you’re throwing money away. You need to pick your beef for both value and quality. I swear by the Kirkland Signature 90/10 ground beef from Costco. You’ll usually find it priced around $3.29 to $4.99 per pound for a massive 10-pound log. The 90/10 ratio is the perfect balance of leanness and flavor. You get enough fat to keep things juicy, but you aren’t left swimming in grease. If you don’t have a Costco membership, check out Aldi. Aldi’s grass-fed organic ground beef runs about $3.99 per pound for the 85/15 blend. I’ve seen their 93% lean hit $6.19 per pound, which is getting a bit steep. I tried buying the super cheap 73/27 blend at Sprouts once. It was a disaster. Stick to 85/15 or 90/10. Beef prices are projected to reach around $6.74 per pound by 2026. Buying in bulk right now is the smartest thing you can do for your grocery budget. You’ll thank yourself later when prices spike next year.
2. Employ Baking Soda for Enhanced Browning

Most people get this wrong. They throw raw meat into a cold pan and hope for the best. If you want a superior, crusty brown on your meat, you need a secret weapon. I learned that the hard way. You need to use baking soda. Dissolve exactly 3/4 teaspoon of Arm & Hammer baking soda (it’s about $1.29 for a 1-pound box at Target) in 2 tablespoons of tap water. Mix this slurry directly into 2 pounds of raw ground beef before cooking. Let it sit for about fifteen minutes. The baking soda raises the pH level of the meat. This promotes the Maillard reaction, that scientific term for that gorgeous, savory brown crust. I tried this wrong for months. I used way too much baking soda the first time, and the meat tasted vaguely like soap. Stick to the exact measurements. Once you get it right, the sizzling sound it makes when it hits the hot cast iron pan is incredible. You won’t ever go back to cooking bare meat. I keep a small box of baking soda right next to my stove just for this.
3. Batch Cook Efficiently to Prevent Steaming

I mentioned my gray meat puddle disaster earlier. That happens when you crowd your pan. If you dump three pounds of cold meat into a small skillet, the temperature drops instantly. The meat releases all its juices, and suddenly you’re boiling your dinner. To achieve perfectly browned crumbles, cook in batches. Use a heavy, large skillet. I rely on my Lodge 12-inch cast iron skillet ($29.90 at Walmart). A 10-inch diameter is the absolute minimum you need for just 1 pound of beef. You need empty space in the pan to allow moisture to evaporate quickly. If you’re prepping four pounds for the week, do it in four separate rounds. It takes a little more time, but the flavor difference is massive. Let the pan get ripping hot between batches. Add a tiny splash of oil, drop the meat in, and don’t touch it for at least three minutes. Let that bottom layer develop a hard sear. I’ve ruined so many meals by stirring constantly. Put the spatula down. Let the heat do the hard work. The caramel-butter smell of properly seared beef filling your kitchen is the ultimate reward.

8 Pack 36oz Large Glass Meal Prep Containers with lids
A dependable everyday pick — 8 Pack 36oz Large Glass Meal Prep Containers with lids pulls in 859 ratings at 4.5 stars. Not flashy, just solid.
4. Use a Potato Masher for Efficient Crumbles

Breaking up a pound of meat with a wooden spoon is exhausting. A lesser-known trick for quickly breaking up meat into fine, even crumbles is to use a standard potato masher. I use the OXO Good Grips stainless steel masher ($14.99 at Kroger). As soon as the meat hits the hot pan and gets that initial sear, press the masher directly into the block. Twist and push down. It separates the meat into perfect, uniform little pieces in about ten seconds flat. This tool helps achieve an even texture, especially when cooking larger batches. I swear by this for making meat sauces or chili where you don’t want giant, awkward chunks floating around. I tried using a fancy plastic meat chopper tool I saw on TikTok, but it melted slightly on the edges of my cast iron pan. That was a toxic disaster I don’t want to repeat. Stick to a sturdy metal potato masher. It cleans up easily in the dishwasher and gives you that perfect fast-food style fine crumble every time. You’ll be amazed at how much faster the cooking goes when the pieces are small. You might also like: 15 Creative Cold Lunch Ideas to Transform Your Space
5. Season Post-Browning for Maximum Flavor Impact

Stop putting your expensive spices on raw meat. This is a massive mistake. When you season ground beef at the very beginning, the spices mix with the fat as it renders out. When you drain the grease, you pour all your expensive cumin and chili powder right down the drain. You’re literally washing your money away. Instead, brown the beef completely first. Drain the excess fat, return the pan to the stove, and then add your seasonings. This ensures the spices adhere better to the meat. I love using the Trader Joe’s Taco Seasoning packets ($0.99 for a 1.25 oz envelope). I sprinkle the whole packet over 1 pound of cooked, drained meat, then add exactly 1/2 cup of water. Let it simmer until the water evaporates and the spices create a thick, glossy sauce coating every single crumble. The smell of paprika and garlic hitting the hot, clean meat is intoxicating. I used to wonder why my homemade tacos tasted bland compared to restaurants. This timing adjustment fixed everything. The flavor locks into the meat, and your dishes won’t taste watered down. Always bloom your spices in the residual heat for about thirty seconds before adding the water. You might also like: 15 Creative Healthy Meal Prep Ideas That Make a Real Difference
6. Drain Fat Smartly with Aluminum Foil

Figuring out what to do with hot beef grease used to be my least favorite part of cooking. I used to pour hot grease directly down my kitchen sink drain. I ended up with a $300 plumber bill right before Thanksgiving because the fat solidified and completely blocked my pipes. Now, I create a little foil cup in my sink drain. I take a 12-inch square of Reynolds Wrap Heavy Duty foil ($5.49 at Target) and push it gently down into the sink drain basket to form a bowl shape. I place a mesh strainer over the top. Then, I pour the hot beef and fat directly into the strainer. The fat drips down and collects safely in the foil cup. The heavy-duty foil won’t tear under the heat. Let the grease sit there for an hour until it cools into a solid, opaque white puck. Then you just fold the foil over it and toss it in the trash. It’s incredibly satisfying to throw away, and it keeps your plumbing perfectly safe. Don’t buy cheap, thin foil for this trick. I tried a dollar store brand once, and the hot grease melted right through it. Cleaning up hot grease is annoying, but this foil trick makes it completely painless and mess-free. You might also like: 15 Brilliant Salmon Dinner Ideas for Any Style

Skroam 10 Pack Glass Meal Prep Containers
A dependable everyday pick — Skroam 10 Pack Glass Meal Prep Containers pulls in 56 ratings at 4.5 stars. Not flashy, just solid.
7. Divide and Conquer with Flavor Bases
Eating the exact same flavor profile for five days straight is a guaranteed way to fail at your diet. You’ll get bored and order takeout by Wednesday. After batch cooking and draining a massive pile of plain ground beef, I divide it into precise 1-pound portions. Then, I season each portion differently. This prevents meal prep boredom entirely. For example, I’ll take the first 1-pound portion and mix in 1 tablespoon of Italian seasoning and 1/2 cup of marinara sauce for pasta dishes. I’ll take the second portion and add 1/4 cup of Kikkoman soy sauce ($3.49 at Walmart), 1 tablespoon of sesame oil, and 2 minced garlic cloves for Asian-inspired rice bowls. The third portion gets my favorite taco seasoning for Mexican salads. You cook once, but you get three entirely different meals for the week. The smell of garlic and soy sauce hitting the warm beef is incredible. I used to prep huge batches of just chili, and I’d be gagging by the fourth day. Portioning out flavor bases takes maybe five extra minutes, but it completely saves your sanity. Store these flavored portions in separate containers, and you’ll actually look forward to opening your fridge.
8. Incorporate Lentils or Mushrooms to Stretch Portions

Meat is expensive. If you want to cut your grocery bill down, you need to learn how to stretch your portions. To extend your ground beef and boost the nutritional value, mix in cooked lentils or finely chopped mushrooms. I take 8 ounces of baby bella mushrooms ($2.99 at Trader Joe’s) and pulse them in my food processor until they match the size of the beef crumbles. I cook them right alongside the meat. The mushrooms act like little sponges, soaking up all the beefy flavor while adding massive volume. If I’m making chili or sloppy joes, I’ll fold in 1 cup of cooked Whole Foods organic brown lentils ($2.29 for a 16 oz bag). Lentils add a huge hit of protein and fiber. I tried adding black beans once, but the texture was too chunky and obvious. Lentils blend in perfectly. Your meals become so much more filling, and your cost per serving drops well under $3.00. It’s a brilliant way to sneak extra vegetables into your diet without feeling like you’re eating rabbit food. The earthy flavor of the mushrooms actually enhances the savory notes of the beef beautifully.
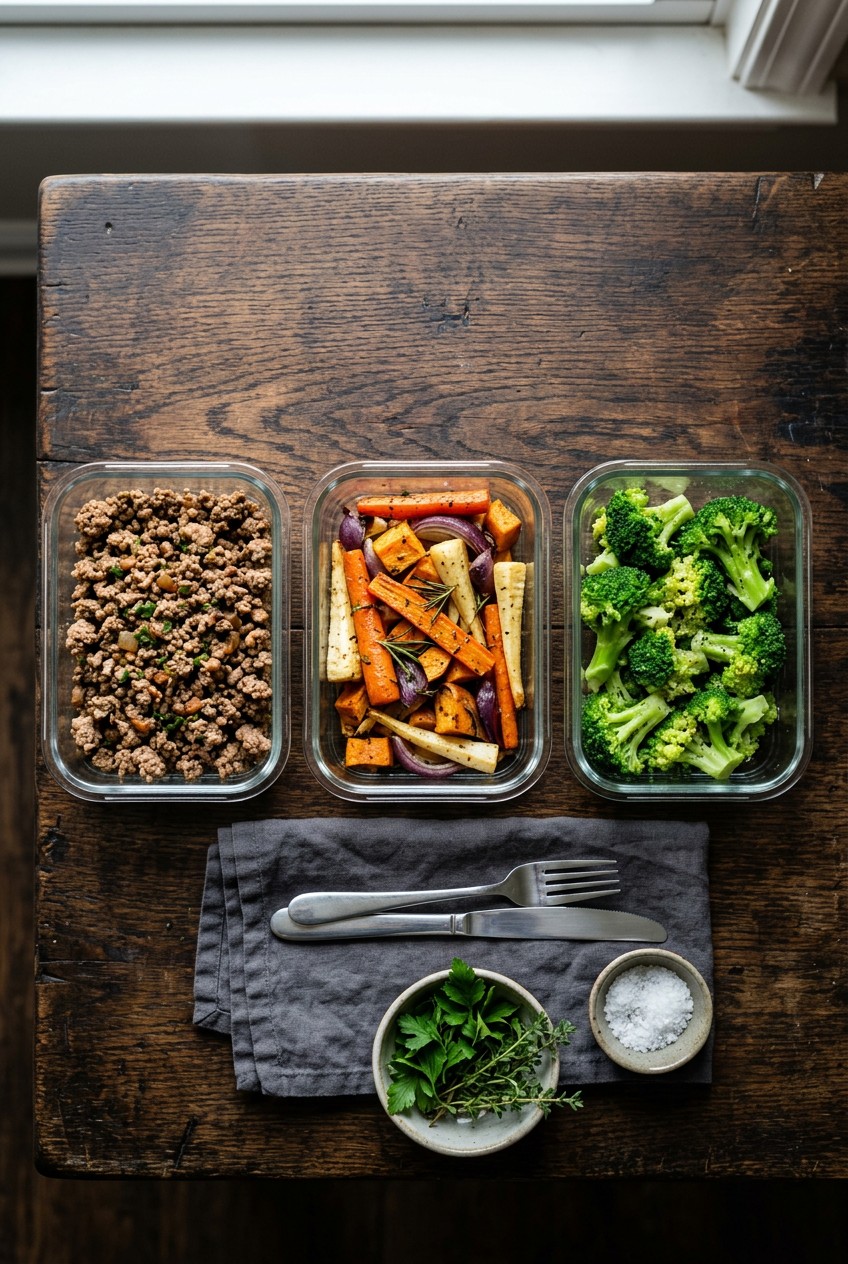
9. Invest in Quality Glass Meal Prep Containers

Stop putting your beautiful, hard-earned meals into cheap plastic tubs. Plastic absorbs odors, stains instantly, and warps in the microwave. I ruined an entire set of plastic containers by storing spaghetti sauce in them. They turned a permanent, glowing radioactive orange. For durability and even reheating, you must use glass meal prep containers. I exclusively use Pyrex 3-cup rectangular glass containers ($22.99 for a 6-pack at Costco). Glass containers reheat your food incredibly evenly. You won’t get those gross cold spots in the middle of your meat. They also don’t hold onto smells. You can store garlic beef in them on Tuesday, wash them, and put fresh fruit in them on Friday without any weird flavor transfer. The snap-on lids keep everything airtight, meaning cooked ground beef can be safely refrigerated for 3 to 4 days without drying out. The heavy glass feels incredibly satisfying to stack in the fridge. Yes, they’re heavier to carry in your lunch bag, but the trade-off is absolutely worth it. Your food literally tastes better when it’s not absorbing microscopic plastic chemicals. Plus, you can pop the glass base directly into the oven if you want to bake.
![C CREST [10 Pack] Glass Meal Prep Containers](https://m.media-amazon.com/images/I/81HfSfzlqUL._AC_UL320_.jpg)
C CREST [10 Pack] Glass Meal Prep Containers
A dependable everyday pick — C CREST [10 Pack] Glass Meal Prep Containers pulls in 348 ratings at 4.5 stars. Not flashy, just solid.
10. Utilize Flat Freezing for Ground Beef Meal Prep
If your freezer looks like a chaotic avalanche of lumpy plastic bags, you need this trick. Freezing big, round balls of meat takes up way too much space and takes days to thaw. When freezing ground beef, I portion it into exact 1-pound amounts. I place the meat inside a Ziploc gallon freezer bag ($11.89 for a 60-count box at Target). Before sealing it, I use a rolling pin to press the meat completely flat until it fills the entire bag in a thin, even layer. Then I squeeze out all the air and seal it. These flat sheets of meat stack together like books on a shelf. A flat sheet of meat thaws in the fridge in a fraction of the time a thick block takes. I used to freeze big clumps, and the outside would be warm while the center was still a rock-solid ice cube. Flat freezing prevents that entirely. Just make sure you label the bags with a sharpie. Frozen ground beef maintains its best quality for about 4 months. Writing the date and the specific flavor profile on the bag takes two seconds and saves you from mystery meals later.
11. Avoid the Common Mistake of Counter Thawing

We’ve all done it. You pull meat from the freezer at 8 AM and leave it sitting on the kitchen counter all day while you’re at work. Never thaw ground beef on the kitchen counter. This is incredibly dangerous. Leaving meat out allows bacteria to multiply rapidly in what the USDA calls the ‘danger zone’ (between 40°F and 140°F). I got terrible food poisoning in college from doing exactly this, and I wouldn’t wish that misery on anyone. Always thaw your ground beef safely. The best method is placing the flat-frozen bag in the refrigerator overnight. It usually takes 12 to 24 hours for a 1-pound package to thaw completely. If you’re in a rush, you can thaw it in a bowl of cold tap water. Just make sure the meat is in a leak-proof bag, and change the water every 30 minutes so it stays cold. You can also use the microwave’s defrost setting, but I find this often cooks the edges of the meat while the center remains frozen. Plan ahead and use the fridge. It’s the only way to keep the texture perfect. Your health is worth the tiny bit of extra planning required to move a bag safely.
12. Cook Ground Beef Directly from Frozen
Sometimes you completely forget to thaw your meat. It happens to me at least once a month. Don’t panic, and don’t order a $30 pizza. You can actually cook ground beef directly from frozen. Place your rock-solid frozen block of beef directly into a hot, lightly oiled skillet. I use 1 tablespoon of Pompeian olive oil ($7.49 at Kroger). Allow the block to sear hard on one side for about three minutes. You’ll hear a loud hissing sound as the ice hits the hot oil. Then, flip the block over. Take your spatula and scrape the browned, cooked layer off the top. As the heat penetrates the block, keep flipping and scraping off the thawed outer layers until the entire block is broken down into crumbles. Continue cooking until it’s fully browned and reaches an internal temperature of 160°F. I tried doing this with a massive two-pound block once, and it took way too long, so stick to 1-pound blocks for this trick. It’s a lifesaver on busy weeknights when your meal prep plans fall apart. Just remember to add your seasonings at the very end, as the melting ice washes them away.
Ground beef meal prep shouldn’t be stressful, and it definitely shouldn’t taste bland. If you follow these exact steps, you’ll have a fridge full of incredible, cheap meals ready to go every single week. I swear by the flat freezing and the baking soda tricks. They completely changed my Sunday prep routine. You won’t ever have to eat rubbery, gray meat again. Pin this article so you have all the measurements handy for your next grocery run, and let me know which flavor base you end up trying first! I’m always looking for new seasoning ideas to add to my rotation.

VERONES 10 Pack 22 OZ Glass Meal Prep Containers
If you want something that just works, VERONES 10 Pack 22 OZ Glass Meal Prep Containers is a safe bet (18 reviews, 4.5 stars).
Frequently Asked Questions
How long does ground beef meal prep last in the fridge?
Cooked ground beef can be safely stored in airtight glass containers in the refrigerator for 3 to 4 days. If you can’t eat it within that timeframe, it’s best to freeze the cooked portions immediately to maintain freshness and prevent bacterial growth.
Can I freeze cooked ground beef meal prep?
Yes, freezing is highly recommended. Portion your cooked, cooled beef into freezer-safe bags, press them flat to save space, and freeze. Flat-frozen cooked ground beef maintains its best quality and flavor for up to 4 months and thaws incredibly fast.
Why does my ground beef meal prep taste bland?
You’re likely seasoning the raw meat before cooking. When the fat renders out and you drain the pan, your spices wash down the sink. Always brown and drain your meat completely first, then add your seasonings with a splash of water.
What is the best meat ratio for ground beef meal prep?
A 90/10 or 85/15 lean-to-fat ratio is ideal for meal prep. These blends offer enough fat to keep the meat juicy and flavorful during reheating, but they won’t leave your meal prep containers swimming in a pool of greasy liquid.