What’s Inside
- Pick Sturdy Greens For Your Meal Prep Salad
- Master The Upside-Down Mason Jar Method
- Dry Your Produce Like Your Life Depends On It
- Upgrade To Airtight Glass Containers Immediately
- Keep Your Dressings In Separate Tiny Containers
- Cool Your Cooked Proteins Completely Before Packing
- Choose Resilient Veggies That Won’t Turn To Mush
- Steal The Upside-Down Paper Towel Trick For Clamshells
- Bulk It Up With Hearty Grains And Legumes
- Try Ingredient Prepping For Your Meal Prep Salad
Last Tuesday night, I stood in front of my open fridge and pulled out what used to be my Tuesday lunch. Instead of a crisp, refreshing meal prep salad, I was holding a slimy, black-green swamp of rotting spring mix that smelled like an abandoned fish tank. That was the exact moment I realized my entire approach to Sunday prep was broken. I threw the whole plastic container straight into the trash. It’s frustrating to spend your hard-earned money and precious weekend hours chopping vegetables, only to eat something that feels like a punishment by Wednesday. You’re probably here because you’ve experienced that exact same soggy disappointment. I tried this wrong for months before figuring it out. I’d buy delicate greens, dump hot chicken directly on top of them, and wonder why my lunches were a total disaster. Learned that the hard way. But making a meal prep salad that actually survives in the fridge for four days isn’t magic. It’s just a few specific strategies, the right glass containers, and a little bit of patience on Sunday afternoon. Let’s fix your lunch routine right now so you actually look forward to eating your greens instead of dreading them.
1. Pick Sturdy Greens For Your Meal Prep Salad

I personally swear by leaving delicate greens at the grocery store if you plan to eat them past Monday. Registered Dietitians at Berry Street actually advocate for hearty greens because they’re structurally tough enough to survive a few days in the cold refrigerator environment. I used to buy the massive 16 oz plastic tub of organic spring mix at Trader Joe’s for $5.49. I thought I was being so healthy. But by Wednesday, those delicate little red leaves would turn into a wet, sticky paste stuck to the sides of my glass bowl. It’s totally gross. Now, I exclusively use chopped Lacinato kale, thick green cabbage, or crisp romaine hearts for my base. Heartier greens don’t wilt as easily and stay crisp for up to a week when stored correctly. If you absolutely need that soft baby spinach, you’ve got to add it fresh on the day you plan to eat it. When I prep my kale, I physically rip out the thick middle ribs. They’re too tough to chew and taste bitter. I chop the dark green leaves into tiny, bite-sized ribbons. Massaging the kale with a tiny drop of olive oil helps soften it up, but don’t overdo it or you’ll defeat the purpose of keeping it dry. A large bundle of organic kale at Whole Foods costs about $2.99, and it yields enough sturdy base for four massive lunches. It’s cheaper, tastes better, and lasts twice as long.
2. Master The Upside-Down Mason Jar Method

Honestly, this changed how I pack my lunches forever. If you’re tired of pulling out a giant plastic tub that takes up half your work bag, you need to try mason jar layering. I exclusively use the classic Ball Mason jars. You can grab a set of 12 wide-mouth quart jars for exactly $16.99 at Target. The wide mouth is non-negotiable. If you buy the regular mouth jars, you won’t be able to get your fork in there to eat comfortably, and dumping the ingredients out onto a plate becomes a messy nightmare. Here’s the secret formula. Put exactly 2 tablespoons of your liquid dressing at the very bottom of the heavy glass jar. Next, layer your heavy, non-absorbent ingredients directly into the dressing. I usually drop in 1/4 cup of whole chickpeas or thick chunks of red bell peppers. They actually marinate in the dressing and taste significantly better by day three. Next, layer your cooked proteins, then your cooked grains, and finally, stuff your leafy greens all the way at the top. This upside-down layering technique prevents the delicate greens from ever touching the liquid until you shake it up. I learned this the hard way. I used to put the greens on the bottom. By lunchtime, my romaine was soaking in balsamic vinegar and looked like wilted seaweed. Keep the greens high and dry.
3. Dry Your Produce Like Your Life Depends On It

Excess moisture is the primary culprit behind soggy lunches. Most people get this wrong. They wash their lettuce, give it a half-hearted shake over the kitchen sink, and throw it straight into a container. That leftover tap water acts like an accelerant for rot in your fridge. You absolutely need a high-quality salad spinner. I bought the OXO Good Grips Large Salad Spinner for $29.99 at Target, and it’s worth every single penny. I spin my washed greens at least three times to use centrifugal force to blast the water off. Then, I dump them onto a clean kitchen towel and pat them completely dry. But I don’t stop there. For an extra measure of safety, I place a fresh, dry paper towel directly inside my glass container with the greens. The paper towel absorbs any lingering condensation that builds up in the cold fridge. It can significantly extend their shelf life. I also started using a quick vinegar wash for my heavier veggies. I fill a large metal mixing bowl with cold water and add exactly 2 tablespoons of Heinz distilled white vinegar. I soak my tomatoes and peppers for five minutes, rinse them under cold water, and dry them aggressively. It helps eliminate surface bacteria and keeps things crunchy for days. You might also like: 20 Lovely Work Lunch Ideas to Inspire Your Next Project

M MCIRCO 10-Pack,22 Oz Glass Meal Prep Containers
If you want something that just works, M MCIRCO 10-Pack is a safe bet (86 reviews, 4.5 stars).
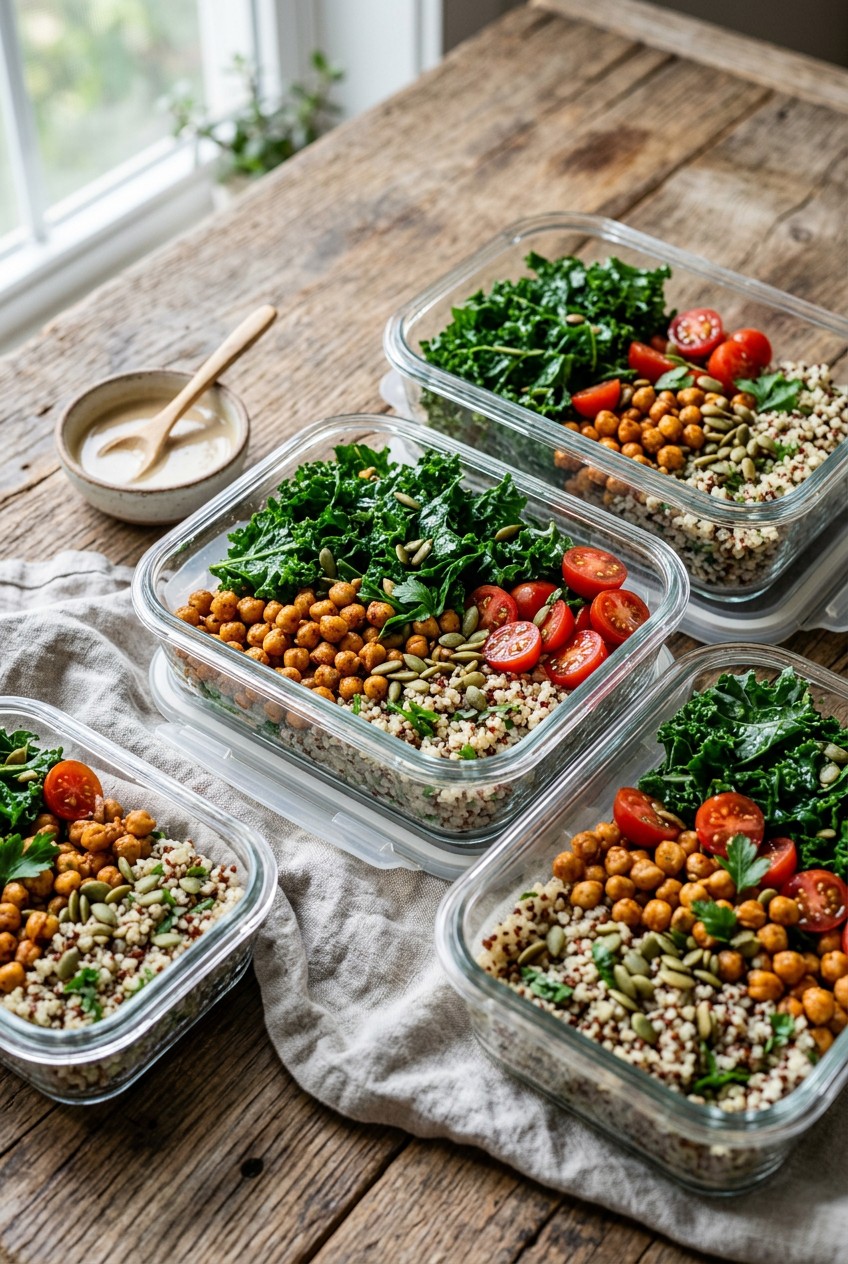
4. Upgrade To Airtight Glass Containers Immediately

Stop using those flimsy plastic takeout containers you washed and saved from last month’s pad thai order. They warp in the hot dishwasher, the thin lids don’t seal properly, and they let in ambient air that kills your fresh produce. Glass containers with secure, airtight silicone seals are infinitely superior for meal prep. They prevent moisture buildup and trap the crispness inside. I highly recommend the OXO Smart Seal Glass Container Sets. I found a great multi-piece set for $29.99 at Costco last month. They’re incredibly heavy, but they’re microwave, oven, freezer, and dishwasher safe. If you’re on a tighter budget and absolutely need plastic, the Bentgo Prep 20-Piece Mint Meal Prep Containers are a decent alternative. You can get a set of 20 for around $16.99 at Walmart. They’re BPA-free and stack beautifully in a small apartment fridge. But honestly, I always push for heavy glass. Plastic holds onto ghost smells forever. I once prepped a huge batch of chopped red onions in a cheap plastic tub. For the next three weeks, every single thing I put in that container tasted faintly of old onions, even after running it through the dishwasher twice on the sanitize cycle. Glass won’t betray you like that.
5. Keep Your Dressings In Separate Tiny Containers

A massive meal prep mistake is dressing your greens on Sunday afternoon. Prevent soggy greens by storing your liquids in small, separate, leak-proof containers. I use the Sistema 1 oz Condiment Containers. You can grab a multi-pack for $6.99 at Kroger. They have twist-top lids that actually stay shut when they get jostled around. I once used a cheap snap-lid container for my homemade vinaigrette. It popped open in my canvas tote bag on the subway. My leather wallet smelled like pungent garlic and olive oil for a solid year. It was a complete disaster. Add your dressing just before serving. Also, take ten minutes on Sunday to batch prepare a homemade dressing. Skip the fat-free stuff from the store. It tastes like wet cardboard and is usually packed with weird gums and chemical thickeners. A basic vinaigrette is incredibly easy to make from scratch. I use a simple ratio of 1/2 cup extra virgin olive oil to 1/4 cup balsamic vinegar, plus a heavy pinch of sea salt and a large spoonful of spicy Dijon mustard. I shake it up vigorously in a small 8-ounce Weck Jar and keep it in the fridge door. It takes two minutes and tastes a million times better than bottled. You might also like: 15 Cozy Easy Dinner Ideas for Every Budget
6. Cool Your Cooked Proteins Completely Before Packing

This is another huge lesson I learned through painful trial and error. If your lunch includes cooked proteins like grilled chicken breast, baked tofu, or hard-boiled eggs, you must let them cool down to room temperature before assembling your containers. I used to pull hot 4 oz portions of roasted chicken right out of the oven and drop them directly onto a bed of crisp romaine lettuce. I’d snap the plastic lid on and shove it straight into the fridge. I thought I was being so efficient. Wrong. Hot ingredients generate massive amounts of steam and condensation inside a sealed container. That trapped steam drips down the cold glass sides and pools at the bottom, accelerating spoilage and instantly wilting your delicate greens. You’ll end up with warm, limp lettuce and terribly waterlogged chicken. It’s disgusting. Now, I spread my cooked proteins out on a metal baking sheet and leave them on the kitchen counter for at least thirty minutes. I do the exact same thing with my roasted sweet potatoes and hot quinoa. Once they’re entirely cool to the touch, then I portion them into my OXO glass containers. It adds a little bit of waiting time to your Sunday prep session, but it saves the texture of your food. Trust me on this. You might also like: 20 Clever Quick Lunch Ideas You Haven’t Thought Of

Skroam 10 Pack Glass Meal Prep Containers
Honestly, Skroam 10 Pack Glass Meal Prep Containers surprised me — sturdier than it looks in the photos, and over 56 buyers gave it 4.5 stars.
7. Choose Resilient Veggies That Won’t Turn To Mush

Not all vegetables are equally suited for sitting in a dark fridge for four days. You have to prioritize sturdy options. I load my glass bowls up with thick slices of red bell peppers, freshly shredded carrots, raw broccoli florets, and spicy radishes. These hard vegetables maintain their firm texture and provide a satisfying loud crunch for several days. I stopped chopping watery vegetables like cucumbers or zucchini on Sundays. Cucumbers are basically just crunchy water. Once you slice them open, they immediately start weeping liquid. By Tuesday afternoon, chopped cucumbers get this weird, slimy film on them that ruins everything they touch. If you love cucumbers, keep them whole in the crisper drawer and slice off a few rounds right before you leave for work in the morning. The same rule applies to large tomatoes. Never chop a massive beefsteak tomato for meal prep. It’ll turn into a messy puddle. Instead, use whole cherry tomatoes. I buy the Nature’s Sweet Cherubs. Because their outer skin is intact, they won’t leak acidic juice all over your carefully dried kale. They hold up perfectly until Friday.
8. Steal The Upside-Down Paper Towel Trick For Clamshells

If you buy large quantities of greens in those clear plastic clamshell boxes, you absolutely need this lesser-known trick. I saw users like @kailinschoice post about this online, and I decided to test it myself. I usually buy the massive 1 lb plastic clamshell of organic baby spinach at Costco for $4.99. The huge problem with those boxes is that cold condensation builds up on the top lid, then drips back down onto the delicate leaves, causing them to rot in gross, slimy patches. Here’s the easy fix. As soon as you get home from the grocery store, open the clamshell. Place two or three dry paper towels directly over the top of the greens. Close the plastic lid tightly. Then, flip the entire plastic container upside down before sliding it onto your refrigerator shelf. This technique effectively draws moisture away from the greens and directly into the absorbent paper towel. Gravity does all the hard work for you. Every couple of days, if the paper towel feels damp to the touch, I just swap it out for a fresh, dry one. I’ve kept a massive box of spinach perfectly fresh for over a week using this exact method. It takes ten seconds and saves you from throwing away half a box of rotten greens every Friday.
9. Bulk It Up With Hearty Grains And Legumes

A sad bowl of lettuce and a few baby carrots won’t keep you full until dinner. You’ll be starving by 2 PM and digging through the office vending machine for stale potato chips. To transform your greens into a complete and filling meal, you have to include complex carbohydrates. I always add cooked grains such as quinoa, chewy farro, or brown rice, along with heavy legumes like chickpeas or black beans. These additions provide essential dietary fiber and plant protein, helping you stay satiated much longer. I love using Bob’s Red Mill Organic Quinoa. I cook a large batch in savory vegetable broth instead of plain water for extra flavor. Just remember the crucial cooling rule from earlier. Let the grains cool completely. I also rely heavily on canned beans because they’re incredibly cheap and require zero actual cooking. I rinse them thoroughly in a metal mesh strainer to remove the thick, starchy canning liquid, then pat them completely dry with a paper towel before tossing them into my containers. A 1/2 cup of quinoa and a 1/4 cup of black beans will make your lunch actually feel like a real, satisfying meal.

M MCIRCO 10-Pack,30 Oz Glass Meal Prep Containers 2
M MCIRCO 10-Pack punches above its price — 23 buyers rated it 4.5 stars. I would buy it again.
10. Try Ingredient Prepping For Your Meal Prep Salad

Moving beyond fully assembled bowls, a massive trend for 2026 is “ingredient prepping.” Honestly, eating the exact same flavor profile four days in a row causes serious meal prep boredom. I used to get so sick of my repetitive lunches by Thursday that I’d just buy a $15 deli sandwich and let my prepped food rot in the work fridge. Ingredient prepping completely solves this. Instead of building four identical bowls on Sunday, you wash, chop, and cook individual components and store them in their own separate glass containers. I’ll roast two large sweet potatoes, bake a block of Nasoya Extra Firm Tofu, and wash a huge batch of crisp romaine. I store the sweet potatoes in one glass container, the tofu in another, and the greens in a third. Each morning, I spend three minutes grabbing handfuls from different containers to build a custom bowl. Monday might be a Mexican-inspired bowl with black beans and fresh salsa. Tuesday might be an Asian-inspired bowl with baked tofu and a sesame ginger dressing. It allows for daily customization and prevents mental burnout. Start small by prepping just three versatile components. You won’t feel trapped by your Sunday decisions.
Don’t let another batch of expensive organic produce turn to mush in your bottom crisper drawer. If you implement even just two of these strategies, like the upside-down paper towel trick or switching to heavy glass containers, your weekday lunches will vastly improve. I’ve ruined enough delicate spring mix to know that a little bit of strategic planning goes a very long way. Give the upside-down mason jar method a try this coming Sunday afternoon. I promise you won’t regret it. If you found these tips helpful, definitely pin this post to your favorite healthy recipe board so you can easily find it next time you’re writing your weekend grocery list!
Frequently Asked Questions
How long does a meal prep salad last in the fridge?
When using sturdy greens like kale or cabbage and airtight glass containers, a properly prepared salad can easily last 4 to 5 days. Delicate greens like spring mix typically wilt within 2 days.
How do I keep my meal prep salad from getting soggy?
Always thoroughly dry your greens using a salad spinner and paper towels. Store your dressing in a separate small container, and never add hot ingredients like freshly cooked chicken directly onto cold lettuce.
What are the best containers for meal prep salads?
Airtight glass containers are the absolute best option because they prevent moisture buildup and don’t retain odors. Wide-mouth glass mason jars are also excellent for layered, grab-and-go lunches.
Should I chop all my vegetables on Sunday?
You can chop sturdy vegetables like bell peppers and carrots in advance. However, avoid chopping watery vegetables like cucumbers or large tomatoes until the day you plan to eat them to prevent excess moisture.