What’s Inside
- Foundation First: Master Your Grains for Efficiency
- Protein Powerhouse: Smart Chicken Prep in Your Burrito Bowl Meal Prep
- The Bean & Corn Base: Bulk Up on a Budget
- Veggie Variety: Don’t Skimp on Freshness
- Sauce Separation: Prevent Soggy Bowls
- Smart Storage: Invest in Quality Glass Containers
- Flavor Boosters: The Power of Thoughtful Toppings
- The “Deconstructed” Approach: A Trending Aesthetic
- Avoid “Soggy Syndrome”: Reheating Best Practices
Three years ago, I pulled a plastic container from my work fridge, popped the lid, and stared at a gray, congealed mass of soggy rice and slimy lettuce. That disaster sparked my obsession with perfecting the burrito bowl. I’m not kidding; that sad, wet lunch almost killed meal prepping for me. I spent months mixing everything together before figuring it out. It tasted like wet cardboard. Let’s fix that. I’ve spent years tweaking, testing, and eating hundreds of lunches to see what works and what fails miserably. You aren’t going to suffer through another mediocre desk lunch. I’ll show you how I build bowls that actually taste fresh by Thursday, using ingredients you can grab at your local shop. Skip the fat-free stuff. It tastes like wet cardboard. We’re going for real flavor, real textures, and food that keeps you full until dinner.
1. Foundation First: Master Your Grains for Efficiency

Start your prep by batch-cooking a versatile grain. I swear by Lundberg Family Farms Organic Brown Basmati Rice. I buy the 32-ounce bag for $6.49 at Whole Foods. Measure out exactly 1.5 cups of dry rice. Once cooked, this yields about 4 cups, which is perfect for four to six bowls. I learned that the hard way. I used to guess and ended up with way too much rice or barely enough to cover the bottom of my containers. Don’t do that. Use a measuring cup.
Registered Dietitian Samantha Nimmons points out that starches like rice, quinoa, or farro are crucial for stretching proteins and providing energy and fiber. I’ve found that skipping carbs leaves me starving by 2:00 PM. To make this hands-off, I throw my rinsed rice into my Instant Pot. It’s a lifesaver. If you don’t have one, a standard rice cooker works perfectly. Last Tuesday at Whole Foods, I almost grabbed a cheap, no-name brand to save a dollar. I remembered the last time I did that. The rice turned into a sticky, gummy paste that ruined my lunches for the week. Stick to a quality brand. It’s worth the extra two dollars. Once your rice is cooked, spread it on a baking sheet to cool completely before packing. Hot rice trapped in a container creates condensation, and that moisture is the enemy of a fresh lunch.
2. Protein Powerhouse: Smart Chicken Prep in Your Burrito Bowl Meal Prep

You need a solid protein to keep you full, and chicken is usually the easiest route. I buy 1.5 to 2 pounds of boneless, skinless chicken thighs for about $8.99 at Sprouts. I prefer thighs over breasts because they reheat better and don’t dry out in the microwave. If you use breasts, you have to be careful not to overcook them. I used to bake unseasoned chicken breasts on Sundays. Horrible mistake. By Wednesday, they were dry, rubbery, and practically inedible.
Now, I never skip the marinade. You need at least 30 minutes, but doing it overnight is where the magic happens. I’m a huge fan of Stubb’s Citrus & Onion Chicken Marinade. A bottle costs exactly $4.99 at Target, and it gives the chicken a tangy flavor that cuts through the heavy beans and rice. Another great option is Lawry’s Caribbean Jerk Marinade, which runs about $3.49 at Kroger. Cook your chicken to an internal temperature of 165°F. I use a cheap digital meat thermometer to check. If you’re leaning into plant-based eating, swap the chicken for a block of extra firm tofu. You can grab a 14-ounce block of Nasoya Extra Firm Tofu for $2.99 at Walmart. Press the water out, cube it, and toss it in the exact same Stubb’s marinade before baking until crispy. It’s a fantastic alternative that holds up beautifully in the fridge all week.
3. The Bean & Corn Base: Bulk Up on a Budget

Beans and corn are the champions of cheap, filling meal prep. Rinse and drain two 15-ounce cans of black beans and one 15-ounce can of whole kernel corn. I grab Bush’s Best Black Beans for $1.49 a can at Kroger, and Del Monte Whole Kernel Corn for $1.29. You can dump them straight from the can, but I recommend taking five extra minutes to cook them slightly. You might also like: 15 Stunning Healthy Dinner Ideas to Steal Right Now
Here is a trick I learned the hard way. Raw, canned corn is incredibly boring. Last Sunday morning, I tossed my drained corn into a scorching hot cast-iron skillet with a drizzle of oil. The smell of charring sweet corn filled my kitchen, and it changed the flavor profile entirely. Let it sit in the pan without stirring for a few minutes until it gets dark, blackened spots. It brings out the natural sweetness and adds a smoky flavor. For the black beans, I dump them into a small saucepan with a splash of water, a pinch of salt, and a heavy dash of cumin. Simmer them for ten minutes until they thicken. Honestly, this changed how I view canned beans. They go from metallic and bland to rich and savory. It’s a tiny extra step that pays off every single day at lunch. You might also like: 15 Stunning Easy Lunch Ideas You Need to See

M MCIRCO 10-Pack,30 Oz Glass Meal Prep Containers 2
M MCIRCO 10-Pack has been one of the most consistently praised picks in this category. 23 reviewers averaged 4.5/5.
4. Veggie Variety: Don’t Skimp on Freshness

A bowl without fresh vegetables is just a brick of carbs and meat. You need at least 1 to 2 cups of fresh vegetables per bowl to break up the textures. I always include chopped romaine lettuce, halved grape tomatoes, diced red onion, and colorful bell peppers. Registered Dietitian Samantha Nimmons points out that veggies are vital for keeping you full. You might also like: 20 Brilliant Quick Dinner Ideas You’ll Want to Bookmark
I buy Sunset Angel Sweet Tomatoes for $3.99 a pint at Target. They’re consistently sweet and rarely mushy. For greens, I stick to crisp romaine hearts rather than spring mix. Spring mix turns into slimy garbage the second it touches anything damp. But here is the most important rule. Never put your fresh lettuce at the bottom of the bowl. I tried this wrong for months. I’d put hot rice and beans directly on top of my chopped romaine. By the time I opened my container the next day, the lettuce had wilted into dark green strings. It’s disgusting. Keep your lettuce in a separate sandwich bag, or just pile it on the very top of your completely cooled ingredients. If you want to follow a trend for 2026, prioritize seasonal produce from local farmers markets. Last Saturday, I bought a massive bundle of fresh radishes for three dollars. Slicing them thin and throwing them into my bowls added an incredible, spicy crunch.
5. Sauce Separation: Prevent Soggy Bowls

Adding your dressing or salsa directly into your meal prep containers on Sunday is the fastest way to ruin your week. The acid and salt in the dressing will break down the fresh vegetables, and the rice will absorb all the liquid, leaving you with a mushy mess. You must store your dressings and sauces separately.
I swear by Nakpunar 1.5-ounce Mini Glass Jars. You can get a 12-pack on Amazon for $14.99. They’re the perfect size, and the metal lids screw on tight so they never leak. Before I bought these, I used cheap plastic condiment cups with flimsy snap-on lids. Last month, one popped off in my work tote. I spent forty-five minutes scrubbing Pace Chunky Salsa out of the canvas lining. Don’t risk it. Buy the glass jars. For a simple, delicious dressing, I mix 2/3 cup of Pace Chunky Salsa (about $2.98 at Walmart) with 1/3 cup of Fage Total 2% Greek Yogurt (around $1.99 for a 5.3-ounce cup). The yogurt makes the salsa rich and creamy while adding protein. Whisk it together, divide it into your mini glass jars, and tuck one into each meal prep container. When you’re ready to eat, just pour it over the top. It’s fresh, cold, and perfect.
6. Smart Storage: Invest in Quality Glass Containers

If you’re still using stained, warped plastic containers from five years ago, it’s time to upgrade. Plastic holds onto grease, absorbs smells, and eventually cracks. I recommend high-quality glass meal prep containers with airtight, leak-proof lids. I use the Rubbermaid Brilliance Glass Food Storage Containers. The 3.2-cup size is perfect for a burrito bowl. You can grab a 4-pack for $34.99 at Target.
These containers are microwave, oven, freezer, and dishwasher safe. You can bake your chicken right in the container if you want. Another fantastic option is the OXO Smart Seal Glass Container Set, which runs between $30 and $60. I used to use cheap plastic containers. After a few weeks of packing chili-powder-seasoned chicken, the plastic turned a permanent, cloudy orange color that made my food look gross before I even opened it. Glass stays crystal clear. If you want an eco-friendly option that costs nothing, save your empty pasta sauce jars. Wash them thoroughly, boil the lids to remove the tomato smell, and use them to layer your bowl ingredients. Just remember to put the dressing at the bottom, followed by the proteins and beans, and pack the lettuce at the very top.

Vtopmart 5Pack 22oz Glass Storage Containers with Lids
Honestly, Vtopmart 5Pack 22oz Glass Storage Containers with Lids surprised me — sturdier than it looks in the photos, and over 32 buyers gave it 4.5 stars.
7. Flavor Boosters: The Power of Thoughtful Toppings

The difference between a boring lunch and one you actually look forward to comes down to the toppings. You need contrasting textures and sharp flavors. I always include 1/4 cup of fresh, chopped cilantro in every bowl. I also add a fresh lime wedge. Squeezing cold, fresh lime juice over your reheated bowl instantly brightens all the heavy flavors.
For cheese, I love the Tillamook Mexican Blend. An 8-ounce bag is $4.49 at Costco or Kroger. It melts beautifully and tastes like actual cheese, unlike those fat-free shreds that feel like plastic. Trust me. Skip the fat-free stuff. It tastes like wet cardboard. For healthy fats, I add 1/4 of an avocado. Here is a massive mistake: slicing an avocado on Sunday and expecting it to be green on Thursday. It won’t happen. It turns brown, slimy, and bitter. Instead, I bring a whole avocado to work, leave it on my desk, and slice it fresh right before I eat. If you need a tangy crunch, pickled red onions are incredible. I make a quick batch using a red onion, white vinegar, and a pinch of sugar. Finally, I never eat a bowl without hot sauce. Cholula Original Hot Sauce is my favorite. It costs $3.89 for a 5-ounce bottle at Walmart. A few dashes of Cholula add the perfect amount of heat and vinegar to cut through the rich cheese and avocado.
8. The “Deconstructed” Approach: A Trending Aesthetic

Instead of dumping all your ingredients on top of each other in a chaotic pile, try arranging them neatly side-by-side. This is called the deconstructed approach, and it’s a major trend for 2026. We eat with our eyes first.
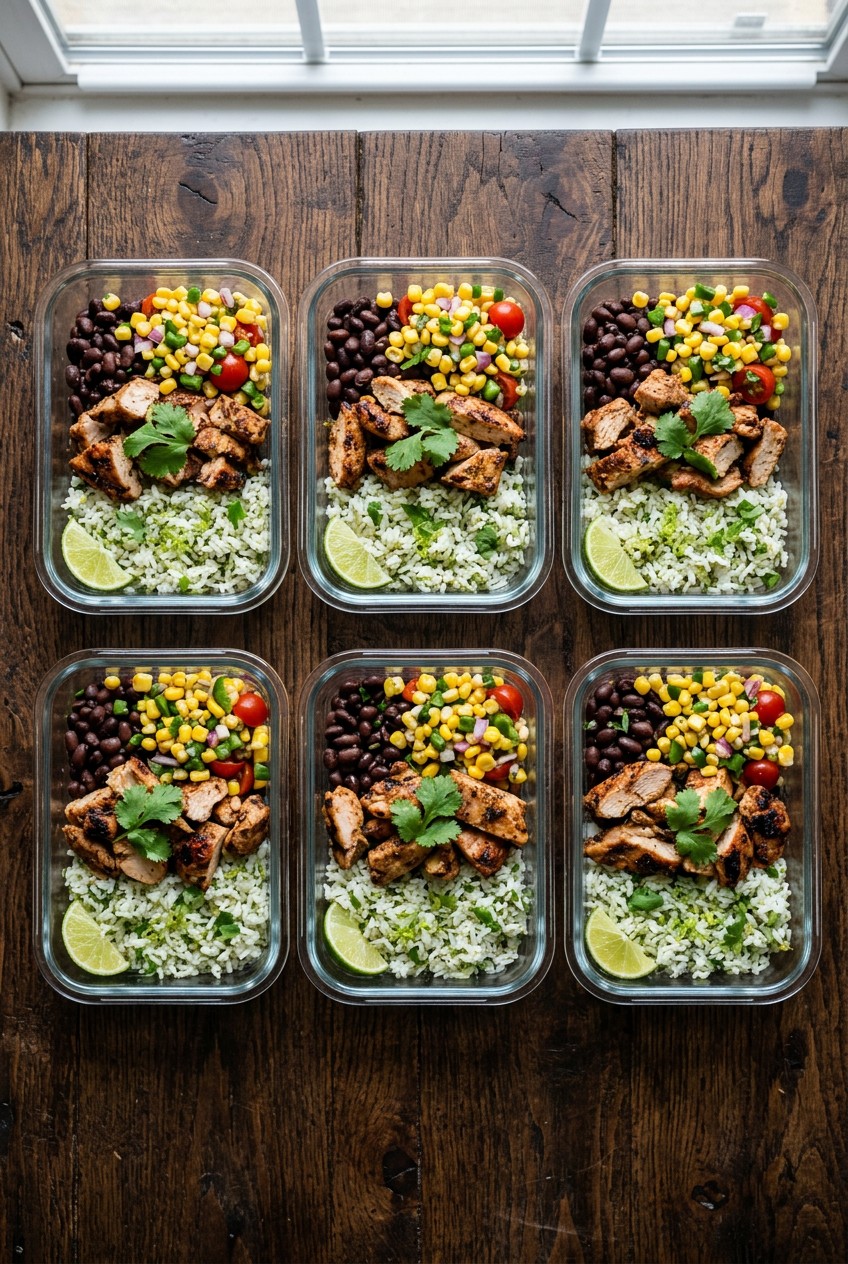
I used to shovel everything into my containers. By the time lunch rolled around, the black beans had stained the rice purple, the corn was smashed into the chicken, and the whole thing looked like dog food. It was unappetizing. Now, I take sixty seconds to place the rice in one corner, the black beans in another, the chicken in a row, and the corn piled next to it. It keeps the individual textures intact. To make the corn pop, I sprinkle Trader Joe’s Everything But The Elote Seasoning Blend right on top. That little bottle costs $2.49 at Trader Joe’s, and it adds cheese, chili, and cumin flavors directly to the corn. Keeping ingredients separated means that when you microwave the container, the moisture from the beans doesn’t turn the rice into mush. You get to control the perfect bite, mixing a little bit of chicken, a scoop of rice, and a crunch of corn exactly how you want it. It’s a small change that makes a huge psychological difference when you sit down to eat.
9. Avoid “Soggy Syndrome”: Reheating Best Practices

If you reheat your bowls wrong, you’re going to have a terrible meal. Improper reheating is the number one reason people give up on meal prepping. You have to handle the hot and cold components separately.
When I’m ready to eat, I pull my glass container out of the fridge. I immediately take out the little glass jar of salsa-yogurt dressing, the fresh lime wedge, and the baggie of crisp romaine lettuce. You can’t microwave lettuce. I did that once during my first month at a new job. The smell of hot, steaming romaine lettuce wafted through the breakroom and I was mortified. It’s awful. Leave the cold stuff on your desk. Microwave the main components (the rice, chicken, beans, and corn) for exactly 1 minute and 30 seconds. If it’s not steaming hot, I’ll do another 30 seconds. Another huge mistake is microwaving sour cream or yogurt. It curdles and separates into a disgusting, oily mess. Always add your dairy-based sauces after the food is hot. Once your base is steaming, pull it out of the microwave. Pile your cold, crisp lettuce on top. Squeeze the fresh lime juice over everything. Pour your cold salsa-yogurt dressing over the lettuce, and add your fresh avocado slices. The contrast between the steaming hot spicy chicken and the ice-cold creamy dressing is incredible.
Meal prepping doesn’t have to mean suffering through soggy, flavorless food by the end of the week. By separating your sauces, investing in decent glass containers, and taking the time to actually season your beans and corn, you’re going to look forward to lunch every single day. I rely on these bowls to keep me sane during busy work weeks. They’re cheap, packed with protein, and they keep me full until dinner. Grab your groceries this weekend and give this routine a try. Pin this guide to your favorite recipe board so you don’t forget the marinade ratios, and let me know how your Sunday prep goes!

8 Pack 36oz Large Glass Meal Prep Containers with lids
Honestly, 8 Pack 36oz Large Glass Meal Prep Containers with lids surprised me — sturdier than it looks in the photos, and over 866 buyers gave it 4.5 stars.
Frequently Asked Questions
How long does a burrito bowl meal prep last in the fridge?
When stored in airtight glass containers, your prepped bowls will stay fresh for up to four days. Keep wet ingredients like salsa and fresh greens stored separately to maintain the best textures.
Can I freeze my burrito bowl meal prep?
You can freeze the cooked rice, beans, and chicken for up to three months. Don’t freeze fresh vegetables, cheese, or sour cream, as their textures will be completely ruined when thawed.
What is the best container for a burrito bowl meal prep?
I highly recommend a 3.2-cup glass container with a leak-proof locking lid. Glass won’t absorb smells or chili powder stains, and it’s perfectly safe for reheating your food in the microwave.
How do I keep the avocado fresh in my burrito bowl meal prep?
You can’t slice it ahead of time. Sliced avocado will turn brown and slimy in the fridge. Bring a whole avocado to work and slice it fresh right before you eat your bowl.
