What’s Inside
- The 3-3-3 Method for Fresh Lunch Meal Prep Ideas
- Batch Cook Budget-Friendly Proteins
- Layered Mason Jar Salads Done Right
- Ingredient Prep Over Full Meals
- Shortcut Your Prep with Ready-to-Use Ingredients
- Cool Your Food Fast on Sheet Pans
- Strategic Freezing for the Long Haul
- Hybrid Prep with Meal Kits When You’re Exhausted
Last Tuesday in the Whole Foods parking lot, I opened my lunch container only to find my spinach had dissolved into a slimy, swamp-green mush. My balsamic dressing leaked everywhere, coating my steering wheel and my favorite white sweater in an oily, vinegar-smelling mess. If you need lunch meal prep ideas that actually survive the commute and taste fresh on a Thursday, I’ve got you covered. I spent three years eating sad, wet cardboard-tasting salads before finally figuring this out. Honestly, most people get meal prep completely wrong. They try to cook five elaborate meals on Sunday, burn out by Tuesday, and end up ordering a twenty-dollar salad from a drive-thru because they can’t stand the thought of eating another dry chicken breast. I’m Esperanza Eliza, and I’m here to tell you that Sunday prep doesn’t have to ruin your weekend. You don’t need to spend six hours chopping onions until your eyes swell shut. Let’s fix your lunch routine with some practical, realistic strategies that I personally swear by. I’ve tested hundreds of containers, ruined countless batches of rice, and wasted so much money on ingredients that rotted in my crisper drawer. Now, I’ve got a system that actually works for real life. Grab your favorite coffee, pull up a chair, and let’s get into the exact methods, brands, and grocery lists you need for a stress-free week.
1. The 3-3-3 Method for Fresh Lunch Meal Prep Ideas

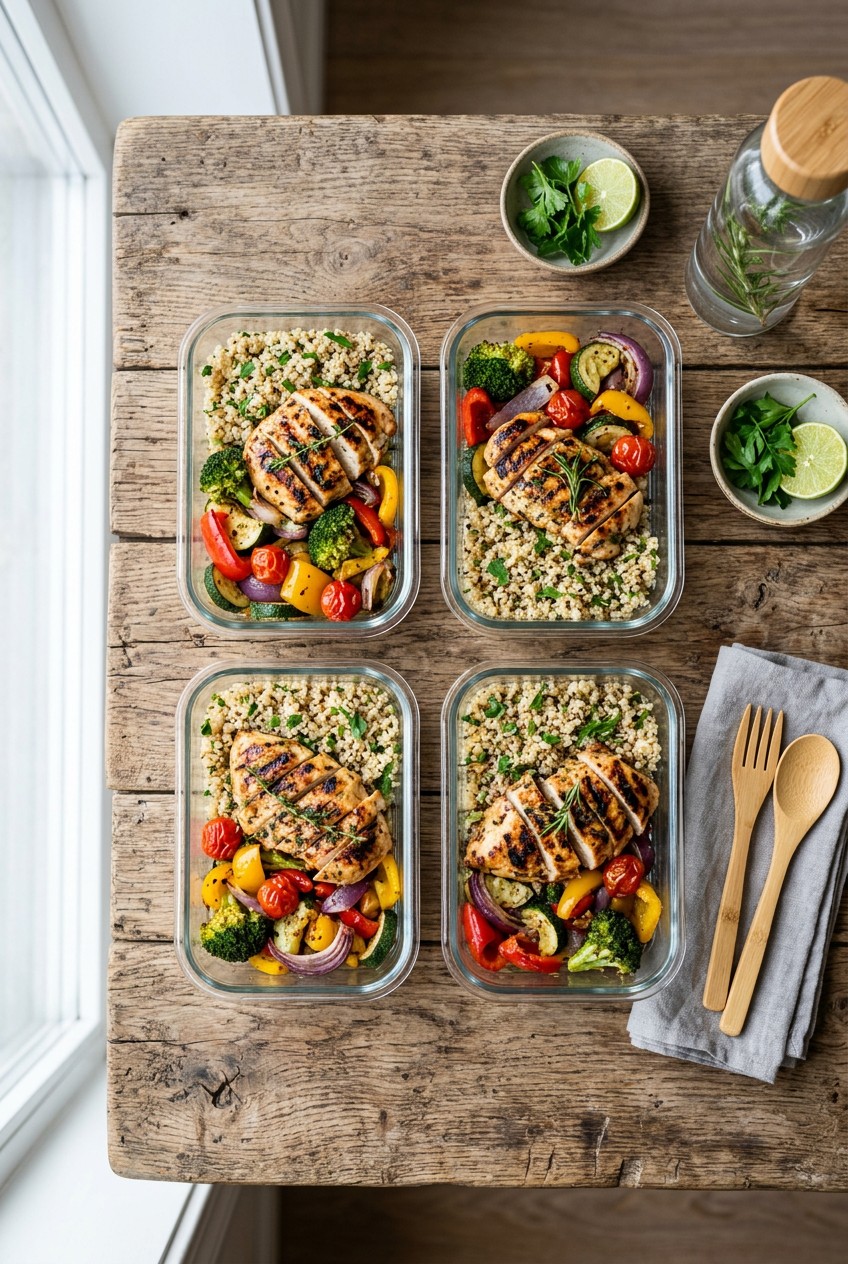
I used to cook one massive pot of chicken and rice, portion it into five identical containers, and absolutely hate my life by Wednesday. The texture gets weird, the flavor gets boring, and you’re just chewing out of obligation. That’s why I’m obsessed with the 3-3-3 method. A dietitian from Colorado Nutrition Counseling actually recommends this trending approach, and it’s brilliant. You simply prepare 3 proteins, 3 carbs, and 3 vegetables for the week. Then, you mix and match them daily so you aren’t eating the exact same thing twice.
For example, I’ll hit up Target and grab their Good & Gather brand quinoa for about $3.59, some sweet potatoes, and a box of whole wheat pasta. For proteins, I’ll prep 4 oz of shredded chicken, some hard-boiled eggs, and a can of black beans. For veggies, I roast broccoli, slice up bell peppers, and wash a bag of arugula. The combinations are endless. You can make a chicken and quinoa bowl on Monday, a black bean and sweet potato taco bowl on Tuesday, and a pasta salad on Wednesday. It’s a total win. Trust me on this.
To make this work, you absolutely need quality containers. Skip the cheap plastic ones that warp in the microwave. I personally swear by the Rubbermaid Brilliance containers. A set costs around $33 to $40, and they’re completely leak-proof. They have these amazing latches that snap shut with a satisfying click, keeping your food incredibly fresh. I also love the OXO Prep & Go Divided Containers. They usually have three compartments, which completely prevents the tragic mistake of your wet ingredients touching your dry ingredients. Food mixing in transit is the fastest way to ruin your appetite. Keep your 1/2 cup of quinoa far away from your juicy roasted tomatoes until you’re ready to eat.
2. Batch Cook Budget-Friendly Proteins

Let’s talk about the cost of meat right now, because it’s honestly ridiculous. If you’re buying pre-cooked steak strips or fancy salmon filets for every single lunch, you’re draining your bank account. To save money, I build my meals around highly affordable protein staples. I’m talking about saving over $100 every single month just by shopping smarter.
Last month at Costco, I bought a massive pack of Kirkland Signature boneless, skinless chicken thighs for about $14.99. They cost about $0.035 to $0.055 per gram of protein, which is insanely cheap compared to buying lunch out. I batch cook 2 to 3 pounds of chicken thighs at once. I season them simply with 1 teaspoon of kosher salt, 1/2 teaspoon of black pepper, and 1 tablespoon of garlic powder. This neutral flavor profile means I can throw the chicken into a spicy Mexican bowl on Monday and a savory Asian-inspired noodle dish on Tuesday.
Don’t sleep on eggs or canned tuna, either. Eggs cost roughly $2 to $4 per dozen and pack about 6 grams of protein per large egg. I boil six eggs on Sunday, peel them, and keep them in a glass bowl in the fridge. They make the perfect protein add-on. Canned tuna is another lifesaver. Grab a 5-ounce can of StarKist Chunk Light Tuna for about $1. It yields 22 grams of protein. I mix it with 2 tablespoons of Greek yogurt instead of mayonnaise for a creamy, tangy tuna salad. I tried using fat-free mayo once, and I’m warning you right now. Skip the fat-free stuff. It tastes like wet cardboard and has a terrifying gelatinous texture. Stick to real, whole ingredients. Also, remember the USDA MyPlate 50/25/25 rule. Aim for a palm-sized 3 to 6 ounces of protein, a fist-sized 1/2 to 1 cup of complex carbs, and a generous 1/2 to 1 cup of veggies.
3. Layered Mason Jar Salads Done Right

I avoided mason jar salads for years because I thought they were just a silly internet aesthetic. I was so wrong. When constructed correctly, they’re the ultimate solution for keeping greens crisp. The secret is entirely in the architecture. Most people get this wrong. They throw their lettuce in first, pour the dressing on top, and wonder why they’re eating a sad, wilted sponge 24 hours later. You might also like: 15 Stunning Easy Lunch Ideas You Need to See
You need a wide-mouth 32-ounce Ball Mason Jar. They cost about $12 for a pack of two at most hardware stores or supermarkets. Always, always put your liquid at the very bottom. I pour exactly 2 tablespoons of my favorite dressing right into the base of the glass jar. Next, you add your hardiest, most impenetrable ingredients. I’m talking about things that can marinate in the dressing without turning to mush. I usually drop in 1/2 cup of cherry tomatoes, 1/4 cup of diced red onions, or 1/2 cup of canned chickpeas. You might also like: 20 Inspiring Carnivore Meal Prep Ideas That Are Totally Worth It
After the hardy layer, add your grains or proteins. I’ll scoop in 1/2 cup of cold farro or 4 ounces of diced chicken breast. Finally, pack the top completely full with your delicate leafy greens. I buy the big plastic tubs of organic baby spinach from Sprouts for about $5.99. Because the spinach is suspended at the top of the jar, far away from the dressing, it stays incredibly crisp for up to four days. When you’re ready to eat, you just shake the jar vigorously and dump it into a bowl. The dressing cascades over the greens perfectly. One quick warning. Avoid delicate vegetables like sliced cucumbers or chopped bell peppers if you aren’t eating the salad within 48 hours. They tend to release water and make the whole jar smell a bit funky by Thursday. You might also like: 15 Clever Family Dinner Ideas for a Fresh New Look

M MCIRCO 10-Pack,30 Oz Glass Meal Prep Containers 2
M MCIRCO 10-Pack punches above its price — 23 buyers rated it 4.5 stars. I would buy it again.
4. Ingredient Prep Over Full Meals

If there’s one concept you take away from this entire article, let it be this. Prep your ingredients, not your full meals. I used to assemble five identical, fully composed Tupperware containers on Sunday afternoon. By Wednesday, the rice was dry, the chicken tasted like a wet dog, and the broccoli smelled like sulfur. It was awful. Now, I practice ingredient prep, and it offers maximum flexibility.
Instead of building complete lunches, I cook large batches of individual components and store them in separate containers. On a typical Sunday, I’ll cook 4 to 5 cups of quinoa or farro. I buy the Trader Joe’s 10 Minute Farro for $3.49 because it has a delightfully chewy, nutty texture and cooks incredibly fast. Then, I focus on roasting hearty vegetables. Culinary experts always advise prioritizing sturdy veggies for meal prep. I chop up two large sweet potatoes, toss them with 1 tablespoon of olive oil, and roast them at 400 degrees Fahrenheit for 25 to 35 minutes until they’re perfectly fork-tender with crispy, caramelized edges.
I store the cooked farro in one container, the roasted sweet potatoes in another, and my cooked proteins in a third. This prevents the moisture from the vegetables from seeping into the grains. Each morning, I spend exactly three minutes assembling my lunch. I grab a clean container, scoop in 1/2 cup of farro, add 1/2 cup of sweet potatoes, and toss in 4 ounces of protein. I can change the flavor profile daily just by grabbing a different sauce from the fridge door. This method completely eliminates meal fatigue. You aren’t locked into eating the exact same flavor profile five days in a row.
5. Shortcut Your Prep with Ready-to-Use Ingredients

I’m going to be completely honest with you. The biggest barrier to consistent meal prep is time. After working a forty-hour week, the last thing I want to do on a Sunday is stand at my kitchen counter peeling tiny cloves of garlic until my fingernails smell like a pizzeria for three days. I used to pride myself on doing everything from scratch. I’d chop every onion, mince every clove of garlic, and shred my own blocks of cheese. I burned out so fast. Learned that the hard way.
Now, I fully embrace shortcuts. The 2026 trend of brands making wholesome, ready-to-use ingredients is a lifesaver. When I’m shopping at Walmart, I always grab a jar of Spice World Minced Garlic. It costs about $4.48 for a massive 32-ounce jar, and it saves me so much frustration. I just scoop out 1 tablespoon of pre-minced garlic and throw it directly into my skillet. I also highly recommend Squeezable Minced Ginger, which runs about $3.99. You just squirt 1 teaspoon of ginger paste right into your stir-fry sauce. No peeling tough ginger skin with a spoon, no grating your knuckles on a microplane.
I also buy pre-chopped mirepoix (the mix of onions, carrots, and celery) from the produce section. Yes, it costs maybe two dollars more than buying the whole vegetables. But you’re buying back your time. If spending an extra $2.50 means you’ll actually cook your meals instead of ordering thirty-dollar takeout on a Tuesday, you’re still coming out way ahead financially. Give yourself permission to use these shortcuts. Meal prep doesn’t have to be an exhausting culinary marathon. It just needs to result in edible, healthy food in your fridge.
6. Cool Your Food Fast on Sheet Pans

This is a massive food safety issue that almost nobody talks about. I learned this the hard way after giving myself a terrible stomach ache from eating funky rice. A critical expert tip you need to memorize is understanding the temperature Danger Zone. Bacteria thrive between 40 degrees and 140 degrees Fahrenheit. You absolutely can’t leave cooked food sitting out on your counter for longer than two hours.
But here’s the other major mistake people make. They take piping hot chicken and freshly steamed rice, dump them directly into a plastic container, snap the airtight lid on, and shove it straight into the refrigerator. I did this for months. The heat creates massive amounts of condensation inside the sealed container. That moisture drips back down onto your food, turning your perfectly roasted sweet potatoes into a soggy, miserable mush. Worse, putting a massive container of hot food into your fridge lowers the overall temperature of the fridge, putting your milk and raw meats at risk.
Instead, you need to cool your foods rapidly. I line a large baking pan with Reynolds Wrap Aluminum Foil, which costs about $5.99 at Kroger, and spread my cooked grains and proteins out into a thin layer. I let the sheet pan sit on my counter for 15 to 20 minutes. Because the food is spread out thinly, the heat dissipates incredibly fast. Once the food reaches room temperature, then I portion it into my containers and put them in the fridge. This simple trick preserves the texture of your food and keeps everything perfectly safe to eat. Also, always use separate cutting boards for raw chicken and fresh veggies. Cross-contamination isn’t a joke. I’ve got a red cutting board exclusively for raw poultry.

KOMUEE 10 Packs 30 oz Glass Meal Prep Containers
A dependable everyday pick — KOMUEE 10 Packs 30 oz Glass Meal Prep Containers pulls in 45 ratings at 4.5 stars. Not flashy, just solid.
7. Strategic Freezing for the Long Haul

If you’re prepping meals that you don’t plan to eat within four days, you’ve got to utilize your freezer. Cooked chicken is only safe in the fridge for 3 to 4 days. Cooked grains like rice and quinoa last maybe 4 to 5 days. After that, you’re playing a dangerous game with your digestive system. I always label my containers with a piece of masking tape and a sharpie, writing down the meal name and the exact date I cooked it.
I strictly follow the First In, First Out or FIFO method in my fridge. I put the newest meals in the back and pull the older meals to the front so they get eaten first. This drastically cuts down on food waste. But for long-term storage, my freezer is my best friend. I cook double batches of hearty, freezer-friendly items like turkey chili, lentil soup, or baked oatmeal.
I portion these wet meals into Souper Cubes Silicone Freezer Trays. They’re incredible. A tray with four 1-cup compartments costs about $19.95 on Amazon or at Target. You pour your soup into the silicone compartments, freeze them solid, and then pop out the frozen cubes just like ice cubes. I transfer the frozen blocks into a large Ziploc freezer bag, which runs about $5.50 a box. When I need a quick lunch, I grab one frozen block, put it in a bowl, and microwave it at work. Cooked ground turkey and chicken actually freeze beautifully for up to 3 months. Just don’t try to freeze fresh lettuce or cucumbers. They turn into a translucent, watery sludge when they thaw.
8. Hybrid Prep with Meal Kits When You’re Exhausted

Some weeks, life just hits you hard. You’re exhausted, the house is a mess, and the thought of spending two hours grocery shopping and another two hours chopping vegetables makes you want to cry. I’ve been there. My biggest piece of advice is: don’t overcommit. A common mistake is trying to prep twenty meals on a Sunday. You’ll inevitably burn out, abandon the project halfway through, and leave a sink full of dirty dishes. Start small. Pick just 2 to 3 simple recipes and dedicate exactly 1 to 2 hours on a Sunday afternoon. No exaggeration.
For those truly overwhelming weeks, I highly recommend a hybrid approach using meal kit services. It’s a huge trend right now, and it completely removes the mental load of meal planning. I’ll order a box from HelloFresh. It costs around $8.99 per serving. They send me the exact pre-portioned ingredients and a glossy recipe card. I don’t have to measure out spices or figure out what to do with a leftover half-bunch of cilantro.
I usually cook three HelloFresh meals on Sunday evening. I’ll eat one portion for dinner and immediately pack the remaining three portions into my glass containers for my Monday, Tuesday, and Wednesday lunches. Home Chef is another great option I’ve used. It’s a fantastic way to maintain your healthy eating habits without committing to full-scale, intensive meal prepping. It keeps you out of the drive-thru line and ensures you’re eating a balanced meal. You can always go back to your hardcore prep routine the following week when you’ve got more energy.
Meal prep doesn’t have to be a miserable chore that steals your entire weekend. By using these strategies, you can actually enjoy your weekday lunches again. I promise that investing in good containers, leaning into ingredient prep, and allowing yourself a few grocery store shortcuts will completely change your routine. Try the 3-3-3 method this Sunday and see how much better your Wednesday lunch tastes. If you loved these lunch meal prep ideas, be sure to save this post and pin it to your favorite recipe board for later! You’ve got this.
Frequently Asked Questions
How long do prepped lunches stay fresh in the fridge?
If you use airtight containers and cool your food properly, most cooked proteins and grains stay fresh for three to four days. I’d highly recommend freezing anything you won’t eat by Thursday to avoid foodborne illness.
What is the best way to keep a prepped salad from getting soggy?
Always store your dressing in a separate small container. If you’re using a mason jar, pour the dressing at the very bottom, add hearty vegetables like tomatoes next, and pack your delicate leafy greens at the very top.
What are the cheapest proteins for lunch meal prep ideas?
Eggs, canned tuna, lentils, and chicken thighs are incredibly budget-friendly. Eggs cost around two to four dollars a dozen, while chicken thighs offer a fantastic protein-to-cost ratio compared to expensive cuts like steak or salmon.
Should I put hot food directly into my meal prep containers?
No! Placing hot food into sealed containers creates condensation, which makes your food soggy and can lower your fridge’s temperature. Always spread hot food on a sheet pan to cool for 15 to 20 minutes before storing.