What’s Inside
- Start Simple Meal Prep with the Pasta Method
- Leak-Proof Containers Are Mandatory
- Component Cooking Beats Full Meals
- Simple Meal Prep with Your Air Fryer
- Master the Danger Zone and Cooling Wands
- Flat Freezing Saves Your Freezer Space
- Use a Digital Food Scale for Precision
- Vacuum Sealing and Sous Vide Cooking
- The Dedicated Fridge Zone and Mandoline Slicing
Last Tuesday at Whole Foods, I stood in front of the bulk bins staring at a massive, scattering puddle of dry quinoa on my favorite white sneakers. I realized my entire approach to meal prep was broken. I dropped the plastic scoop in defeat. I felt my face get hot as other shoppers stared. I was buying random, expensive ingredients without a plan. I’d go home, stand in my cramped kitchen, and cook for six exhausting hours. By Wednesday, I ended up hating my food. I’d stare at a sad, sweaty container of broccoli and order a $25 pizza instead. Skip the complicated, color-coded Pinterest boards. I tried the marathon sessions for months before figuring it out. The burnout is real. Let’s fix this mess. I’m going to show you how I handle my food for the week. I’ll share the tools I use, the prices I pay, and the massive mistakes I’ve made—I learned that the hard way, trust me. You don’t need a culinary degree. You just need a better system. I promise you can master this.
1. Start Simple Meal Prep with the Pasta Method

I used to ruin brown rice and ancient grains constantly. I’d follow the package instructions, but it was always a crunchy, wet mess at the bottom of the pot. I’d scrape the burnt bits into the trash and feel defeated. Then I learned the pasta method. It changed my Sunday routine. You don’t need precise water-to-grain ratios anymore. You just boil a huge, heavy-bottomed pot of water. I add 2 tablespoons of coarse kosher salt so the water tastes like the ocean. Toss your rinsed grains straight in. Boil them until they’re tender. Drain them in a fine-mesh metal strainer. It works every time. I buy the Target Good & Gather Organic Quinoa. It costs $3.99 for a 16 oz bag. I pour 1 cup of dry quinoa into 6 cups of boiling water. It yields about 4 cups of fluffy grains. Just taste a tiny spoonful after twelve minutes. If it’s soft with a slight bite, it’s done. I portion out 1/2 cup servings into my glass containers. The warm, nutty smell fills the kitchen. It’s so much better than the mushy disaster I used to make. Don’t overthink this. Just boil, drain, cool, and pack. You won’t ever burn rice to the pan again.
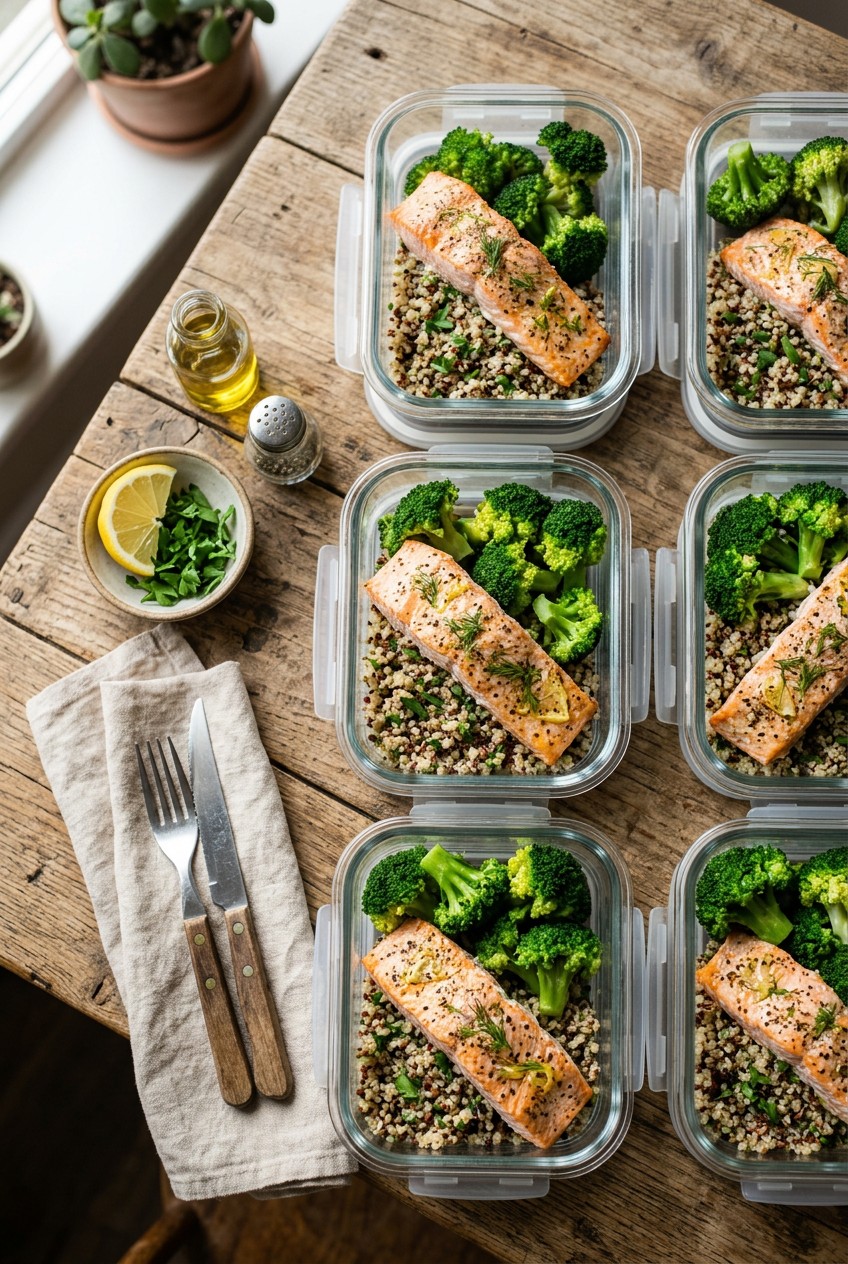
2. Leak-Proof Containers Are Mandatory

I learned this the hard way last year. I packed a cheap, flimsy plastic tub full of leftover teriyaki chicken and rice. I shoved it into my canvas tote bag before jumping on the morning train. The lid popped off. It leaked thick, sticky soy sauce all over the inside of the bag, ruining my planner and my expensive headphones. The sharp, salty smell of cold garlic chicken lingered for weeks. You must invest in high-quality, leak-proof containers. I’m obsessed with the Rubbermaid Brilliance 10-piece set. It costs $29.98 at Walmart. The Tritan plastic is clear and stain-resistant. You can store bright red pasta sauce in them, wash them, and they still look new. You hear a loud, satisfying snap when the side latches lock down. It won’t leak a drop, even if you turn it upside down and shake it. If you prefer glass, get the Prep Naturals Glass Containers. A 5-pack costs $24.99 on Amazon. They use thick, heavy borosilicate glass. You can take them from the freezer and put them directly into a hot oven. Just remember to leave the lids off. Never buy flimsy, dollar-store containers. They crack in the freezer. They melt in the microwave. Buy containers that actually protect your food.
3. Component Cooking Beats Full Meals

Most people get this wrong. They cook five identical portions of chicken, brown rice, and steamed broccoli on Sunday. By Thursday, the food tastes like wet cardboard. You’re chewing on rubbery meat and hating your life. I practice component-based prep. I cook items in bulk. I’ll grill 1.5 lbs of Trader Joe’s Organic Chicken Breasts. They cost $7.99 per pack. I’ll roast 2 cups of cubed sweet potatoes. I’ll wash 4 oz of fresh spinach. Then I mix and match them. Registered Dietitian Samantha Nimmons gave me the best advice. Start small. Prep just two or three days of food. You avoid overwhelming yourself on Sunday. You also cut down on food waste. I used to throw away slimy, rotting spinach on Fridays. Now I keep my components separate in the fridge. I dress my salads right before I eat them. Don’t prep highly perishable items like sliced avocados or tomatoes in advance. They turn into brown, watery mush in hours. Also, remember that cooked chicken won’t last longer than 4 days in the fridge safely. Keep your components fresh, rotate your proteins, and you won’t get bored. You might also like: 20 Gorgeous Meal Planning Ideas for Any Style
![[8-Pack,30 oz]Glass Meal Prep Containers](https://m.media-amazon.com/images/I/713Zfdsgi4L._AC_UL320_.jpg)
[8-Pack,30 oz]Glass Meal Prep Containers
Honestly, [8-Pack surprised me — sturdier than it looks in the photos, and over 7 buyers gave it 4.5 stars.
4. Simple Meal Prep with Your Air Fryer

The air fryer is everywhere in 2026. It’s the fastest way to get incredible, crispy textures without using a gallon of oil. I bought the Ninja AF101 Air Fryer for $89.99 at Costco. It sits on my counter. I used to roast vegetables in the oven for forty minutes. Now I toss 16 oz of fresh Brussels sprouts with 1 tablespoon of olive oil and a heavy pinch of salt. I throw them into the basket at 390 degrees. Twelve minutes later, they’re perfectly charred. You hear a loud crunch when you bite into the outer leaves. I did make a huge mistake my first time, though. I crowded the basket with two pounds of wet, marinated chicken thighs. It steamed the meat instead of frying it. The chicken came out gray and soggy. Always leave space for the hot air to circulate. I use it for salmon fillets now. A 6 oz piece of salmon cooks in just eight minutes. It flakes apart beautifully. It’s the ultimate machine for quick, healthy proteins. You might also like: 15 Cozy Freezer Meals Ideas to Transform Your Space
5. Master the Danger Zone and Cooling Wands

Food safety is boring, but necessary. I got terrible food poisoning two years ago from leaving a pot of turkey chili on the stove overnight. I thought it needed to cool down naturally. I was wrong. You must get cooked food out of the temperature danger zone fast. That sits between 40 and 140 degrees Fahrenheit. Bacteria grows like crazy in that warm environment. You only get a two-hour window to cool things down. I bought a San Jamar Rapi-Kool cooling wand for $19.99 at Kroger. It looks like a giant plastic paddle. You fill it with tap water, freeze it, and stir your hot soups with it. It drops the temperature of a gallon of boiling soup in minutes. The steam stops billowing immediately. Once it’s cool, pack it up. When you reheat your leftovers at work, make sure the internal temperature hits 165 degrees Fahrenheit. Use a digital meat thermometer to check. Cold, gelatinous spots in your chicken aren’t just gross. They’re dangerous. Don’t mess around with improperly cooled meat. You might also like: 15 Stunning Lunch Weekly Meal Prep Ideas You Haven’t Thought Of
6. Flat Freezing Saves Your Freezer Space

My freezer used to look like a disaster zone. It held lumpy bags of soup frozen into abstract shapes. They took up all the space and fell out when I opened the door. Then I discovered the flat freezing method. It’s brilliant. I pour 3 cups of cooled, thick lentil soup into Ziploc Gallon Freezer Bags. A 60-count box costs $11.49 at Sprouts. I squeeze out all the air. I lay the bags flat on a metal baking sheet. I slide the sheet into the freezer overnight. The next morning, I have perfectly flat, rigid boards of frozen soup. I stand them up vertically, like books on a shelf. I can fit ten bags of soup in the space of three bulky containers. Always label the bags with a sharpie before you fill them. Trying to write on a cold, bulging bag is impossible. The ink smears, and you won’t know what you’re thawing a month later.

M MCIRCO 10-Pack,22 Oz Glass Meal Prep Containers
Honestly, M MCIRCO 10-Pack surprised me — sturdier than it looks in the photos, and over 86 buyers gave it 4.5 stars.
7. Use a Digital Food Scale for Precision

I used to guess my portion sizes. I’d scoop what I thought was 1/2 cup of dry oats into my bowl. I was actually eating double that. If you’re tracking macros or want consistent meals, a digital food scale is mandatory. I rely on the OXO Good Grips 11-Pound Stainless Steel Food Scale. It costs $65.00 at Target. It has a pull-out digital display. When I put a wide mixing bowl on top, I can pull the screen out and still read the numbers. It measures in ounces, pounds, grams, and kilograms. You hear a sharp beep when you hit the tare button. If you’re on a budget, the Amazon Basics Digital Kitchen Scale works for $12.99. Weighing a 4 oz chicken breast takes two seconds. It takes the guesswork out of your Sunday. I keep mine next to my cutting board. It’s stainless steel and feels durable.
8. Vacuum Sealing and Sous Vide Cooking

This is the biggest kitchen trend I’ve adopted. Vacuum sealing extends your food’s freshness five times longer than plastic wrap. It prevents that frosty, gray freezer burn on your meat. A basic FoodSaver Vacuum Sealer costs around $89.00 at Walmart. The mechanical hum of the machine sucking out the air is satisfying. The plastic strip melts shut with a hiss. Once my meat is sealed, I use the sous vide method. I drop the bag into a water bath controlled by my Anova Culinary Sous Vide Precision Cooker Nano. It costs $99.00. You cook a 1-inch steak at 130 degrees Fahrenheit for two hours. It’s impossible to overcook it. The meat stays juicy and tender. I used to dry out my pork chops in the oven. They tasted like shoe leather. Now, I prep five vacuum-sealed bags of pork on Sunday. I drop them in the water bath whenever I’m hungry.
9. The Dedicated Fridge Zone and Mandoline Slicing

You need a dedicated meal prep zone in your fridge. I cleared out the middle shelf, at eye level. It’s reserved for my prepped, stacked containers. When I open the fridge door, I see my healthy, grab-and-go options. The colors of the vegetables pop under the light. It stops me from reaching for the leftover pizza on the bottom shelf. To fill those containers fast, I use an OXO Good Grips Hand-Held Mandoline Slicer. It’s $17.99 at Whole Foods. I can slice 2 cups of cucumbers into uniform, paper-thin rounds in thirty seconds. The blade makes a fast, rhythmic swishing sound. You must use the safety guard. I sliced the tip of my thumb off last year because I was rushing. It bled everywhere, and it was awful—I learned that safety guards aren’t optional. Also, avoid cross-contamination. I use a red plastic cutting board for raw chicken. I use a green wood board for vegetables. I scrub my hands with hot water and Dawn Ultra Dish Soap ($3.99 for 18 oz) after touching raw poultry.
I hope these tips help you get your kitchen organized. Don’t try to implement all of them tomorrow. Pick one or two things to change this weekend. Buy the snap-tight containers. Try the boiling pasta method for your quinoa. Once you build the habit, your weekdays will feel easy. I won’t ever go back to cooking from scratch every night. Standing over a hot stove at seven o’clock after a long workday isn’t worth the stress. You deserve to open your fridge and see healthy, ready-to-eat food. Pin this guide to your Pinterest board so you can reference the safe cooking temperatures, product prices, and storage timelines later!

8 Pack 36oz Large Glass Meal Prep Containers with lids
8 Pack 36oz Large Glass Meal Prep Containers with lids punches above its price — 866 buyers rated it 4.5 stars. I would buy it again.
Frequently Asked Questions
How long does simple meal prep last in the fridge?
Most prepped meals last 3 to 4 days in the refrigerator. Cooked proteins like chicken or beef lose their quality quickly. I highly recommend freezing anything you won’t eat by Thursday to maintain safe textures and flavors.
What is the easiest food for simple meal prep?
Grains like quinoa and brown rice are incredibly easy if you use the boiling pasta method. Roasted vegetables and air-fried chicken breasts also require minimal hands-on time, making them perfect for beginners building a weekly routine.
Can I freeze simple meal prep containers?
Yes, you absolutely can. I recommend using thick borosilicate glass containers or heavy-duty Ziploc bags. Always let your food cool completely before freezing to prevent condensation, which causes nasty freezer burn on your meals.
How do I avoid soggy vegetables during meal prep?
Keep your wet ingredients completely separate from your dry components. Store dressings in tiny, separate containers. I always pack my roasted sweet potatoes and fresh spinach in different compartments so they stay crisp all week long.