What’s Inside
- Adopt the “Building Block” Method for Vegan Meal Prep
- Start Small to Avoid the Vegan Meal Prep Burnout Trap
- Batch Cook Cheap Plant Proteins Like Lentils
- Master Tofu and Tempeh Marinades for Flavor
- Pre-Cook Heavy Grains in Bulk
- Fix Your Veggies by Roasting Everything at Once
- Don’t Sleep on Frozen Vegetables for Quick Meals
- Rely on Vegan Protein Powders for Breakfast Boosts
- Invest in Proper Glass Containers and Shelf-Stable Milks
Last Tuesday at Whole Foods, I found myself staring blankly at a wall of organic produce with a sinking feeling in my chest. I’m not proud of it, but my very first attempt at vegan meal prep ended with me standing over my kitchen trash can, scraping wet, sulfurous-smelling mush off a baking sheet. I did this wrong for months before figuring it out. I thought vegan meal prep meant making five complicated, entirely different recipes on a Sunday afternoon. I spent hours chopping, cooking, and doing dishes, only to end up with meals that tasted like damp cardboard by Wednesday. It’s a miracle I didn’t give up entirely.
I remember standing there, staring at the $14.00 pre-made salads, wondering if I was just fundamentally bad at adulting. The truth is, nobody’s born knowing how to efficiently chop, roast, and store massive amounts of produce. It’s a learned skill. If you’re tired of eating sad, soggy salads or spending half your paycheck on pre-packaged plant-based meals, you’re in the right place. Clean eating doesn’t have to be a miserable chore. Over the past few years, I’ve completely overhauled my Sunday routine. I’ve learned how to make tofu that actually tastes good, how to keep greens crispy, and how to pack serious flavor into simple ingredients. I’ll share the exact steps, specific products, and hard-learned lessons that finally made my plant-based prep routine stick. It took me years to figure out.
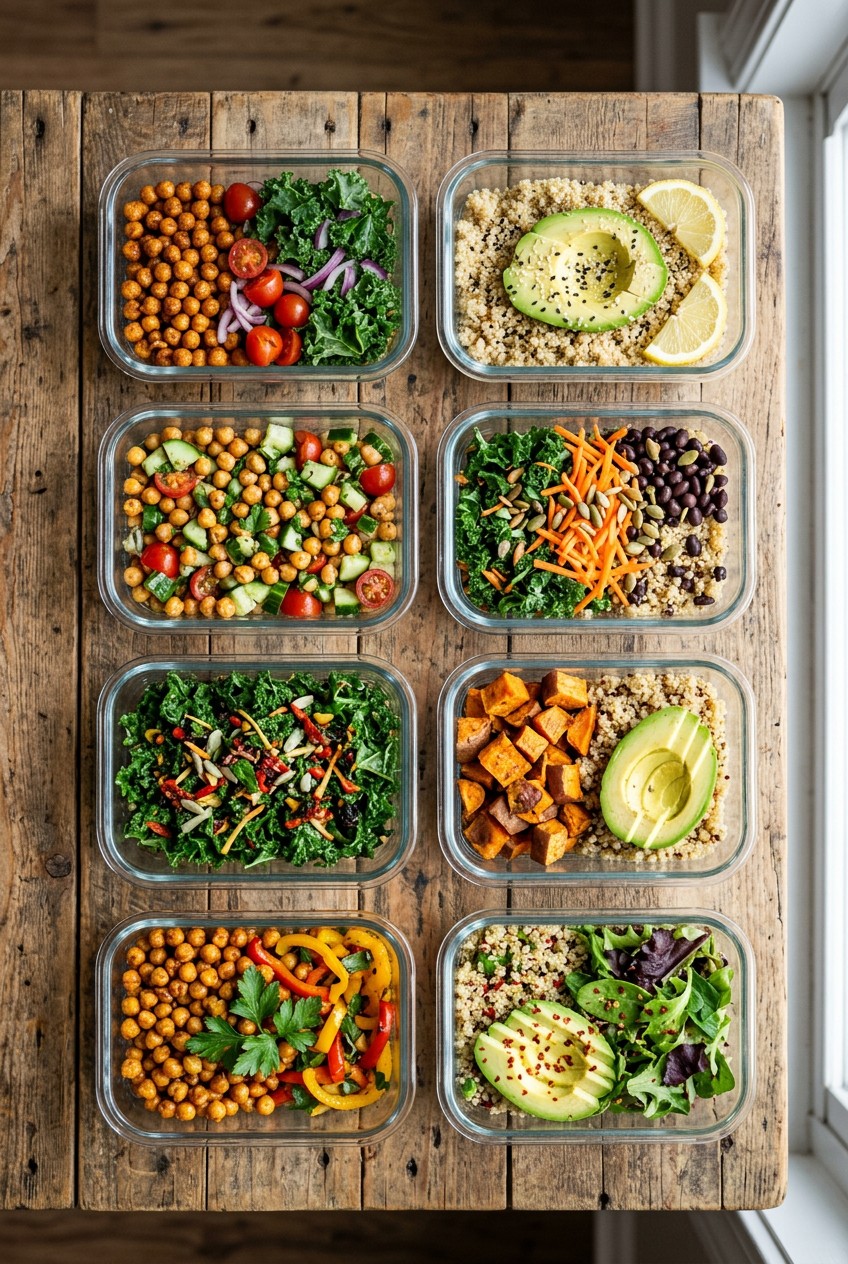
1. Adopt the “Building Block” Method for Vegan Meal Prep

I used to cook three massive casseroles on Sunday, and by Thursday, I literally couldn’t stomach the thought of eating the same thing again. You’re going to want to skip the full-meal recipes and embrace the modular building block method instead. I learned this from David and Stephen Flynn of The Happy Pear, and honestly, it saved my sanity. Instead of prepping finished dishes, I prep individual components.
I’ll roast 1 large head of cauliflower, 2 medium sweet potatoes, and 1 sliced red onion. Next to that, I’ll bake 1 batch of seasoned tofu and simmer 1 pot of fluffy quinoa. Throughout the week, I mix and match these blocks. On Monday, I’ll throw 1/2 cup of quinoa, 4 oz of tofu, and a handful of roasted veggies over fresh spinach. On Tuesday, I’ll wrap those same ingredients in a tortilla with hot sauce.
For the protein block, I swear by Nasoya Organic Extra Firm Tofu ($2.99 for a 14 oz block at Target). I’ll cut the entire 14 oz block into 1/2 inch cubes, toss it with 2 tablespoons of tamari, 1 tablespoon of maple syrup, 1/2 teaspoon of garlic powder, and 1/2 teaspoon of smoked paprika. The smell of the smoked paprika caramelizing in the hot cast iron pan is incredible. This modular approach means I’m never bored, and my fridge looks like an organized salad bar. Plus, it forces me to plan with nutrient density in mind, ensuring I get enough iron and calcium without overthinking it.
2. Start Small to Avoid the Vegan Meal Prep Burnout Trap

A massive mistake most beginners make is trying to prep too many different recipes at once. I’m guilty of this. During my first month of trying to eat clean, I spent six hours in my kitchen on a Sunday. By 11 PM, my sink was overflowing with sticky pots, my feet throbbed, and I was so exhausted I ordered greasy takeout anyway. Start small. You can’t tackle five complicated Pinterest recipes in one day without losing your mind.
I tell everyone to begin by choosing exactly four things: 1 grain, 1 protein, 1 roasted vegetable, and 1 versatile sauce. That’s it. Once you’re comfortable with that baseline, you can gradually expand. For my simple beginner setup, I usually cook 1 cup of dry brown rice, roast 1 bunch of chopped broccoli, and open a can of chickpeas.
I love using Trader Joe’s Organic Garbanzo Beans ($1.29 for a 15.5 oz can). They have a perfectly firm texture that doesn’t turn to mush when you mix them into a bowl. I’ll drain and rinse the 15.5 oz can, then toss the chickpeas with 1 tablespoon of olive oil and a heavy pinch of sea salt. Keeping the menu this restricted means I can finish my entire prep in under an hour. Expert nutritionists emphasize variety to prevent deficiencies in B12 and omega-3s, but you don’t need to hit every single nutrient in week one. Build the habit first, then worry about the complex spreadsheets later.
3. Batch Cook Cheap Plant Proteins Like Lentils

If you’re buying pre-marinated, packaged vegan meats for every single lunch, you’re draining your grocery budget for no reason. I used to buy those expensive frozen crumbles until I realized how ridiculously cheap raw legumes are. Lentils and chickpeas are highly cost-effective and incredibly versatile protein powerhouses. A 1/2 cup serving of cooked chickpeas costs around $0.28, while a 1 cup serving of cooked lentils is approximately $0.45. You can’t beat that math.
Every Sunday, I simmer a massive pot of lentils to keep in the fridge. I buy the Simple Truth Organic Brown Lentils ($1.99 for a 16 oz bag at Kroger). I’ll rinse 2 cups of dry lentils, toss them in a pot with 4 cups of vegetable broth, 1 bay leaf, and 2 cloves of smashed garlic. The earthy, savory smell that fills the kitchen while they simmer is so comforting. They take about 25 minutes to get tender. You might also like: 20 Inspiring Carnivore Meal Prep Ideas That Are Totally Worth It
Once they cool, I pack them into glass containers. During the week, I scoop out 1/2 cup of these cooked lentils to bulk up thin soups, toss into cold salads, or mix with marinara sauce for a quick pasta dish. I tried doing this with red lentils once, and they completely disintegrated into a mushy paste. Stick to brown or green lentils for meal prep because they actually hold their shape in the fridge. It’s a cheap, easy habit that guarantees I’m hitting my protein goals without spending a fortune. You might also like: 20 Cozy High Protein Lunch Ideas for Any Style

8 Pack 36oz Large Glass Meal Prep Containers with lids
If you want something that just works, 8 Pack 36oz Large Glass Meal Prep Containers with lids is a safe bet (859 reviews, 4.5 stars).
4. Master Tofu and Tempeh Marinades for Flavor

I spent my entire first year of eating plant-based forcing down bland, wet, spongy tofu. I honestly thought that was just how it tasted. If you aren’t pressing and marinating your soy products, they taste like wet cardboard. To ensure flavorful tofu and tempeh, you absolutely must marinate them in advance. Tempeh is a fermented soybean product that’s particularly rich in protein, boasting around 20.7g per 100g, and it readily absorbs whatever liquid you soak it in. You might also like: 15 Brilliant Simple Meal Prep Ideas for a Fresh New Look
I usually grab Lightlife Organic Original Tempeh ($3.49 for an 8 oz package at Sprouts). I’ll take a 14 oz block of firm tofu or an 8 oz block of tempeh, press the water out with a heavy cast-iron skillet for twenty minutes, and then cut it into 1/2 inch cubes. My go-to marinade is 2 tablespoons of soy sauce, a drizzle of olive oil, and a sprinkle of black pepper.
I toss the cubes in the liquid, let them sit for ten minutes, and then bake them at 350 to 400 degrees Fahrenheit for 20 to 25 minutes. I always make sure to flip them halfway through so every side gets a crispy, chewy crust. The texture difference is night and day. You get a firm, salty bite that holds up perfectly in a container for four days. Don’t skip the pressing step. I tried skipping it out of laziness, and the tofu just steamed in its own juices and turned into a rubbery mess. Learned that the hard way.
5. Pre-Cook Heavy Grains in Bulk

Waiting 45 minutes for brown rice to cook on a busy Tuesday night is a guaranteed way to make me order a pizza. Grains like quinoa, brown rice, and farro are foundational for so many plant-based bowls, but they take forever to make from scratch. You absolutely must cook a large batch of your preferred grain at the beginning of the week. This saves significant time during daily meal assembly.
I usually measure out 2 cups of dry quinoa or brown rice on Sunday afternoon. I’ll rinse it thoroughly in a fine-mesh sieve to remove the bitter coating. Then, I throw it in my rice cooker with a pinch of salt. I love the Bob’s Red Mill Organic Quinoa ($8.49 for a 13 oz bag at Whole Foods). Two cups of dry quinoa yields about six cups cooked, which is plenty for my lunches Monday through Friday.
When I open the rice cooker, the nutty, warm steam smells amazing. I let the grains cool completely on a baking sheet before storing them. If you pack hot grains straight into a container and seal the lid, the trapped condensation turns the whole batch into a sticky, clumpy disaster. I learned that the hard way when I ruined a whole batch of expensive farro. Having perfectly fluffy, cold grains ready to scoop makes throwing a quick lunch together take less than three minutes. It’s the ultimate lazy hack for clean eating.
6. Fix Your Veggies by Roasting Everything at Once

I used to roast my potatoes for forty minutes, take them out, and then put my broccoli in for twenty minutes. It took hours. You need to maximize your oven efficiency by roasting multiple types of vegetables at the exact same temperature simultaneously. I set my oven to 425 degrees Fahrenheit. Sweet potatoes, cauliflower, and carrots can all roast beautifully at this high heat.
I’ll chop 2 medium sweet potatoes, 1 large head of cauliflower, and 4 large carrots into uniform, bite-sized pieces so they cook evenly. I toss the whole pile with 2 tablespoons of oil. I’d highly recommend Chosen Foods 100% Pure Avocado Oil ($12.99 for a 16.9 oz bottle at Costco) because it has a high smoke point and won’t burn at 425 degrees like some cheap olive oils will.
I spread the vegetables out across two large baking sheets. If you crowd them onto one pan, they’ll steam instead of roast, and you won’t get those gorgeous, crispy caramelized edges. I spent months eating sad, limp carrots because I piled them too high on the tray. Give them space to breathe. Roasting everything at 425 degrees takes about 25 to 30 minutes. I pull the pans out when the sweet potatoes have dark, sugary blisters on the corners. This method saves so much electricity and prep time, and the deep, roasted flavor makes eating vegetables actually enjoyable rather than a chore.

Skroam 10 Pack Glass Meal Prep Containers
Honestly, Skroam 10 Pack Glass Meal Prep Containers surprised me — sturdier than it looks in the photos, and over 56 buyers gave it 4.5 stars.
7. Don’t Sleep on Frozen Vegetables for Quick Meals

There’s a weird stigma around frozen produce in the clean eating community, and I’m honestly so tired of it. Don’t underestimate the power of frozen vegetables. I used to think I had to buy fresh everything, which meant I spent half my weekend washing, peeling, and chopping. Then half of my fresh spinach would turn to green slime in the crisper drawer by Thursday. Fixing this common mistake changed my entire routine.
Frozen vegetables retain their nutritional value because they’re flash-frozen at peak ripeness, they save massive amounts of prep time, and they’re almost always more economical. I always keep a stock of frozen broccoli, chopped spinach, and mixed vegetables in my freezer. I buy the Great Value Organic Frozen Chopped Spinach ($1.98 for a 10 oz bag at Walmart).
When I’m making a quick tofu scramble or a pot of lentil soup, I just dump 1 cup of frozen spinach straight into the hot pan. No washing, no chopping, no wilting required. It effortlessly bulks up stir-fries and grain bowls. I’ll say, you can’t roast frozen vegetables very well. I tried roasting frozen broccoli florets once, and they released so much water that they turned into a soggy, gray puddle on the baking sheet. Keep the frozen stuff for soups, stews, and skillets where the extra moisture doesn’t matter. It’s a massive time-saver for busy weeknights.
8. Rely on Vegan Protein Powders for Breakfast Boosts

Some mornings, I don’t have time to scramble tofu or sit down for a massive bowl of beans. For busy days or when you just need an extra protein boost to hit your macros, you should incorporate a high-quality vegan protein powder into your routine. I used to rely on just nuts and seeds for breakfast protein, but I was always starving by 10 AM. Finding a powder that doesn’t taste like chalk or dirt was a struggle.
I went through so many gritty, artificially sweetened tubs before finding the good ones. Brands like Transparent Labs Organic Plant-Based Protein, which uses a pea and rice protein blend, or 1st Phorm’s Vegan Power Pro are fantastic. I personally stock up on 1st Phorm Vegan Power Pro ($54.99 for a 30-serving tub). It delivers 20g of protein per serving and offers a complete amino acid profile.
I’ll mix 1 scoop of the vanilla powder into 1 cup of cooked oatmeal, or blend it with 1 frozen banana and 1 cup of almond milk for a thick, creamy smoothie. Skip the fat-free stuff or cheap soy isolates. They taste terribly artificial. The pea and rice blends digest so much better and give baked goods a really nice, fluffy texture. Having a tub of this in my pantry means I know I’m covered on protein even if my lunch and dinner prep falls apart during a chaotic workday.
11. Invest in Proper Glass Containers and Shelf-Stable Milks

If you’re still storing your beautifully prepped food in stained, warped plastic takeout boxes, you’re doing yourself a disservice. I used to pack my turmeric tofu in cheap plastic, and the containers turned permanently neon yellow and smelled like garlic forever. You need to invest in durable, eco-friendly glass containers like Pyrex or Snapware. They’re microwave-safe, freezer-safe, and they won’t leach weird chemicals into your hot food.
I use the Pyrex 3-Cup Rectangular Glass Storage containers ($6.99 each at Target) for my main grain and veggie bowls. For individual portions of overnight oats or small batches of tahini dressing, the 8-ounce Weck 741 Jars are absolutely perfect. To maintain optimal texture and prevent sogginess, you must store your prepped components separately. Keep the wet sauces away from the dry grains until you’re ready to eat. Add your fresh avocado just before serving so it doesn’t turn brown.
Another massive upgrade for my fridge space has been switching to shelf-stable plant milks in aseptic packaging. Brands like Elmhurst offer plant-based milks that can last up to six months in your pantry before opening. I buy Elmhurst Unsweetened Almond Milk ($5.99 for a 32 oz carton). Once opened, I refrigerate it and consume it within 5 to 7 days. Alternatively, Healthier Comforts Organic Oat Milk Powder offers a crazy long shelf-life with no refrigeration needed until mixed. It saves so much plastic waste and fridge space.
Figuring out a solid plant-based routine doesn’t happen overnight, but these small tweaks will save you hours of frustration. I personally swear by keeping things modular and relying heavily on my spice cabinet to keep things interesting. Don’t let a failed batch of rice or a burnt pan of broccoli discourage you. We’ve all been there. The goal isn’t perfection; it’s just having a reliable, healthy lunch ready when you’re starving on a Wednesday afternoon. Don’t be afraid to make mistakes and adjust these tips to fit your own schedule. If you found this breakdown helpful, please save or pin this article so you can easily reference these exact measurements and brands before your next Sunday grocery run. Happy prepping, and I’ll see you in the kitchen!
Frequently Asked Questions
How long does vegan meal prep last in the fridge?
Most vegan meal prep components, like roasted vegetables, cooked grains, and marinated tofu, will last 4 to 5 days in airtight glass containers. Keep wet dressings and fresh greens stored separately to maintain the best texture throughout the week.
What are the cheapest vegan proteins for meal prep?
Lentils and chickpeas are incredibly cost-effective. A half-cup of cooked chickpeas costs roughly $0.28, while a cup of lentils is about $0.45. Buying dry legumes in bulk rather than canned options will save you even more money over time.
How do I stop my roasted vegetables from getting soggy?
Roast your vegetables at a high heat, around 425 degrees Fahrenheit, and ensure they have plenty of space on the baking sheet. If you crowd the pan, the vegetables will steam in their own moisture instead of getting crispy caramelized edges.
Can I freeze my vegan meal prep bowls?
Yes, but stick to freezer-friendly ingredients. Soups, stews, and cooked grains freeze beautifully. Avoid freezing raw greens, fresh avocado, or roasted vegetables with high water content, as they will turn mushy and lose their texture when thawed.