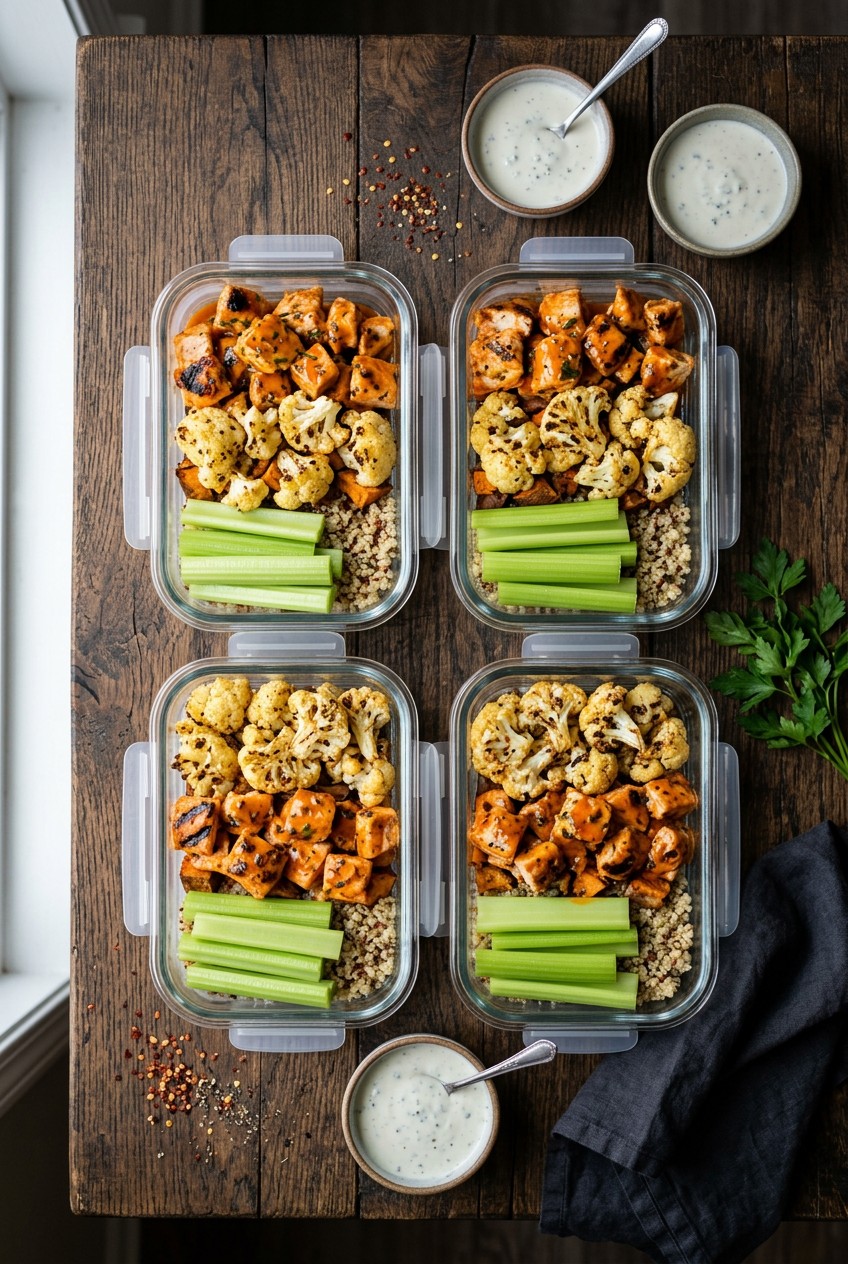
What’s Inside
- Opt for Boneless, Skinless Chicken Breast for Lean Protein in Your Buffalo Chicken Meal Prep
- Master Multiple Cooking Methods for Chicken
- Choose Your Buffalo Sauce Wisely (and Consider Making Your Own)
- Enhance Sauce Flavor and Health Profile
- Achieve Perfectly Shredded Chicken with Minimal Effort
- Prevent Soggy Meal Preps with Smart Layering in Your Buffalo Chicken Meal Prep
- Incorporate Trending Bowl Foods for Balanced Meals
- Boost Fiber and Reduce Carbs with Smart Substitutions
- Add Cooling and Crunchy Elements
- Don’t Forget the Dressing (on the Side!)
I sat in my kitchen last Tuesday staring at a puddle of neon orange grease pooling at the bottom of my glass container. My first attempt at buffalo chicken meal prep was a total disaster. The chicken was rubbery. The rice was soggy. The vinegar smell was so sharp it made my eyes water. I did this wrong for months before I finally figured it out. I actually cried over a ruined batch of chicken breasts after a long shift. I’ve spent the last three years perfecting my weekly lunches. I refuse to eat sad desk food. I was wandering the aisles of Target last weekend looking at overpriced, sad little pre-made salads. They cost $7.99 for wilted lettuce and dry chicken. I knew I could do better. You can do better too. Let’s fix your lunch routine together.
1. Opt for Boneless, Skinless Chicken Breast for Lean Protein in Your Buffalo Chicken Meal Prep

For a classic buffalo chicken meal prep, you absolutely need to start with boneless, skinless chicken breasts. I usually grab a bulk pack at Costco. A typical recipe for four solid lunches requires about 1 to 2 pounds of chicken breast. You can usually find these on sale for $1.99 to $3.49 per pound. The bulk packs offer way better value. I used to buy the small, expensive organic packs for $8.99 a pound at Whole Foods. I’m telling you, it’s not necessary. The heavy sauce masks any subtle flavor differences anyway. Last month, I made the mistake of buying chicken breasts that were way too thick. I didn’t pound them down. They cooked unevenly. The outside was dry and stringy. The inside was barely cooked. I had to throw away two pounds of meat. It was heartbreaking. Now, I always slice them in half horizontally. You’re going to shred this meat anyway. You want it to cook fast and stay juicy. The texture of properly cooked breast meat absorbs the spicy, tangy sauce perfectly. It’s the ideal blank canvas. Don’t buy the pre-cooked strips. They taste like wet cardboard. You want fresh meat for the best texture. The smell of raw chicken grosses me out, so getting it in the hot cast iron pan quickly is key. The Costco packs come with six massive breasts. I portion them into freezer bags. I freeze them flat. This saves so much space in my tiny freezer.
2. Master Multiple Cooking Methods for Chicken

Don’t limit yourself to one cooking method. I’ve tried them all. Chicken breasts can be baked at 425°F for 10 to 20 minutes. You can pan-fry them for 4 to 5 minutes per side. You can also slow-cook them on low for 6 to 8 hours until easily shredded. The Instant Pot is my personal favorite quick option. It cooks chicken on high pressure for exactly 30 minutes. I bought my Instant Pot Duo 7-in-1 at Walmart for $99.99. It changed my Sunday afternoons. Before I got it, I ruined chicken breasts in the oven constantly. I didn’t use a meat thermometer. The edges would get hard and crusty. The middle would be rubbery. Chewing it felt like eating a pencil eraser. I finally bought a Farberware digital meat thermometer for $14.99. You need one. Pull the chicken out at 165°F. Not a degree higher. If you’re using the slow cooker, the house will smell amazing all day. The scent of chicken broth and garlic powder wafting through the living room is pure comfort. Just don’t leave it on warm for 12 hours. I did that once. The meat turned into a powdery, dry mess that even a gallon of sauce couldn’t fix. I highly suggest the pan-fry method if you want a little caramelization. Heat 1 tablespoon of olive oil in a skillet. The sizzle when the meat hits the hot metal sounds incredibly satisfying. It creates a nice golden-brown crust. That crust adds a deep, savory flavor that you just can’t get from boiling.
3. Choose Your Buffalo Sauce Wisely (and Consider Making Your Own)

Frank’s RedHot Buffalo Wings Sauce is the undisputed king of buffalo sauce. It has that perfect, sharp, vinegary bite that hits the back of your throat in the best way. I buy the 12 oz bottle for $3.98 at my local Kroger. For those wanting an extra kick, Frank’s RedHot Xtra Hot Buffalo Wings Sauce works fantastically. If you’re doing a Whole30 round, Primal Kitchen makes a great compliant buffalo sauce. It costs about $6.49 for an 8.5 oz bottle. I’ve tried the fat-free, low-calorie store brands. Skip the fat-free stuff. It tastes like wet cardboard mixed with battery acid. It’s watery and separates in the fridge. I prefer making my own sauce from scratch. I melt 1/4 cup of unsalted Kerrygold butter with 1/2 cup of original Frank’s hot sauce. I add 1 tablespoon of white vinegar and 1/2 teaspoon of Worcestershire sauce. I also dump in a heavy pinch of garlic and onion powder. The caramel-butter smell is intoxicating. It coats the back of a spoon with this glossy, bright orange sheen. I tried making a huge batch once and accidentally used apple cider vinegar instead of white vinegar. The fruity flavor completely clashed with the heat. It tasted like spicy apple juice. I had to dump the whole pan. Stick to plain white vinegar. Your tastebuds will thank you. You might also like: 20 Inspiring Meal Prep Ideas for Any Style

KOMUEE 10 Packs 30 oz Glass Meal Prep Containers
A dependable everyday pick — KOMUEE 10 Packs 30 oz Glass Meal Prep Containers pulls in 45 ratings at 4.5 stars. Not flashy, just solid.
4. Enhance Sauce Flavor and Health Profile

To make your buffalo sauce healthier and creamier without excessive fat, you need to incorporate plain Greek yogurt. I use about 1/2 cup of yogurt per 1.5 lbs of chicken. I swear by Fage 2% Greek yogurt. I pick up the 17.6 oz tub for $3.99 at Trader Joe’s. The 2% fat gives it enough richness. Non-fat yogurt tastes too chalky. The yogurt cuts the harsh acidity of the vinegar. It leaves you with a smooth, rich coating that clings to every single shred of meat. Most people get this wrong. I certainly did. The first time I tried this, I dumped freezing cold yogurt directly into a pan of boiling hot buffalo chicken. The yogurt instantly curdled. It looked like spicy cottage cheese. The texture was grainy and horrifying. I actually gagged trying to eat it. Now, I know better. You have to let the chicken and sauce cool down for at least 10 minutes. Then, you gently fold in the room-temperature yogurt. The result is a velvety, pale orange sauce that looks just like the greasy restaurant version, but feels so much better in your stomach. You won’t feel sluggish after eating this for lunch. It’s light but incredibly filling. You can also add 1 tablespoon of nutritional yeast for a slightly cheesy, nutty undertone. I buy Bragg Nutritional Yeast for $6.99 at Sprouts. It dissolves right into the warm sauce. It adds a savory depth that makes the chicken taste like it simmered all day. You might also like: 15 Clever Family Dinner Ideas for a Fresh New Look
5. Achieve Perfectly Shredded Chicken with Minimal Effort

After cooking, shredding chicken can be a massive chore. Doing it with two forks takes forever and hurts my wrists. I used to stand at the counter for twenty minutes, tearing apart hot chicken breasts. My hands would cramp. I’d inevitably drop pieces on the floor for my dog to steal. Then I discovered the hand mixer trick. I use my basic KitchenAid 5-Speed Ultra Power Hand Mixer. It cost me $49.99 at Target. You just drop the cooked chicken breasts into a deep bowl. You turn the mixer on low. Within 30 seconds, you have perfectly, evenly shredded meat. It’s practically magic. The beaters pull the muscle fibers apart flawlessly. The meat masher tool also works if you want a manual option. Just don’t use a blender or food processor. I tried to pulse my chicken in a Ninja blender once. It turned the meat into a weird, gritty chicken paste. It looked like baby food. I couldn’t even look at it, let alone eat it. When you use the hand mixer, do it inside a deep pot. The first time I tried it in a shallow bowl, hot chicken juice and buffalo sauce splattered all over my favorite white t-shirt. It left neon orange grease stains that never washed out. Once the chicken is shredded, pour the warm sauce directly over it while the meat is still hot. The steam opens up the fibers. The chicken absorbs maximum flavor this way. If you wait until the meat gets cold, the sauce just sits on the outside. You might also like: 20 Inspiring Sunday Dinner Ideas You Need to See
6. Prevent Soggy Meal Preps with Smart Layering in Your Buffalo Chicken Meal Prep

A common mistake is combining all your ingredients too early. This leads to soggy vegetables and mushy grains. To avoid this disaster, you absolutely must store your wet and dry components separately. Keep your buffalo chicken meal prep chicken and rice in one container. Keep your fresh vegetables like lettuce, cucumber, or celery in another. You combine them just before eating. I use the Black+Blum glass containers with dividers. They cost $24.95 each. The glass containers feel heavy, but they aren’t prone to leaking at all. I used to pack everything together in cheap plastic tubs. I’d open my lunch at work on a Wednesday and find a disaster. The hot sauce would seep into the brown rice overnight. The rice would turn into a pink, mushy paste. The celery would lose its crispness and become rubbery. The smell of sad, wet lettuce is something I can’t stomach. The texture was so disgusting I ended up ordering takeout instead. Now, I use silicone muffin liners to separate my toppings inside the main container. You can buy a pack of 12 silicone liners for $6.99 on Amazon. They hold a handful of cherry tomatoes or a scoop of pickled onions perfectly. They keep the wet juices away from the dry grains. When you microwave the chicken and rice, you just pull the silicone liner out first. Your vegetables stay ice cold. Your chicken gets piping hot. The contrast between the steaming spicy meat and the crisp, cold veggies makes the meal taste fresh, even on day four.
![[8-Pack,30 oz]Glass Meal Prep Containers](https://m.media-amazon.com/images/I/713Zfdsgi4L._AC_UL320_.jpg)
[8-Pack,30 oz]Glass Meal Prep Containers
[8-Pack has been one of the most consistently praised picks in this category. 7 reviewers averaged 4.5/5.
7. Incorporate Trending Bowl Foods for Balanced Meals

Healthy and fresh bowl foods are a massive trend right now. They combine grains, vegetables, and proteins in a single, satisfying serving. You should construct your lunches as a bowl. Start with a solid base. I use 3 cups of cooked brown rice per 2 lbs of chicken. I buy the Lundberg Family Farms organic short grain brown rice. A 32 oz bag is $5.49 at Whole Foods. It has a nutty, chewy texture that holds up well to heavy sauces. Next, add roasted vegetables. I use about 400g of zucchini and 227g of whole mushrooms per 2 lbs of chicken. I chop the zucchini into thick half-moons. I toss them in 1 tablespoon of olive oil. I roast them at 400°F until the edges get dark and caramelized. The visual of the bright orange chicken sitting next to the deep brown roasted mushrooms and green zucchini looks beautiful. It looks like a $15 restaurant meal. I used to just eat chicken and plain rice. It was so boring. I’d get hungry two hours later. Adding the dense, fibrous vegetables keeps me full until dinner. Just don’t overcook the zucchini. I left a pan in the oven for 40 minutes once. They turned into a slimy, gray mush that completely ruined the aesthetic and texture of my bowl. To build the perfect bowl, put the rice at the bottom. Layer the roasted vegetables on one side. Spoon the saucy chicken on the other side. We eat with our eyes first.
8. Boost Fiber and Reduce Carbs with Smart Substitutions

For a lower-carb option, you can swap traditional rice for cauliflower rice, roasted cauliflower florets, or zucchini noodles. Registered Dietitians emphasize focusing on whole-food sources like produce, nuts, beans, lentils, and whole grains for fiber. I love using frozen cauliflower rice to save time. I buy the Green Giant frozen riced cauliflower. A 12 oz bag is $2.49 at Walmart. I microwave it for five minutes. Here is the crucial step. You have to squeeze the water out of it. I wrap the steamed cauliflower in a clean dish towel. I twist it until a literal cup of water drains into the sink. The first time I made cauliflower rice bowls, I skipped this step. I just dumped the wet cauliflower into my glass container. By Tuesday, my lunch was a watery, spicy soup. The chicken was floating in a puddle of orange liquid. It tasted like a wet sponge. It was incredibly unappetizing. Once you squeeze the water out, you can pan-fry the dry cauliflower bits in 1 teaspoon of sesame oil. It gets a slightly toasted flavor. It mimics the mouthfeel of real rice perfectly. You can also mix half brown rice and half cauliflower rice. It’s a great way to trick your brain into eating more vegetables while still getting that comforting starch texture. Another great substitution involves roasted spaghetti squash. A medium squash costs about $3.99 at Kroger. You roast it cut-side down for 40 minutes. The strands pull apart like noodles. The slightly sweet flavor of the squash balances the aggressive heat of the buffalo sauce beautifully.
9. Add Cooling and Crunchy Elements

Buffalo chicken’s heat pairs incredibly well with cooling, crunchy vegetables. You need that textural contrast. I always include 1 cup of sliced English cucumber and 2 large celery stalks in my weekly prep. I buy the organic celery hearts for $2.99 at Sprouts. The sharp crunch of cold celery cutting through the spicy, rich chicken feels like perfection. You can actually hear the crunch when you bite into it. I also love adding pickled red onions. They add a tangy twist and a gorgeous pop of neon pink color. I make them myself. I slice one large red onion. I boil 1/2 cup of water, 1/2 cup of white vinegar, 1 tablespoon of sugar, and 1 teaspoon of kosher salt. I pour the hot liquid over the onions in a mason jar. I tried using regular raw onions once because I was feeling lazy. It was a terrible idea. The raw onion breath lingered all afternoon at the office. The sharp, pungent bite completely overpowered the flavor of the chicken. Pickling them mellows out the harshness. It leaves a sweet and sour crunch that improves the whole bowl. Crisp romaine lettuce works as a great addition too. Just make sure you dry the leaves completely after washing them. Wet lettuce will rot in your fridge by Wednesday. I use an OXO Good Grips Salad Spinner. It gets the leaves bone dry. Tucking a few crisp leaves into the side of your container gives you a fresh, salad-like component that makes the meal feel lighter.

Vtopmart 5Pack 22oz Glass Storage Containers with Lids
Vtopmart 5Pack 22oz Glass Storage Containers with Lids punches above its price — 32 buyers rated it 4.5 stars. I would buy it again.
10. Don’t Forget the Dressing (on the Side!)

A light ranch dressing or Greek yogurt ranch acts as a classic accompaniment to buffalo chicken. You can’t have one without the other. I portion out 1 to 2 tablespoons of dressing into small, separate containers. I use the tiny 2 oz Sistema dressing containers. A 4-pack costs $5.99 on Amazon. I personally swear by Bolthouse Farms Greek Yogurt Ranch. It costs $4.49 for a 14 oz bottle at Kroger. It has 45 calories per serving but tastes incredibly rich and herbaceous. You must keep the dressing separate. I used to drizzle the ranch directly over the chicken on Sunday night. By Wednesday, the dressing had curdled and separated. The oil pooled at the top. The herbs sank to the bottom. It looked absolutely vile. Another time, I used a cheap, flimsy plastic cup with a snap-on lid for my dressing. The lid popped off inside my canvas tote bag on the subway. I spilled ranch dressing all over my wallet and my keys. The smell of sour milk and garlic haunted that bag for months. I finally had to throw the bag away. Invest in screw-top containers. When you’re ready to eat, you just dip your cold celery into the ranch, then take a bite of the hot chicken. It’s a flavor explosion. If you want to make your own dressing, whisk 1/4 cup of plain Greek yogurt with 1 teaspoon of dried dill, 1/2 teaspoon of garlic powder, and a splash of unsweetened almond milk. It takes two minutes. It tastes fresher than anything you can buy in a plastic bottle. Learned that the hard way.
I hope these tips save you from the soggy, rubbery lunch disasters I’ve endured. Buffalo chicken meal prep doesn’t have to be boring or repetitive. When you use the right containers, balance the spicy sauce with crisp vegetables, and shred the meat properly, you’ll actually look forward to your lunch break. I’ve been eating this exact setup for three weeks straight, and I’m still not tired of it. It’s cheap, it’s packed with protein, and it hits those comfort food cravings hard. No exaggeration. Go grab a giant pack of chicken breasts and fire up your hand mixer. You won’t regret it. If you found this helpful, please pin this article to your favorite meal prep board on Pinterest. Let’s make sad desk lunches a thing of the past!
Frequently Asked Questions
How long does buffalo chicken meal prep last in the fridge?
When stored in airtight glass containers, your prepped bowls will stay fresh for four to five days in the refrigerator. I highly recommend keeping the wet and dry ingredients separate so the vegetables don’t get soggy by Thursday.
Can I freeze shredded buffalo chicken?
Yes, shredded buffalo chicken freezes incredibly well. I pack the cooled meat into freezer-safe zip bags and press them flat. They thaw quickly in the fridge overnight and maintain their spicy flavor perfectly for up to three months.
What is the best way to reheat these meal prep bowls?
Always remove fresh vegetables like celery or lettuce before heating. I microwave the chicken and rice on high for about two minutes. If the chicken seems dry, I stir in a tiny splash of water before heating.
Is buffalo sauce healthy for meal prep?
Traditional buffalo sauce is mostly vinegar and aged cayenne peppers, making it very low in calories. If you skip the heavy butter and mix it with plain Greek yogurt instead, it’s a fantastic, high-protein option for healthy lunches.
